background image


10

Start the operation 

NOTE: To operate under constant voltage or constant current modes, adjust the other 

parameter to the maximum value. For example, to operate under constant voltage, 

adjust current to max before running using constant voltage, and vice versa. 

 
1.  Place the unit on a sturdy and level surface in a safe, dry place, away from laboratory 

traffic.  

 
2.  Ensure that the AC power switch is OFF, and then plug the three-pronged power cord 

into a grounded three-prong AC outlet with appropriate voltage (100V to 240V as 
indicated on the rating sticker near the AC cord on the back of the unit). 

 
3.  Power on the unit by pressing the ON/OFF switch. 
 
4.  Connect the DC output jacks from the FlashGel™ Dock or other electrophoresis unit; 

insert the red lead (+) into the red output jack, and the black lead (-) into the black 
output jack. 


5.  Constant voltage or current   

*To set constant voltage, press 

, the LED indicator will light up. 

*To set constant current, press 

, and LED indicator will should light up. 


6.  Adjust the output value by pressing the 

  or 

  button. 

*When running FlashGel™ Cassettes, refer to the FlashGel™ Dock instruction 
manual for recommended electrophoresis conditions. 

 
7.  After adjusting your constant mode output value, switch to the other parameter and 

set it to maximum. 

 
8.  Timer Setting: After setting the current or voltage output value, press the Timer button, 

and then press 

  button or 

  button to adjust timer accordingly. 


Summary of Contents for FlashGel 57024

Page 1: ...FlashGel Power Supply Instruction Manual Lonza Rockland Inc www lonza com scientific support lonza com Scientific Support 800 521 0390 Customer Service 800 638 8174 Rockland ME 04841...

Page 2: ......

Page 3: ...1 Table of Contents Safety Information 2 Maintenance 3 Specifications 4 Introduction 7 Operation Instructions 9 Troubleshooting 12 Ordering Information 15 Warranty and Liability Information 17...

Page 4: ...powe tive termi re to adhe atory haza power so safety alw ible to una quipment 2 ion user to im or possible arning of po sult in deat posal instruc or utmost p please recy tement e serious in the oper...

Page 5: ...se contact a qualified service representative or scientific support lonza com Environmental Conditions Ensure the instrument is installed and operated strictly under the following conditions 75 kPa 10...

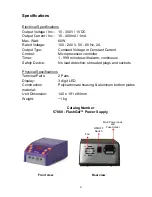
Page 6: ...roprocessor controller Timer 1 999 minutes with alarm continuous Safety Device No load detection shrouded plugs and sockets Physical Specifications Terminal Pairs 2 Pairs Display 3 digit LED Construct...

Page 7: ...e could void the user s authority to operate the equipment It is strongly recommended for the user to read the following points carefully before operating this equipment 1 Read and follow the manual i...

Page 8: ...ounded AC outlet Avoiding Damage to the Instrument 1 Do not attempt to operate the device if damage is suspected 2 Protect this unit from physical damage corrosive agents and extreme temperatures dire...

Page 9: ...d FlashGel Camera offers an all in one comprehensive package for fast easy nucleic acid separation Its compact size with two terminal pairs which provide sufficient and accurate output voltages can de...

Page 10: ...atures 2 electrode pairs allowing for up to 2 FlashGel Cassettes to be run simultaneously saving both time and valuable bench space With a universal voltage rating the FlashGel Power Supply is also de...

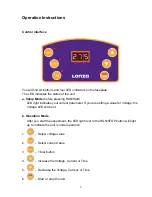
Page 11: ...cates your current parameter If you are setting a value for Voltage the Voltage LED will be lit b Operation Mode After you start the experiment the LED light next to the RUN STOP button will light up...

Page 12: ...the unit by pressing the ON OFF switch 4 Connect the DC output jacks from the FlashGel Dock or other electrophoresis unit insert the red lead into the red output jack and the black lead into the blac...

Page 13: ...ill light up 10 Press button again to stop the unit at any time if necessary 11 When the run is completed Press button to terminate a timed run and turn the AC power OFF by the switch on the rear 12 T...

Page 14: ...correct cords The fuse has blown Replace the fuse Repeated fuse broken Hardware failure Contact Lonza Scientific Support Operation stops Electrophoresis leads are not connected to the power supply or...

Page 15: ...if the problem persists Er3 Error message Thermal limitation reached Output voltage 10V 1 Check the connections 2 If Er3 error message persists the problem may be caused by internal fan failure Conta...

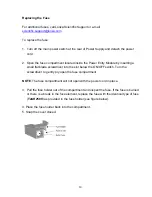
Page 16: ...ll flat blade screwdriver into the slot below the ON OFF switch Turn the screwdriver to gently pry open the fuse compartment NOTE The fuse compartment will not open with the power cord in place 3 Pull...

Page 17: ...y Pack Includes FlashGel Dock and FlashGel Power Supply 57065 FlashGel Camera Pack Includes FlashGel Dock and FlashGel Camera FlashGel Consumable Kits Cat No Description 57063 FlashGel DNA Kit Include...

Page 18: ...16 Notes...
Page 19: ...CIATED WITH THIS PRODUCT WHETHER BASED IN TORT CONTRACT STRICT LIABILITY OR ANY OTHER LEGAL THEORY IS EXPRESSLY LIMITED TO REPLACEMENT OF NONCONFORMING PRODUCT OR PAYMENT IN AN AMOUNT NOT TO EXCEED TH...

Page 20: ...Lonza Rockland Inc www lonza com scientific support lonza com Scientific Support 800 521 0390 Customer Service 800 638 8174 Document 00525706 0812 2 Rockland ME 04841...

Reviews: