background image

Zero Clearance Box

Flush Wood Medium, Flush Wood Large Hybrid-Fyre™

Lopi DVL, DVS GS2, Radiant Plus Large

Dragon Wholesaling Pty Ltd | 2/16 Lexington Drive, Bella Vista NSW 2153 | Phone. (02) 8824 9122 Fax. (02) 8824 6487

Zero Clearance Box Assembly Details

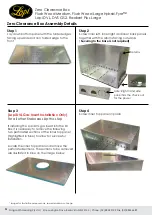
Step 1

Lay down bottom panel with the folded edges 

facing upwards and non folded edge to the 

front

Step 2

Screw inner left, inner right and inner back panels 

together with the returns facing outwards

(

Securing to the base is not required)

Step 3  

(Lopi DVL Gas Insert Installation Only)

For all other fireboxes skip this step


If installing the Lopi DVL gas insert into the ZC 

Box it is necessary to remove the following 

two perforated sections of the inner top panel 

(highlighted in blue) to allow for successful 

installation.  


Locate the inner top panel and remove the 

perforated sections. The sections to be removed 

are illustrated in blue on the image below. 

Note: Right hand side 

panel has the check out 

for the power

returns

* Images for illustration purposes only, some details may change

3

Step 4

Screw inner top panel in place

Summary of Contents for Zero Clearance Box

Page 1: ...24 6487 Suitable for Lopi Flush Wood Medium Lopi Flush Wood Large Hybrid Fyre Inserts Lopi DVL DVS GS2 Radiant Plus Large Gas Inserts Zero Clearance Box Installation Manual Australia Only www lopi com...

Page 2: ...eed wires and the air hose through the knockout holes in the access plates Once the inbuilt is in place restore the access panels to their original posi on Zero Clearance Box Dimensions The Zero clear...

Page 3: ...g outwards Securing to the base is not required Step 3 Lopi DVL Gas Insert Installation Only For all other fireboxes skip this step If installing the Lopi DVL gas insert into the ZC Box it is necessar...

Page 4: ...nels into place ensuring the vent holes are to the bottom and return facing outwards Step 7 Screw outer top panel into place with 1 x large return facing upwards at the front x 3 small returns facing...

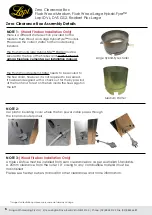
Page 5: ...nt as per installation manual NOTE 2 Use plastic insulating cover where the fan power cable passes through the inner and outer panels NOTE 3 Wood Firebox Installation Only A triple skin flue must be i...

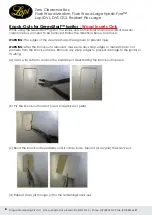
Page 6: ...Follow the directions below to remove WARNING The edges of the steel are sharp Wear gloves to prevent injury WARNING After the knock out is removed make sure any sharp edges or metal strips do not pr...

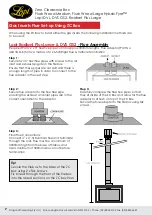
Page 7: ...split and there is enough length of pipe in order to connect to the flue adaptor in the next step Step 2 Secure flue adaptor to the flue flexi pipe ensuring the exhaust and inlet pipes are in the corr...

Page 8: ...ctors to DVL Adaptor using Tek screws This provides an extension to flue adaptor 3 4 pipes Step 2 Secure Adaptor Cover Plate to ZC Box feed DVL Adaptor through ZC Box lid and secure to the air inlet a...

Page 9: ...Lopi DVS DVL Radiant Plus Large Models Only Plan View Timber or Concrete Floor Elevation View Dimensions are subject to change at our discretion please check with our office for further details 9 550...

Page 10: ...ber or Concrete Floor 250 Suggested 550 10 Plaster Wall FC Non Combustible Wall Sheeting ZC Box Gas Insert 34 Finished Hearth Bottom of Gas Insert Finishing Panel Timber or Concrete Floor Firebox Show...

Page 11: ...ggested 550 34 25mm Clearance Around flue to combustibles 4 x 6 5 8 168mm Flue Internal Stud Wall Min 50mm clearance from adaptor to timber header Plaster Wall Finished Hearth ZC Box Allowance must be...

Reviews: