76
User Manual
An appropriate warning message will be shown to notify that the Navigation is
already active and to confirm whether Slave mode can be set.
Inhibit Navigation operation
As soon as Slave mode is set, the destination cannot be placed anymore either the
C-Link navigation data is received from the Master or not. Also, when the C-Link
navigation data is received from the Master, it will not be allowed to deactivate the
Navigation.
Inhibit Route following
While navigating to the route received from the Master the destination is reached
(either applying distance or perpendicular criteria), the destination will not be moved
to the next Waypoint on the route.
MOB handling
If the Navigation to the external destination is active and the the MOB key is pressed
on the Slave Chart Plotter, the MOB is placed but the navigation to the MOB is not
activated.
Notes
While navigating to the external destination the Operating Mode is switched to Master
mode, the navigation to the external destination will be terminated. An appropriate
warning message will be shown to notify that the Navigation to the external destina-
tion is active and to confirm whether Slave mode can be set. Setting Slave mode,
the C-Link navigation data will be deleted.
The C-Link navigation data are deleted at Power Off.
4.7.1.5
C-Link navigation data: Acquisition and Display
As soon as the C-link navigation data is received, the Slave parses the infor-
mation received and executes the relative actions depending on its current working
status.
Important
When the Navigation to the external Destination is activated, the Slave Chart Plotter will show
all relevant c-link navigation data exactly like when the destination is not the external one:
(Destination Name, DST and BRG to Destination, calculate XTE, calculate TTG etc). These
values will be displayed all places where required and they will be used to format NMEA-0183
output data.
Summary of Contents for Compact 7 Plus
Page 14: ...16 User Manual...
Page 19: ...21 User Manual Fig 2 5 1 GPS Connection on Port 3...
Page 50: ...52 User Manual...
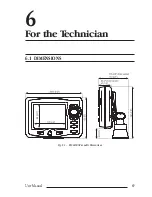
Page 87: ...89 User Manual 6 For the Technician 6 1 DIMENSIONS Fig 6 1 EXCALIBUR models Dimensions...
Page 92: ...94 User Manual Fig 6 4a GPS Connection on Port 3 for chartplotter with external GPS receiver...
Page 98: ...100 User Manual...

