background image

Page

IPSC240P

Information in this document is subject to change without notice. As our products are subject to continuous improvement, Lorex Technology and our subsidiaries reserve the right to 

modify product design, specifications and prices, without notice and without incurring any obligation. E&OE © 2006 LOREX. All rights reserved.

WWW.LOREXINTERNATIONAL.COM

Step 1 should take approximately 5-10 minutes

10:00

SETTING UP YOUR SYSTEM

System Contents

 - Color Camera
 - Power Supply
 - Camera Stand (with screws)
 - Ethernet Cable
 - Quick Setup Guide
 - Lorex Application Software CD

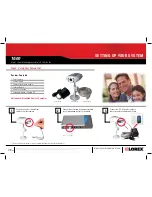
Step 1 - Set Up Your Camera First

Connect one end of the ethernet 
cable to the color camera

1

Power Supply

Not Included: Broadband Router & Computer

Connect the other end of the ethernet cable 
to your broadband router (not included)

2

Connect the 2V AC power supply to 
the color camera and electrical outlet

3

Color Camera

Ethernet Cable

* This set-up guide is intented for users using Internet Explorer as their Internet browser

Summary of Contents for IPSC1240P

Page 1: ...nutes 10 00 SETTING UP YOUR SYSTEM System Contents 1 Color Camera 1 Power Supply 1 Camera Stand with screws 1 Ethernet Cable 1 Quick Setup Guide 1 Lorex Application Software CD Step 1 Set Up Your Camera First Connect one end of the ethernet cable to the color camera 1 Power Supply Not Included Broadband Router Computer Connect the other end of the ethernet cable to your broadband router not includ...

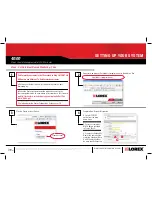
Page 2: ... CD ROM 1 Select the Lorex IP EDIT Option 2 Single click on the item listed under Monitor Lists to set up Local Viewing Settings Record the IP and MAC Addreses below 3 4 Step 2 Set Up Local Viewing On Your PC Second SETTING UP YOUR SYSTEM IP ADDRESS 192 168 45 39 MAC ADDRESS 00 69 70 63 6D 22 record the period It is part of the IP Address DO NOT record the colon NOTE Active X must be enabled to se...

Page 3: ...Active X by clicking the Security Tab Fourth select the Custom Level button Next enable Active X in the Security Settings window followed by pressing the OK button Enable Active X First open your web browser to enable Active X Click tools and select Internet Options 5a Second click the Settings button in the Check for Newer Versions of Stored Pages option and check Automatically followed by OK 5b ...

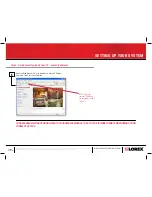
Page 4: ...hout incurring any obligation E OE 2006 LOREX All rights reserved WWW LOREXINTERNATIONAL COM FOR ADVANCED VIEWING OPTIONS REFER TO YOUR OWNERS MANUAL TO SET UP THE INTERNET REMOTE MONITORING OPTION PROCEED TO STEP 3 Step 2 Set Up Local Viewing On Your PC Second Continued Open the Web Browser Enter on the Address Bar the IP Address entered in Step 4 to view the picture 6 NOTE Enter your camera s IP...

Page 5: ...different To Port Forward your router a Refer to your Router s manual for specific instructions on port forwarding or b Check the Router configuration guide support document in the consumer guide section on our website for information on Port Forward ing http lorexstore lorextechnology com uploads PortFor ward_Guide pdf C Select and print the Router Configuration Guide on your CD http ddns strateg...

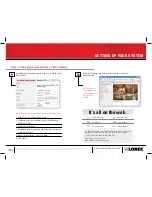
Page 6: ...ights reserved WWW LOREXINTERNATIONAL COM 5 Open your web browser and enter the camera s IP address 6 Step 3 Set Up Internet Remote Monitoring Third Continued SETTING UP YOUR SYSTEM Click the Configuration option 7 Click the DDNS option 8 Print and Save the Automated Email Registration information Service Provider ddns strategicvista net Domain name house strategicvista net User name John Doe Pass...

Page 7: ...nable Click on the Radio Button circle 2 UserName Enter the user name from your Confirmation of Registration Email 3 Password leave blank 4 DomainName Enter the domain name from your confirmation of registration email 5 Make sure the interval is set to 15 minutes 6 Click Submit NOTE Please allow 15 minutes for your entries to be registered NOTE Enter your Domain Name i e john strategicvista net to...

Reviews: