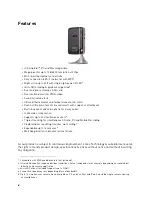
2
Camera Overview
•
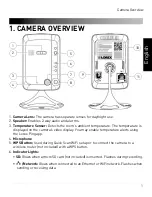
/ Status:
Glows when camera is connected to the Internet. Flashes when there is
a connection problem.
7.
PIR Motion Sensor:
Allows the camera to detect motion by tracking body heat.
8.
Infrared LED:
Allows the camera to see in the dark.
9.
DC/IN:
Connect the included power adapter.
10.
CamID Label:
Shows the camera’s CamID number and a QR code for easy setup
using mobile devices.
11.
NET:
Connect an Ethernet cable and connect the other end to your router (not
included).
12.
MicroSD Card Slot:
Insert a microSD card (not included) to enable recording on the
camera. Camera supports microSD or microSDHC cards up to a maximum size of
32GB.
13.
Audio Out:
Connect to an external speaker (not included) using a 3.5mm headphone
jack.
14.
Mounting Stand:
For mounting instructions, see “Wall or Ceiling Mounting” on
page 199.
15.
Reset Button:
While the camera is powered on, press with a pin or small object for at
least 4 seconds to reset the camera to factory defaults. This is useful if you have
forgotten the password for the camera.
12
13
15
14
Bottom of camera
Summary of Contents for LNC216 Series
Page 2: ......
Page 213: ......
Page 214: ......
Page 215: ......
Page 216: ...Copyright 2013 Lorex Technology Inc LNC216 Series www lorextechnology com Version 2 0...

