background image

16

Getting Started

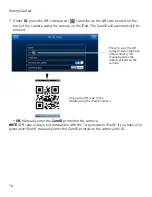
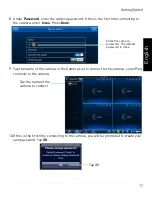
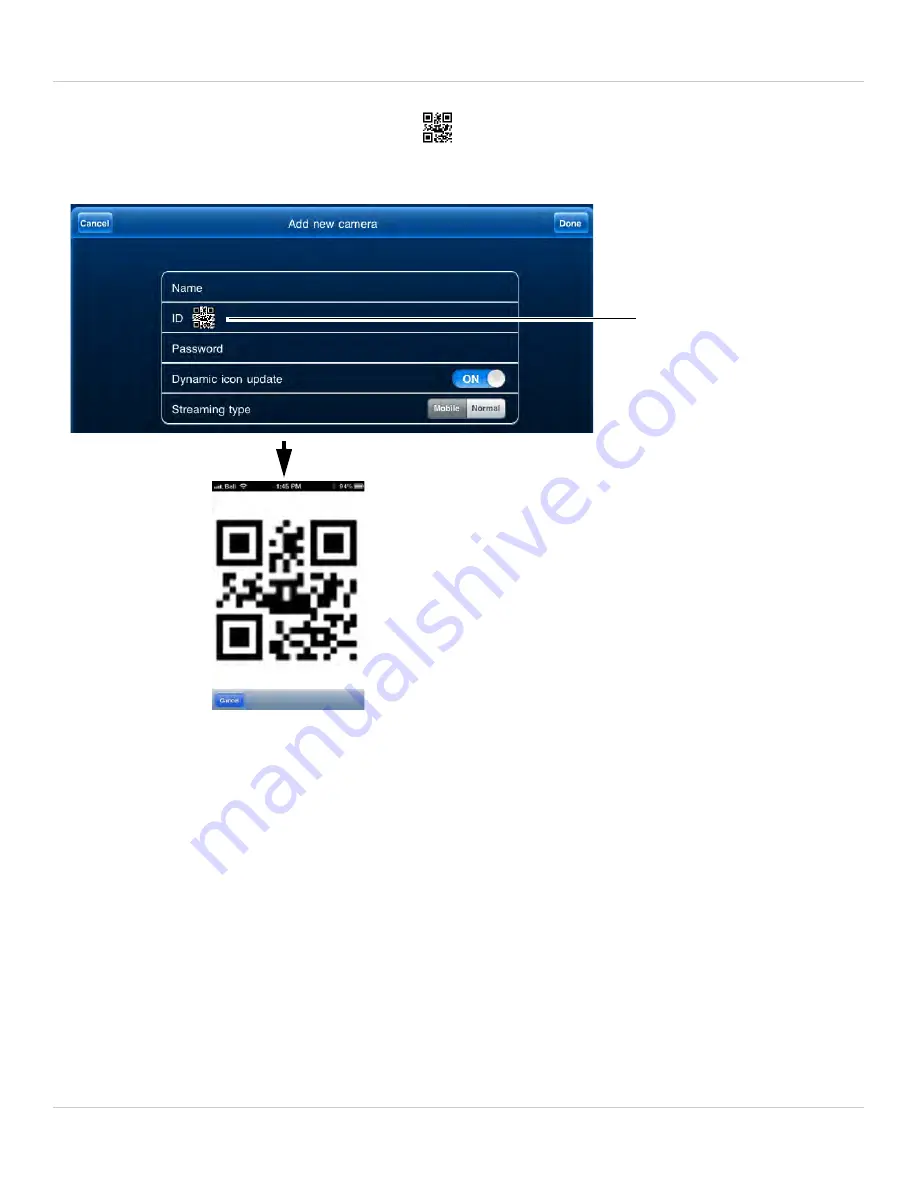
7. Under 

ID

, press the QR code button (

) and line up the QR code printed on the 

back of the camera using the camera on the iPad. The CamID will automatically be 
entered.

• 

OR:

 Manually enter the 

CamID

 printed on the camera.

NOTE:

 QR code setup is not compatible with the 1st generation iPad®. If you have a 1st 

generation iPad®, manually enter the CamID printed on the camera into ID.

Press to scan the QR 
code printed on the back 
of the camera, OR 
manually enter the 
CamID printed on the 
camera

Line up the QR code to the 
middle using the iPad® camera

Summary of Contents for LNC216 Series

Page 1: ...www lorextechnology com WIRELESS NETWORK CAMERA LNC216 SERIES Copyright 2013 Lorex Technology Inc Instruction Manual English Version 2 0 RETAIL INDUSTRY BUSINESS BUSINESS HOME OUTDOOR...

Page 2: ......

Page 3: ...vice for warranty matters 1 888 425 6739 1 888 42 LOREX Tech Support for technical installation issues 1 877 755 6739 1 877 75 LOREX Mexico 001 800 681 9263 001 800 514 6739 International 800 425 6739...

Page 4: ...les produits guides d utilisation guides de d part rapide et FAQ www lorextechnology com support En ligne Hay 2 maneras f ciles de comunicarse con nosotros Norte Am rica Atenci n al cliente para asun...

Page 5: ...ology com support If you require further installation assistance please visit www lorextechnology com installation or contact a professional installer Please note that once the components of this prod...

Page 6: ...de ce produit vous ne pouvez pas retourner celui ci directement au magasin sans son emballage original Favor de leer la gu a de instalaci n r pida y la gu a del usuario antes de instalar este producto...

Page 7: ...This user s guide refers to the following models LNC216 Contents Before you start make sure you have the contents listed below 1 x Camera 1 x Camera power adapter and USB power cable 1 x Ethernet cabl...

Page 8: ...ot use the camera near a heat source such as a radiator Do not point the camera directly towards the sun or a source of intense light Do not disassemble the camera Periodic cleaning may be required Us...

Page 9: ...nd other safe sleep environments for infants MAKE SURE to run all power adapter cords and network cables where they are unlikely to be tripped over and are out of arms reach of your infant Keep them a...

Page 10: ...ing for simultaneous SD card PC and Mobile Recording Flexible indoor mounting counter wall ceiling Expandable up to 16 cameras5 Watchdog function to prevent system failure As our product is subject to...

Page 11: ...our Camera on PC 28 2 4 3 PC WiFi Setup 31 2 5 Connecting to your Camera on Mac 34 2 5 1 Basic Setup 34 2 5 2 Connecting to your Camera on a Mac 36 2 5 3 Mac WiFi Setup 39 3 L View 116 for PC 42 3 1 S...

Page 12: ...s 67 3 9 3 Fixed IP Access 68 3 9 4 Login Enabling a Password to Access L View 69 3 9 5 Image Ratio 69 3 9 6 Software Update 70 4 L Play Playing Recorded Video on your PC 71 4 1 Running L Play 71 4 2...

Page 13: ...Push Notifications 101 6 4 4 Configuring Temperature Push Notifications and temperature Units Fahrenheit or Celsius 102 6 4 5 Editing Camera Mobile Streaming Settings 103 6 4 6 Editing Camera Video S...

Page 14: ...34 7 4 12 Enabling Speaker Alarms 136 7 4 13 Configuring MicroSD Recording 137 7 4 14 Configuring the Camera Recording and Alarm Schedule 138 7 4 15 Configuring the Camera Date and Time 140 7 4 16 Reb...

Page 15: ...Browser 166 9 1 Web Configure Overview 167 9 2 Network 168 9 2 1 Wired Network DHCP or Fixed IP 168 9 2 2 WiFi Security Configuring Wifi settings 169 9 3 Video 170 9 3 1 Video Settings 170 9 3 2 Mobi...

Page 16: ...x 13 Wall or Ceiling Mounting 193 13 1 Installation Tips and Warnings 193 13 2 Installation 193 14 Troubleshooting 195...

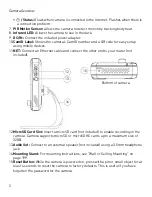
Page 17: ...e camera s video display You may enable temperature alerts using the Lorex Ping app 4 Microphone 5 WPS Button Used during Quick Scan WiFi setup or to connect the camera to a wireless router not includ...

Page 18: ...connect the other end to your router not included 12 MicroSD Card Slot Insert a microSD card not included to enable recording on the camera Camera supports microSD or microSDHC cards up to a maximum...

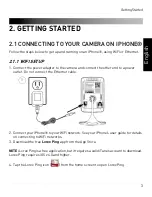
Page 19: ...t the other end to a power outlet Do not connect the Ethernet cable 2 Connect your iPhone to your WiFi network See your iPhone s user guide for details on connecting to WiFi networks 3 Download the fr...

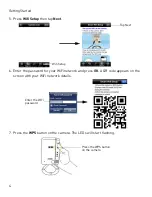
Page 20: ...r the password for your WiFi network and press OK A QR code appears on the screen with your WiFi network details 7 Press the WPS button on the camera The LEDs will start flashing Wifi Setup Tap Next E...

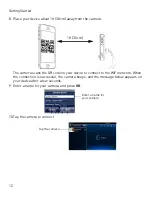
Page 21: ...to the WiFi network The camera scans the QR code on your iPhone to connect to the WiFi network When the connection is successful the camera beeps and the message below appears on your device after a f...

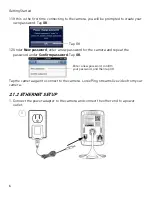
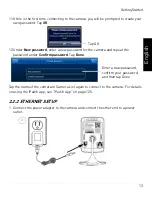
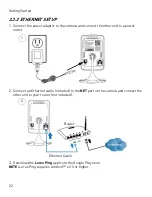
Page 22: ...r a new password for the camera and repeat the password under Confirm password Tap OK Tap the camera again to connect to the camera Lorex Ping streams live video from your camera 2 1 2 ETHERNET SETUP...

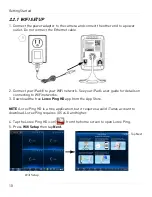
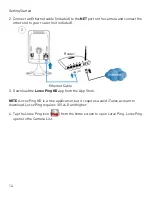
Page 23: ...not included 3 Download Lorex Ping from the App Store NOTE Lorex Ping is a free application but it requires a valid iTunes account to download Lorex Ping requires iOS v4 0 and higher 4 Tap the Lorex P...

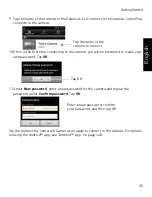
Page 24: ...lly be entered OR Manually enter the CamID printed on the camera 8 Under Password enter the camera password If this is the first time connecting to the camera enter lorex Press Done Enter a name for y...

Page 25: ...Tap OK 11 Under New password enter a new password for the camera and repeat the password under Confirm password Tap OK Tap the camera again to connect to the camera Lorex Ping streams live video from...

Page 26: ...etwork See your iPad s user guide for details on connecting to WiFi networks 3 Download the free Lorex Ping HD app from the App Store NOTE Lorex Ping HD is a free application but it requires a valid i...

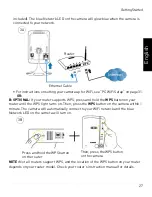
Page 27: ...the password for your WiFi network and press OK A QR code appears on the screen with your WiFi network details 7 Press the WPS button on the camera The LEDs will start flashing Enter the WiFi password...

Page 28: ...QR code on your device to connect to the WiFi network When the connection is successful the camera beeps and the message below appears on your device after a few seconds 9 Enter a name for your camera...

Page 29: ...for the camera and repeat the password under Confirm password Tap Done Tap the name of the camera in Camera List again to connect to the camera For details on using the iPad app see iPad App on page 1...

Page 30: ...r not included 3 Download the Lorex Ping HD app from the App Store NOTE Lorex Ping HD is a free application but it requires a valid iTunes account to download Lorex Ping requires iOS v4 0 and higher 4...

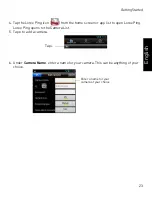
Page 31: ...15 Getting Started English 5 Tap to add a camera 6 Under Name enter a name for your camera This can be anything of your choice Tap Enter a name for your camera of your choice...

Page 32: ...entered OR Manually enter the CamID printed on the camera NOTE QR code setup is not compatible with the 1st generation iPad If you have a 1st generation iPad manually enter the CamID printed on the ca...

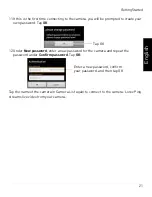
Page 33: ...x Press Done 9 Tap the name of the camera in the Camera List to connect to the camera Lorex Ping connects to the camera 10 If this is the first time connecting to the camera you will be prompted to cr...

Page 34: ...camera For details on using the iPad app see iPad App on page 125 2 3 CONNECTING TO YOUR CAMERA ON ANDROID Follow the steps below to connect to your camera on an Android device using Ethernet or WiFi...

Page 35: ...Lorex Ping app from the Google Play Store NOTE Lorex Ping is a free application Lorex Ping requires Android v2 3 and higher 4 Tap the Lorex Ping icon to open Lorex Ping 5 Press Wifi Setup then tap Ne...

Page 36: ...s the QR code on your device to connect to the WiFi network When the connection is successful the camera beeps and the message below appears on your device after a few seconds 9 Enter a name for your...

Page 37: ...own password Tap OK 12 Under New password enter a new password for the camera and repeat the password under Confirm password Tap OK Tap the name of the camera in Camera List again to connect to the ca...

Page 38: ...nect the other end to a power outlet 2 Connect an Ethernet cable included to the NET port on the camera and connect the other end to your router not included 3 Download the Lorex Ping app from the Goo...

Page 39: ...icon from the home screen or app list to open Lorex Ping Lorex Ping opens to the Camera List 5 Tap to add a camera 6 Under Camera Name enter a name for your camera This can be anything of your choice...

Page 40: ...OR Manually enter the CamID printed on the camera 8 Under Password enter the camera password If this is the first time connecting to the camera enter lorex Press OK Press to scan the QR code printed o...

Page 41: ...prompted to create your own password Tap OK 11 Under New password enter a new password for the camera and repeat the password under Confirm password Tap OK Tap the name of the camera in Camera List a...

Page 42: ...ing the USB connector 2 Connect the power adapter to a surge protector or power outlet Connect the power adapter cable to the DC IN port on the camera The camera LED s will begin flashing 3 A Connect...

Page 43: ...n your router until the WPS light turns on Then press the WPS button on the camera within 1 minute The camera will automatically connect to your WiFi network and the blue Network LED on the camera wil...

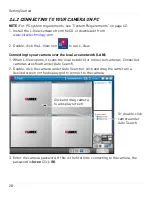
Page 44: ...a over the local area network LAN 1 When L View opens it scans the local network for connected cameras Connected cameras are shown under Auto Search 2 Double click the camera under Auto Search or clic...

Page 45: ...be used for the camera Under Confirm Password enter the password again Click OK 6 Double click the camera again under Auto Search to connect Enter the new password for the camera then click OK to conn...

Page 46: ...g to the camera the password is lorex Click OK 6 Double click the camera or drag the camera to a display screen to connect to the camera 7 If you have connected to this camera before L View connects t...

Page 47: ...local network must be connected to the same router as the camera and connect to the camera 2 Right click on the camera ID in the Auto Search area and click Web Configure 3 Enter the camera admin user...

Page 48: ...d 5 Click WiFi Scan and select your WiFi network from the list 6 Under WPA PSK Key or WEP Key enter the WiFi password Click Save and Apply WiFi Scan Click your WiFi network from the list Save Apply En...

Page 49: ...nds 8 When successful Status will say Test Success If unsuccessful double check your wireless password and make sure your camera is close enough to the wireless router to get a good signal 9 Remove th...

Page 50: ...r using the USB connector 2 Connect the power adapter to a surge protector or power outlet Connect the power adapter cable to the DC IN port on the camera The camera LED s will begin flashing 3 A Conn...

Page 51: ...on your router until the WPS light turns on Then press the WPS button on the camera within 1 minute The camera will automatically connect to your WiFi network and the blue Network LED on the camera wi...

Page 52: ...e installer file and double click it to run 3 Click and drag the L View icon to Applications to install Connecting to your Camera on the Local Network Mac NOTE Your computer must be on the same networ...

Page 53: ...click OK L View connects to your camera and streams live video TIP To save the camera password in L View click and drag the ID from the Auto Search List to the Camera List Then right click the ID and...

Page 54: ...t lorex and then click OK 5 Double click the camera to open it in L View 6 If this is the first time connecting to the camera you are prompted to change your password Click OK 7 Enter a new password a...

Page 55: ...ra and connect to the camera 2 Right click on the camera ID in the Auto Search area and click Web Configure 3 Enter the camera admin user name and password By default the admin user name is admin and...

Page 56: ...d 5 Click WiFi Scan and select your WiFi network from the list 6 Under WPA PSK Key or WEP Key enter the WiFi password Click Save and Apply WiFi Scan Click your WiFi network from the list Save Apply En...

Page 57: ...nds 8 When successful Status will say Test Success If unsuccessful double check your wireless password and make sure your camera is close enough to the wireless router to get a good signal 9 Remove th...

Page 58: ...nnecting to your camera using L View see Connecting to your Camera on PC on page 28 NOTE For Mac software instructions see L View for Mac on page 87 3 1 SYSTEM REQUIREMENTS Description Minimum System...

Page 59: ...ed in click and drag the camera image to pan the camera Double click to open the display area in full screen Double click again to exit full screen Right click to open the display sub menu See Display...

Page 60: ...store 6 Maximize Revert to Window 7 Exit 8 Camera List Shows list of saved cameras Available cameras are in blue Cameras in red are not available If a camera appears in red check the network connectio...

Page 61: ...gs Click to open settings for L View See Configuring L View on page 71 L Play ClicktoopenL Playforadvancedplaybackoptions See L Play Playing Recorded Video on your PC on page 76 Scheduling Click to co...

Page 62: ...The Display sub menu contains the following controls Full window Open the camera in single camera view Auto reconnect L View will attempt to reconnect to the camera if it becomes disconnected Stop Di...

Page 63: ...connected cameras Clear all connection info Remove all cameras from the display grid 3 3 CAMERA LIST MANAGING CAMERAS The Camera List is used to save connection information for your cameras so you don...

Page 64: ...onnecting to a Camera Over the Internet PC on page 29 to add the camera to the Camera List Right click on your camera to open the Camera List sub menu See below for instructions 3 3 2 SAVING CAMERA PA...

Page 65: ...ter a name for the camera that will appear in Camera List This can be anything of your choice 3 Under Password enter the camera password to save the password in L View 4 Click OK 3 3 3 DELETING CAMERA...

Page 66: ...Under Resolution select the resolution that will be used when connecting to the camera using a smart phone or tablet 320x240 480x360 640x400 or 1024x768 Under Frame rate select the frame rate that wi...

Page 67: ...ight mode control 2 Select one of the following Automatic day and night mode switch Camera will automatically switch between day mode or night mode based on the amount of light in the room Scheduled t...

Page 68: ...a and click OK 4 The camera will disconnect when the setting is changed Double click the camera in Camera List to reconnect 3 4 RECORDING TO YOUR PC S HARD DRIVE You can manually record video to your...

Page 69: ...ecording is active 2 To disable motion triggered recording right click and click Motion Recording again NOTE To view recordings click to open L Play See L Play Playing Recorded Video on your PC on pag...

Page 70: ...1 schedule which records or displays 1 camera There are a maximum of 16 possible screens that can be configured for recordings The screens are numbered between 1 and 16 in the order shown below NOTE A...

Page 71: ...ou would like the schedule to run on The arrangement of screens in L View is shown above 3 Double click a camera from the Camera List to select it for this schedule The camera connection information a...

Page 72: ...eras shown on the screen when it starts Select Give up that scheduled recording playing to cancel this schedule if there is already a camera on the selected screen 8 Click Save to save the schedule NO...

Page 73: ...Enable to enable the schedule or Disable to disable it 5 Select Periodic recording 6 Under Time period select Forever to have the schedule repeat forever or select During to have the schedule apply o...

Page 74: ...s are shown in blue and un selected days are shown in white 8 Under Start and End configure the start and end times for recording on days that the schedule applies 9 Click Save to save your schedule N...

Page 75: ...nnect to the camera you would like to playback recordings from 2 Click the microSD button on top of the camera display area Enter the camera password if required 3 A list is created of all days with r...

Page 76: ...Stop then right click again and select Play 3 7 PLAYING BACK RECORDINGS FROM NAS IN L VIEW You can playback recordings from a NAS device not included in L View For instructions on setting up recording...

Page 77: ...ay 3 8 CONFIGURING CAMERA VIDEO SETTINGS The Video Settings menu allows you to adjust the quality of the camera video To open the Video Settings menu Click on the top of the display area for the camer...

Page 78: ...anually configuring the resolution and frame rate configure the following Resolution Manually select either 320x240 QVGA 640x480 VGA 1024x768 or 1280x800 resolution Higher resolution will give you a b...

Page 79: ...min user name default admin and password default left blank and click OK The camera will disconnect Wait about 15 seconds and then double click the camera in Camera List or Auto Search to reconnect to...

Page 80: ...sitivity set the camera s sensitivity in low light environments between Very High highest High and Normal lowest 7 Check Enable time display on video to turn on video time stamps or un check it to dis...

Page 81: ...ra List or Auto Search to reconnect to the camera To configure motion detection sensitivity NOTE The following method works when using video motion detection It does not work when using PIR motion det...

Page 82: ...ings for L View click the settings button 3 9 1 DIRECTORIES OPENING OR CHANGING THE SNAPSHOT RECORDING FOLDER The Directories menu shows you the folder where snapshots and video files are saved It all...

Page 83: ...s 1 Check Automatically start L View when Windows starts to have L View open when your computer is turned on 2 Check Restore the last time playing running state when L View starts to set L View to res...

Page 84: ...ure your camera to use a fixed IP address 1 Check Connect to the camera with a fixed IP address to enable cameras to use fixed IP addresses 2 Click OK to save changes 3 In the camera list right click...

Page 85: ...ord that must be used when you open L View 3 Click OK to save changes The next time you exit L View and re open it it will ask you for a password to log in 3 9 5 IMAGE RATIO The Image Ratio menu allow...

Page 86: ...online for an software updates when it opens If an update is available follow the on screen instructions to install the update It will also check for camera updates when a new firmware is available I...

Page 87: ...e that allows you to play back recorded video or snapshots from your computer hard drive or NAS 4 1 RUNNING L PLAY L Play is automatically installed when you install L View To open L Play Double click...

Page 88: ...s from your computer hard drive See Playing Back Video from Computer Hard Drive in L Play on page 79 7 Open NAS Open recordings from a NAS device not included See Playing Back Video from NAS in L Play...

Page 89: ...ing video was recorded at 12 View Recording Snapshot Folders Click to open or select folders for storing Recordings or Snapshots NOTE If changing Recording Snapshot folders make sure the same Recordin...

Page 90: ...e of video being played back Click to mute un mute audio 4 3 PLAYING BACK VIDEO FROM COMPUTER HARD DRIVE IN L PLAY You can playback recordings from your computer hard drive in L Play For instructions...

Page 91: ...ins from the earliest video files recorded on that day Use the slider to adjust the playback time 4 4 PLAYING BACK VIDEO FROM NAS IN L PLAY You can playback recordings from a NAS device not included i...

Page 92: ...cordings in L Play NOTE To complete the steps below your NAS device must be connected to the same network as your computer 1 Click Open NAS 2 Click Browse 3 Click Scan Neighborhood to scan your local...

Page 93: ...PCamRecordFiles Click OK 5 Click next to the year and then click next to the month you would like to play back video from 6 Double click a day to select video recorded on that day L Play shows times t...

Page 94: ...lider to adjust the playback time 4 5 VIEWING SNAPSHOTS IN L PLAY You can use L Play to open snapshots saved from either L Play or L View To view snapshots in L Play 1 Click Open Snapshot L Play opens...

Page 95: ...the snapshot was taken 4 Double click the snapshot file to open the snapshot Snapshots are opened in Windows Photo Viewer or your default image viewing program Click to open snapshots from a camera Cl...

Page 96: ...video file is playing click Start Time The converted avi video file will start at this point in the video NOTE If you have more than one video open make sure to select the screen that is currently pl...

Page 97: ...the avi file click Browse or use the default folder 5 Optional If you want to use a custom file name for the avi file enter it under File name 6 Click Convert to convert the video file to avi Wait fo...

Page 98: ...om For instructions on connecting to your camera using Mac see Connecting to your Camera on Mac on page 34 5 1 SYSTEM REQUIREMENTS 5 2 L VIEW FOR MAC INTERFACE Description Minimum System Requirements...

Page 99: ...click the camera ID and select Web configure to configure the camera settings using a browser See Configuring Camera Settings using a Web Browser on page 171 4 Playback Click to open Playback mode Fo...

Page 100: ...a view Click to open 4 camera view Click to open 6 camera view Click to open the current display in full screen Press ESC to exit full screen 5 3 CAMERA LIST MANAGING CAMERAS The Camera List is used t...

Page 101: ...ameraListandselectDeleteCamera Click OKtoconfirm 5 4 RECORDING VIDEO TO YOUR MAC S HARD DRIVE You can manually record video to your computer s hard drive To record video to your Mac s hard drive 1 Pre...

Page 102: ...C S HARD DRIVE You can playback video files you have saved to your Mac s hard drive in L View To play back video from your Mac s hard drive 1 Use the instructions above to record some video if you hav...

Page 103: ...hhmmss format e g 103045 is 10 30 45am 4 Use the on screen playback controls Click the arrow next to Recording to expand the recording list Click the arrows next to the camera you would like to playb...

Page 104: ...ra s microSD card 1 Right click on the camera in Camera List and select SD Card Playback 2 Enter the password for the camera and click OK L View searches for recordings on the microSD card 3 Select th...

Page 105: ...o settings or Night mode control See below for details 5 6 1 QUALITY TAB CONFIGURE BANDWIDTH RESOLUTION AND FRAME RATE The Quality tab allows you to configure image quality settings such as the camera...

Page 106: ...Framerate Manuallyselecttheframeratebetween30fps highest and1fps lowest 30fps is real time video meaning that movement in the image will appear smooth with no choppiness 4 Under Preference select you...

Page 107: ...or video setting Select Indoor Sunlight if the picture is too bright on the Indoor setting If you select Indoor or Indoor Sunlight select 60Hz or 50Hz under Light Frequency to adjust the camera for th...

Page 108: ...3 CONTROL TAB CONFIGURE STATUS LED S AND MOTION DETECTION SENSITIVITY The Control tab allows you to configure the camera status LED s to make the camera harder to spot at night It also allows you to...

Page 109: ...the Control tab 2 Under Motion Detection Sensitivity select the motion detection sensitivity between 1 High and 10 Low If Motion Detection Sensitivity is set to 1 motion detection will be triggered i...

Page 110: ...and select Night mode control 2 Select one of the following Auto Camera will automatically switch between day mode or night mode based on the amount of light in the room Scheduled time of night mode C...

Page 111: ...Click Update to apply changes to your camera Enter the admin user name default admin and password default left blank for the camera and click OK Click OK to exit the settings window NOTE The camera ma...

Page 112: ...OR IPHONE You can use Lorex Ping in portrait or landscape mode Tilt the phone to switch between portrait or landscape Video information Disconnect button only shown in portrait mode Record video to ph...

Page 113: ...to take a snapshot from the camera You can view snapshots using the Camera app or save photos to your computer by connecting your iPhone to your computer using a USB cable 6 1 3 RECORDING VIDEO TO IP...

Page 114: ...elect 3 Tap the date of the video recording you would like to playback Then tap the desired video file to start playback 4 Use the on screen video controls to control playback Tap Stop to return to th...

Page 115: ...dings created on that day 5 Tap a recording to play it 6 Tap Disconnect to return to the recordings list 6 4 USING CAMERA LIST TO EDIT CAMERA SETTINGS You can use the Camera List to adjust the connect...

Page 116: ...ection settings 1 In Camera List tap next to the camera you would like to edit 2 Change the Name and Password as needed 3 Under Dynamic icon update select ON to have the camera icon automatically upda...

Page 117: ...UND NOTIFICATION SETTINGS PUSH NOTIFICATIONS Push Notifications can be set up to create a notification straight to your iPhone when motion or sound is detected by the camera Push Alarm Notifications g...

Page 118: ...Push Alarm Notifications between 1 lowest and 10 highest and press OK 7 Tap Update to save your settings 6 4 4 CONFIGURING TEMPERATURE PUSH NOTIFICATIONS AND TEMPERATURE UNITS FAHRENHEIT OR CELSIUS Te...

Page 119: ...ear the camera goes above this value 7 Tap Update to save your settings 6 4 5 EDITING CAMERA MOBILE STREAMING SETTINGS Configure the camera image quality settings for streaming to mobile devices i e s...

Page 120: ...ecting to the camera using a smart phone or tablet 320x240 480x360 640x400 or 1024x768 Under Frame rate select the frame rate that will be used when connecting to the camera using a smart phone or tab...

Page 121: ...well lit environments Select Indoor if you notice strip lines in the image or if the picture is too dark on the Outdoor video setting Select Indoor Sunlight if the picture is too bright on the Indoor...

Page 122: ...ll or ceiling upside down 5 Tap Video Settings when finished making changes then tap Update to save your settings 6 4 7 CONFIGURING LED CONTROL AND MOTION DETECTION SENSITIVITY Configure the behavior...

Page 123: ...then tap Update to save your settings 6 4 8 CONFIGURING NIGHT MODE SETTINGS Configure when the camera uses day or night mode When day mode is on the camera sees in color When night mode is on the came...

Page 124: ...e or Night for night mode 4 Tap Update to save your changes 6 4 9 EDITING CAMERA WIRED NETWORK SETTINGS Configure the camera IP address when connected using Ethernet Select DHCP or Fixed IP To edit ca...

Page 125: ...eway DNS1 and DNS2 5 Tap Update to save your settings 6 4 10 EDITING CAMERA WIFI NETWORK SETTINGS Configure WiFi network settings for the camera To edit camera WiFi settings 1 In Camera List tap next...

Page 126: ...n Camera List to exit the edit camera screen 9 Tap the camera in the Camera List to connect If you cannot connect check to make sure you have entered the correct wireless password and that the camera...

Page 127: ...t the PIR motion detector 6 Check the following trigger options for email alarms Motion Use Video motion detection to trigger email alarms Video motion detection looks for movement in the image to det...

Page 128: ...OTE If you want to use a custom SMTP server to send Email messages click SMTP Settings enter your SMTP server information and tap OK 6 4 12 ENABLING SPEAKER ALARMS Configure the siren The siren can be...

Page 129: ...uses changes in temperatures e g from a person moving around in front of the camera to determine if there is motion PIR motion detection is less effective at higher temperatures NOTE You may also sel...

Page 130: ...lowing recording options Always Recording Camera will record continuously at all times Schedule Recording Camera will record according to settings set in the recording schedule NOTE To enable Motion d...

Page 131: ...ou would like to edit 3 Tap Camera Settings 4 Tap Schedule then Scheduling 5 Tap Add Schedule 6 Under Email Alarm check Motion trigger to send an email alarm based on video motion select PIR trigger t...

Page 132: ...cheduletoapplyto TapStartandEndandusethesliderstoconfigure the start and end time for the schedule Tap OK Every day Create a daily recording schedule Tap then tap Start and End and use the sliders to...

Page 133: ...e the camera date and time The camera syncs with an Internet NTP time server to automatically provide the correct time once you have configured your time zone and daylight savings time settings To set...

Page 134: ...for Daylight Savings Time and then tap OK Tap Back to return 6 Tap Update to save your changes Tap OK The camera will reboot to apply the new time zone 6 4 16 REBOOTING THE CAMERA 1 In Camera List ta...

Page 135: ...ans for cameras on your local network Tap Search to re scan 3 Tap a camera from the list The Add camera screen comes on with the camera ID already entered 4 Enter a Name of your choice and enter the c...

Page 136: ...g iPad see Connecting to your Camera on iPad on page 9 7 1 LIVE VIEWING WITH LOREX PING HD Perform action to all cameras View selected camera in single channel view 4 camera view 6 camera view Full sc...

Page 137: ...ad to your computer using a USB cable 7 1 3 RECORDING VIDEO TO IPAD You can manually record video from your camera directly to your iPad s built in memory To record video to your iPad s memory 1 While...

Page 138: ...ED TO MICROSD ON IPAD You can playback video recorded on the camera microSD card not included on your iPad For details on setting up microSD recording see Configuring MicroSD Recording on page 142 Tap...

Page 139: ...Select the camera you would like to playback from 3 The camera scans for recorded video files and shows a list of days with recorded video Tap a day to view recordings created on that day 4 Tap a rec...

Page 140: ...he camera admin user name and password before you may change settings By default the admin user name is admin and the password is left blank 7 4 1 EDITING CAMERA CONNECTION SETTINGS You can edit your...

Page 141: ...ave the admin user name and password the next time you enter it or OFF to require the admin user name and password whenever settings changes are made 5 Tap Done to save changes 7 4 2 DELETING CAMERAS...

Page 142: ...To enable Push Alarm Notifications 1 In Camera List tap next to the camera 2 Tap Alarm notification 3 Under Motion select ON to enable Push Alarm Notifications when motion is detected using video mot...

Page 143: ...TURE PUSH NOTIFICATIONS AND TEMPERATURE UNITS FAHRENHEIT OR CELSIUS Temperature Push Notifications can be set up to send you alerts if the temperature near the camera goes higher or lower than the spe...

Page 144: ...evices i e smart phones and tablets Please note that less bandwidth is generally available over mobile networks than over WiFi or Ethernet To edit mobile streaming settings 1 In Camera List tap next t...

Page 145: ...Update to save your settings 7 4 6 EDITING CAMERA VIDEO SETTINGS 1 In Camera List tap next to the camera 2 Tap Video Settings 3 Tap Video 4 Configure the following Video color Select Colored to view t...

Page 146: ...Quality to have the camera maintain image quality and reduce frame rate when bandwidth is insufficient Select Better Quality to have the cameramaintainframerateandincreasequalitywhenbandwidthissuffic...

Page 147: ...itivity between 1 High and 10 Low If Motion Detection Sensitivity is set to 1 motion detection will be triggered if a moving object is larger than 1 of the video area If it is set to 10 a moving objec...

Page 148: ...e room Schedule Camera will switch between day mode and night mode at scheduled times each day If using this option tap under Scheduletimeofnightmode use the sliders to set the Start time when night m...

Page 149: ...ecommended to allow the camera to automatically obtain an IP address from the router or Static to use fixed IP address settings If you select Static configure your IP Address Subnet mask Default gatew...

Page 150: ...network When it is connected the blue Network LED will be on or flashing 8 Tap next to the camera to exit the edit camera screen 9 Tap the camera in the Camera List to connect If you cannot connect c...

Page 151: ...0 a moving object must be larger than 10 of the video area to trigger motion detection Tap Email alarm to return to the Email Alarm menu NOTE This setting does not affect the PIR motion detector 6 Che...

Page 152: ...3 that will receive email alarms 8 Tap Update to save your changes NOTE If you want to use a custom SMTP server to send Email messages click SMTP Settings enter your SMTP server information and tap OK...

Page 153: ...both motion triggers Schedule Create audio alarms based on the settings set in the Scheduling menu Disable Disable speaker alarms 5 Under Alarm Loop Times select the number of times you would like th...

Page 154: ...ger or both Motion trigger and PIR trigger selected 7 Check Circular recording to set the camera to overwrite the oldest recordings when the microSD card is full or select Stop recording to set the ca...

Page 155: ...or select both 7 Under Speaker Alarm check Motion trigger to activate the siren based on video motion check PIR trigger to use the PIR motion sensor or select both 8 Under SD card record check Contin...

Page 156: ...Start and End using the sliders to configure the exact date and time when you would like the schedule to start and end Tap Done 10 Tap Done to save the schedule Tap Update to save your settings To de...

Page 157: ...ure the start and end time for Daylight Savings Time and then tap Done 6 Tap Update to save your changes Tap OK The camera will reboot to apply the new time zone 7 4 16 REBOOTING THE CAMERA 1 In Camer...

Page 158: ...local network Tap Search to re scan 3 Tap a camera from the list The Add camera screen comes on with the camera ID already entered 4 Enter a Name of your choice and enter the camera Password If you ha...

Page 159: ...18 8 1 LIVE VIEWING WITH LOREX PING FOR ANDROID You can use Lorex Ping in portrait or landscape mode Tilt the phone to switch between portrait or landscape Disconnect button only shown in portrait mo...

Page 160: ...See your Android device s Instruction Manual for details 8 1 3 RECORDING VIDEO TO ANDROID You can manually record video to the built in memory on your Android device To record video to your Android de...

Page 161: ...ike playback 3 Select the date that you would like to playback video from and then tap a video file to open it 4 Use the on screen controls to control playback Tap the camera Tap the date to playback...

Page 162: ...tablet For details on setting up microSD recording see Enabling microSD Recording on page 165 To play back video recorded on the camera microSD card 1 From the Camera List tap 2 Tap SD card playback...

Page 163: ...ust the connection or other settings for your camera To access Camera Settings Tap Camera List Then tap next to the camera you would like to edit The Camera List Settings Menu appears Tap to view a re...

Page 164: ...o update the icon shown in Camera List every time you connect to it or OFF for the icon to remain as is 5 Under Save Admin Account select ON to save the admin user name and password so you do not have...

Page 165: ...Or select OFF to manually select the resolution and frame rate If you select OFF configure the following Under Resolution select the resolution that will be used when connecting to the camera using a...

Page 166: ...s select 60Hz light freq or 50Hz light freq to adjust the camera for the frequency of your indoor lighting Favor Preference Select whether you would like the camera to reduce the image quality or the...

Page 167: ...to the camera you would like to edit 2 Tap Video Settings Then tap Control 3 Under Status LED select one of the following Normal LED s will function as normal For details on LED functions see Camera...

Page 168: ...tings Then tap Night Mode Control 3 Select one of the following Auto Camera will automatically switch between day mode or night mode based on the amount of light in the room Schedule Camera will switc...

Page 169: ...Notifications can be set up to create a notification straight to your Android device when motion or sound is detected by the camera Push Alarm Notifications go directly to the notifications area on yo...

Page 170: ...cations between 1 lowest and 10 highest 6 Tap Update to save your settings 8 4 8 CONFIGURING TEMPERATURE PUSH NOTIFICATIONS AND TEMPERATURE UNITS FAHRENHEIT OR CELSIUS Temperature Push Notifications c...

Page 171: ...emperature value You will receive a notification if the temperature near the camera goes above this value 7 Tap Update to save your settings 8 4 9 EDITING CAMERA WIRED NETWORK SETTINGS Configure the c...

Page 172: ...nfigure your IP Address Subnet mask Default gateway DNS1 and DNS2 5 Tap Update to save your settings 8 4 10 EDITING CAMERA WIFI NETWORK SETTINGS Configure WiFi network settings for the camera To edit...

Page 173: ...l be on or flashing 8 Press Camera Settings then Camera List to exit the edit camera screen 9 Tap the camera in the Camera List to connect If you cannot connect check to make sure you have entered the...

Page 174: ...alarms Video motion detection looks for movement in the image to determine if there is motion This means that there may be false alarms caused by changes in lighting trees moving in the wind etc PIR...

Page 175: ...like the speaker alarm to repeat when alarms occur 6 Select from the following speaker alarm triggers Motion Use Video motion detection to trigger audio alarms Video motion detection looks for moveme...

Page 176: ...e sure a microSD card not included is inserted into the camera It is recommended to format the microSD card before using it with the camera 2 In Camera List tap next to the camera you would like to ed...

Page 177: ...te the oldest recordings when the microSD card is full or select Stop recording to set the camera to stop recording when the microSD card is full 8 Tap Update to save your settings 8 4 14 CONFIGURING...

Page 178: ...duled time or select both 9 Under Time period select one of the following Every week Create a weekly recording schedule Tap and check the days you wouldlikethescheduletoapplyto TapStartandEndandusethe...

Page 179: ...TIME Configure the camera date and time The camera syncs with an Internet NTP time server to automatically provide the correct time once you have configured your time zone and daylight savings time se...

Page 180: ...gure the start and end time for Daylight Savings Time and then tap OK 7 Tap Update to save your changes 8 4 16 REBOOTING THE CAMERA 1 In Camera List tap next to the camera you would like to edit 2 Tap...

Page 181: ...s on your local network Tap Search to re scan 3 Tap a camera from the list The Add camera screen comes on with the camera ID already entered 4 Enter a Camera Name of your choice and enter the camera P...

Page 182: ...etwork as the camera to use Web Configure You may change camera settings over the Internet using the iPhone iPad or Android apps 2 Enter the camera admin user name and password By default the admin us...

Page 183: ...d wireless network settings Connect to a wireless network 3 Video Configure camera video and streaming settings 4 Schedule Configure recording settings and schedules Configure email and audio alarms 5...

Page 184: ...matically recommended Use DHCP and allow the camera to obtain an IP address from the router automatically Use the following IP address Use a fixed IP address and manually enter the IP address informat...

Page 185: ...Setup on page 39 1 Perform one of the following To Scan available WiFi networks click WiFi Scan To connect to a hidden WiFi network select Enable Wifi function and manually fill out the SSID Security...

Page 186: ...apps 1 Under Password play video enter a password to access the camera video using L View or smart phone and tablet apps 2 Click Save Apply to save the new password To configure camera video quality s...

Page 187: ...ge quality when bandwidth is insufficient Select Image Quality to have the camera maintain image quality and reduce frame rate when bandwidth is insufficient Select Better Quality to have the camera m...

Page 188: ...stamps 2 Click Save Apply to apply the settings to the camera You may need to reconnect to the camera after making settings changes 9 3 2 MOBILE VIDEO Set streaming settings for connecting using a sm...

Page 189: ...nd tablets 6 Click Save Apply to apply changes to your camera 9 3 3 NIGHT MODE Configure when the camera uses day or night mode When day mode is on the camera sees in color When night mode is on the c...

Page 190: ...amera will return to day mode Manual night mode control Manually select day mode or night mode If using this option under Mode select Day for day mode or Night for night mode 2 Click Save Apply to app...

Page 191: ...e of the following alarm triggers Motion Use Video motion detection to trigger email alarms Video motion detection looks for movement in the image to determine if there is motion This means that there...

Page 192: ...detection will be triggered if a moving object is larger than 1 of the video area If it is set to 10 a moving object must be larger than 10 of the video area to trigger motion detection NOTE This sett...

Page 193: ...trees moving in the wind etc PIR Use the PIR motion detector to trigger audio alarms The PIR motion detector uses changes in temperatures e g from a person moving around in front of the camera to det...

Page 194: ...ding Record according to the settings set in the Schedule Disable Recording Do not record 3 Under When disk space full select Overwrite for the camera to record over the oldest recordings when the mic...

Page 195: ...xample of an acceptable recording folder would be public To configure NAS recording settings 1 Select one of the following Always Recording Record to NAS continuously all the time Schedule Recording R...

Page 196: ...ddress under Use NAS IP address 4 Under Shared folder name enter the folder on the NAS where you would like to save recordings to Enter the folder name in all lower case letters and no slashes This fo...

Page 197: ...ons are correct click NAS Settings again and then click NAS Info This will allow you to see the recording and hard drive status of your NAS device NOTE Recordings will not appear on your NAS device un...

Page 198: ...lect PIR triggered to use the PIR motion sensor or select both NAS Record Check to use this schedule for NAS recording Select Continuous for the camera to record continuously during the scheduled time...

Page 199: ...nder Start time enter the exact date and time when you would like the schedule to start and enter the End time 4 Click Add Schedule To delete a schedule 1 Existing schedules are shown at the top of th...

Page 200: ...notifications on phones and tablets 3 Under Temperature Range Low select the low temperature value that will trigger push notifications on phones and tablets 4 Click Save Apply 9 6 ADMIN Configure the...

Page 201: ...For added security you may change the camera s web access port Please note that if you change the web access port you must enter the camera s IP address a colon and the camera s web access port when...

Page 202: ...e the LED s 1 Select one of the following Normal LED display LED s will function as normal For details on LED functions see Camera Overview on page 1 Turn off LED display always LED s are turned off a...

Page 203: ...d Time for Daylight Savings Time if needed 3 Click Save Apply to apply settings to the camera 9 6 4 UPGRADE Upgrade the camera firmware When firmware upgrades are released they will be available as a...

Page 204: ...click Upgrade 5 Select Upgrade from local file 6 Click Browse locate the firmware upgrade file and then click Open 7 Click Upgrade Wait for the firmware upgrade to complete Do not disconnect the power...

Page 205: ...Web Browser English 9 6 5 REBOOT Restart the camera from your Internet browser This is useful if you need to restart the camera to apply settings changes or if the camera encounters an error To resta...

Page 206: ...10 TECHNICAL SPECIFICATIONS As our product is subject to continuous improvement Lorex Technology subsidiaries reserve the right to modify product design specifications prices without notice and witho...

Page 207: ...g please do not try to repair it yourself Contact customer service for assistance Disposal of the Device At the end of the product lifecycle you should not dispose of this product with normal househol...

Page 208: ...s place the camera at least 20cm 7 87in from nearby persons Industry Canada statement This device complies with RSS 210 of the Industry Canada Rules Operation is subject to the following two condition...

Page 209: ...ily connect the camera and test it before permanent installation If using the camera with a wireless network set up the camera s wireless connection before permanent installation Make sure that power...

Page 210: ...e as necessary See below for suggested stand configurations 4 Secure the stand position by using a Philipshead screwdriver to tighten the screw connecting the camera to the stand 5 Connect the power a...

Page 211: ...ect password network information entered Re complete WiFi setup and double check your WiFi network settings Camera is not in range of WiFi router Move the camera closer to the WiFi router Interference...

Page 212: ...twork checkthenetwork connection Cannot access Web Configure on PC or Mac Camera may be on different network than computer Connect the camera and computer to the same network i e the same router or us...

Page 213: ......

Page 214: ......

Page 215: ......

Page 216: ...Copyright 2013 Lorex Technology Inc LNC216 Series www lorextechnology com Version 2 0...

Reviews: