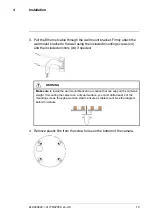
3. Pull the Ethernet cable through the wall mount bracket. Firmly attach the
wall mount bracket to the wall using the included mounting screws (x4)
and the included anchors (x4) if needed.
WARNING
Make sure
to install the wall mount bracket in a location that can support the camera’s
weight. If mounting the camera on a drywall surface, you must drill at least 2 of the
mounting screws through a wooden stud to ensure a stable mount. See the diagram
below for details.
4. Remove plastic film from the screw holes on the bottom of the camera.
#LX400020; r.41770/42005; en-US
10
Summary of Contents for LNZ32P12 series
Page 1: ...Instruction Manual LNZ32P12 12x Network PTZ Camera Series ...
Page 30: ...Technical Specifications 8 8 1 Dimensions LX400020 r 41770 42005 en US 27 ...
Page 35: ......
Page 36: ...Manuel d utilisation Série de caméras réseau PTZ LNZ32P12 12x ...
Page 73: ......
Page 74: ...Manual de instrucciones Serie de cámaras PTZ de red de 12x LNZ32P12 ...
Page 111: ......

