www.lorextechnology.com
LW1740_LW2740_SERIES_QSG_EN_R1 Page 2
WIRELESS VIDEO MONITORING SYSTEM
LW1740 / LW2740 SERIES
QUICK START GUIDE
Power:
Press and hold for 2 seconds to turn the receiver on or off.
Press
to enter the main menu.
E. Setting the Date & Time
Scan the QR code or go to the
address below for the complete
user’s guide.
lorex.ca/LW1740
It’s all on the Web
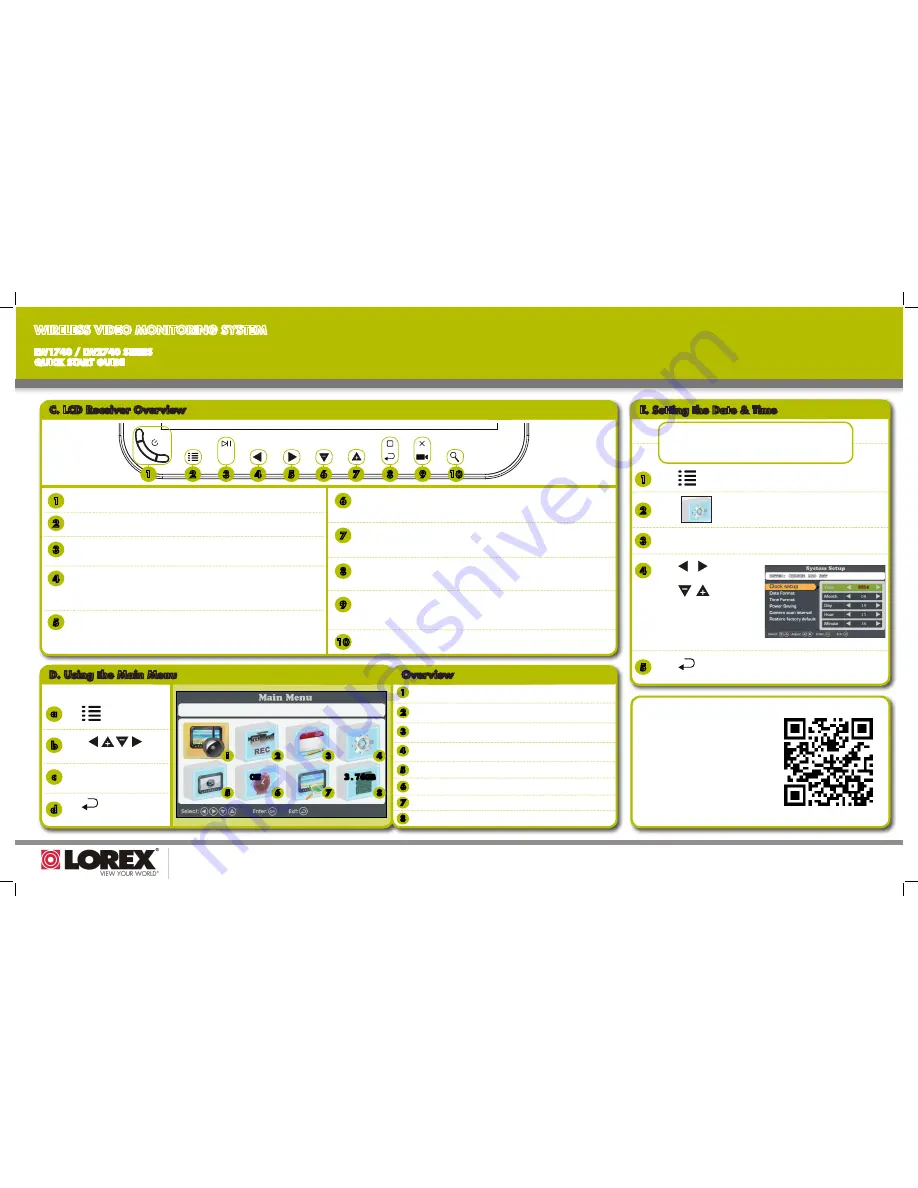
C. LCD Receiver Overview
OK
1
2
3
8
9
10
1
Menu:
Press to enter the system menu.
2
Enter:
In menus, press to confirm a selection.
3
Change View:
During live view, press repeatedly to change the view to a different
channel or to see all channels in quad or sequence mode.
4
Play/Pause:
During video playback, press to play/pause video.
4
5
6
7
Left Arrow:
In menus, press to move menu selection to the left.
Rewind:
During video playback, press and hold to rewind video.
5
Change View:
During live view, press repeatedly to change the view to a different
channel or to see all channels in quad or sequence mode.
5
Right Arrow:
In menus, press to move menu selection to the right.
Fast-forward:
During video playback, press and hold to fast-forward video.
6
7
Back:
In menus, press to return to the previous menu.
8
Snapshot:
During live view, press to save an image of the video display.
9
Stop:
During video playback, press to stop video.
Record Video:
During live view, press and hold to begin recording video.
Delete:
Press while an image or video file is selected to delete the file.
10
Zoom:
During live viewing, press to zoom in. Press again to zoom out.
Decrease Volume:
During live view and playback, press to decrease the volume
of the receiver.
Down Arrow:
In menus, press to move menu selection down.
Increase Volume:
During live view and playback, press to increase the volume
of the receiver.
Up Arrow:
In menus, press to move menu selection up.
Use the
keys to make a selection.
b
Press
OK
to confirm a selection.
c
To use the main menu:
Press
to enter the menu.
a
Press
to exit or return to
the previous menu.
d
2
3
Camera Settings:
Configure motion detection, brightness, and
pair additional cameras to the monitor.
1
4
Recording:
Configure recording settings such as date stamps, recording file
size, file overwrite and more.
Schedules:
Set schedules to have the system record continuously or just
motion-events during specific times each day.
System Settings:
Configure system time, date & time format, power
saving mode, or restore default system settings.
6
7
Playback:
View and manage saved images and videos.
5
8
Alarm:
Enable / disable alarm buzzer for motion-detection events.
Monitor:
View live video.
SD Capacity:
Displays the size of the inserted microSD card.
1
2
5
3
4
6
7
8
1
2
3
4
5
NOTE:
It is important to set the date and time
to ensure that they are properly captured on
recordings.
D. Using the Main Menu
Overview
NOTE:
See user guide for complete details.
3.76GB
ON
Select
using the arrow keys, then press
OK
.
Select
Clock setup
, then press
OK
.
Press / to configure
the current date and time.
Press
/
to move
between items.
When finished, press
OK
to save your settings.
Press
to close any remaining menu windows.


