background image

viii


Service

13. 

Servicing

 - Do not attempt to service this video 

equipment yourself as opening or removing covers 
may expose you to dangerous voltage or other 
hazards. Refer all servicing to qualified service 
personnel.

14. 

Conditions Requiring Service

 - Unplug this video 

product from the wall outlet and refer servicing to 
qualified service personnel under the following 
conditions.

A. When the power supply cord or plug is 
damaged.

B. If liquid has been spilled or objects have fallen 
into the video product.

C. If the video product has been exposed to rain 
or water.

D. If the video product does not operate normally 
by following the operating instructions. Adjust 
only those controls that are covered by the 
operating instructions. Improper adjustment of 
other controls may result in damage and will 
often require extensive work by a qualified 
technician to restore the video product to its 
normal operation.

E. If the video product has been dropped or the 
cabinet has been damaged.

F. When the video product exhibits a distinct 
change in performance. This indicates a need for 
service.

15. 

Replacement Parts

 - When replacement parts are 

required, have the service technician verify that the 
replacements used have the same safety 
characteristics as the original parts. Use of 
replacements specified by the video product 
manufacturer can prevent fire, electric shock or 
other hazards.

16. 

Safety Check

 - Upon completion of any service or 

repairs to this video product, ask the service 
technician to perform safety checks recommended 
by the manufacturer to determine that the video 
product is in safe operating condition.

17. 

Wall or Ceiling Mounting

 - The cameras provided 

with this system should be mounted to a wall or 
ceiling only as instructed in this guide, using the 
provided mounting brackets.

18. 

Heat

 - The product should be situated away from 

heat sources such as radiators, heat registers, 
stoves, or other products (including amplifiers) that 
produce heat.

Use

19. 

Cleaning

 - Unplug the video product from the wall 

outlet before cleaning. Do not use liquid cleaners or 
aerosol cleaners. Use a damp cloth for cleaning.

20. 

Product and Cart Combination

 - Video and cart 

combination should be moved with care. Quick stops, 
excessive force, and uneven surfaces may cause the 
video product and car combination to overturn.

21. 

Object and Liquid Entry

 - Never push objects for any 

kind into this video product through openings as they 
may touch dangerous voltage points or “short-out” 
parts that could result in a fire or electric shock. 
Never spill liquid of any kind on the video product.

22. 

Lightning

 - For added protection for this video 

product during a lightning storm, or when it is left 
unattended and unused for long periods of time, 
unplug it from the wall outlet and disconnect the 
antenna or cable system. This will prevent damage 
to the video product due to lightning and power line 
surges.

Summary of Contents for LW2110 Series

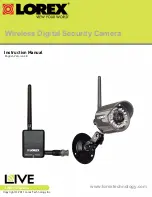
Page 1: ...Wireless Digital Security Camera Instruction Manual English Version 3 0 www lorextechnology com Copyright 2011 Lorex Technology Inc LW2110 Series ...

Page 2: ...SONNEL The lightning flash with arrowhead symbol within an equilateral triangle is intended to alert the user to the presence of uninsulated dangerous voltage within the products enclosure that may be of sufficient magnitude to constitute a risk of electric shock The exclamation point within an equilateral triangle is intended to alert the user to the presence of important operating and maintenanc...

Page 3: ... www lorextechnology com support If you require further installation assistance please visit www lorextechnology com installation or contact a professional installer Please refer to the Need Help insert for technical support and customer care information Please note that once the components of this product have been unsealed you cannot return this product directly to the store without the original...

Page 4: ... Veuillez constater qu une fois que les com posantes de ce produit ont été retirées de l emballage vous ne pourrez plus retourner ce produit directement au magasi Favor de leer la guía de instalación rápida y la guía del usuario antes de instalar este product Puede conseguir las guías del consumidor y los cursos en enseñanza video sobre el Internet visi tando www lorexcctv com support Si necesita ...

Page 5: ...Care for warranty and accessory sales customerservice lorexcorp com Customer Feedback info lorexcorp com Need Help CONTACT US FIRST Online To order accessories visit www lorextechnology com 3 Easy Ways to Contact Us Please make sure to register your product at www lorextechnology com to receive product updates and information Product Support is available 24 7 including product information user man...

Page 6: ...arantie et les ventes d accessoires customerservice lorexcorp com OU 3 maneras sencillas de comunicarse con nosotros Norte América Atención al cliente 1 888 425 6739 1 888 42 LOREX Soporte técnico 1 877 755 6739 1 877 75 LOREX Mexico 1 800 514 6739 Internacional 800 425 6739 0 Ejemplo Desde el Reino Unido marque el 00 en lugar del Por Teléfono apoyo al producto disponible 24 7 incluyendo informaci...

Page 7: ...t replaced by your service technician 7 Power Cord Protection Power supply cords should be routed so that they are not likely to be walked on or pinched by items placed upon or against them paying particular attention to cords at plugs convenience receptacles and the point where they exit from the video product 8 Ventilation Slots and openings in the case are provided for ventilation to ensure rel...

Page 8: ...r can prevent fire electric shock or other hazards 16 Safety Check Upon completion of any service or repairs to this video product ask the service technician to perform safety checks recommended by the manufacturer to determine that the video product is in safe operating condition 17 Wall or Ceiling Mounting The cameras provided with this system should be mounted to a wall or ceiling only as instr...

Page 9: ...ith the instructions may cause harmful interference to radio communications However there is no guarantee that interference will not occur in a particular installation IC Receiver Notice This Class B digital apparatus complies with Canadian ICES 003 Cet appareil numérique de la classe B est conforme à la norme NMB 003 du Canada Operation is subject to the following two conditions 1 This device may...

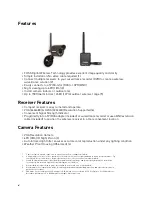
Page 10: ... Auto infrared light filter ensures accurate color reproduction under any lighting condition Weather Proof Housing IP66 rated 4 1 Camera requires a wired connection to a power outlet Power adapter included 2 Using multiple receivers in close proximity to each other may cause a slight slowdown in frame rate performance Try to maintain at least a few inches of space between each receiver 3ft extensi...

Page 11: ...eras 6 Powering Multiple Receivers Using The Power Splitter Cable LW2110PK2 only 7 On Screen Display 7 Pairing Cameras 8 Appendix A System Specifications 9 Appendix B About Digital Wireless Technology 10 Appendix C Facts About Digital Wireless Cameras 11 Appendix D Troubleshooting 13 Appendix E Frequently Asked Questions 14 Appendix F Extending Wireless Range 15 ...

Page 12: ...xii ...

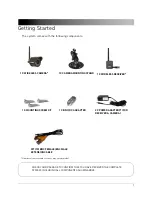
Page 13: ...RELESS CAMERA 1 X WIRELESS RECEIVER 2 X POWER ADAPTERS FOR RECEIVER CAMERA 3FT 1M BNC FEMALE BNC MALE EXTENSION CABLE 1 X POWER SPLITTER CABLE FOR RECEIVER Included with 2 pack only Number of cameras and receivers may vary by model CHECK YOUR PACKAGE TO CONFIRM THAT YOU HAVE RECEIVED THE COMPLETE SYSTEM INCLUDING ALL COMPONENTS SHOWN ABOVE ...

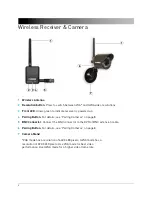
Page 14: ...utton For details see Pairing Cameras on page 8 5 BNC Connector Connect the BNC connector to the DVR or BNC extension cable 6 Pairing Button For details see Pairing Cameras on page 8 7 Camera Stand 1 2 3 4 5 1 6 7 VGA mode has a resolution of 640 X 480 pixels QVGA mode has a resolution of 320 X 240 pixels Use VGA mode for best video performance Use QVGA mode for a higher video frame rate 11 ...

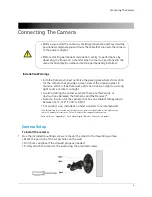
Page 15: ...ation position where it will be permanently installed Installation Warnings Aim the Cameras to best optimize the viewing area Select a location for the camera that provides a clear view of the area you want to monitor which is free from dust and is not in line of sight to a strong light source or direct sunlight Avoid installing the cameras where there are thick walls or obstructions between the C...

Page 16: ...f the stand 1 Adjust the angle of the camera until the desired view is set Tighten the thumbscrews to secure the desired camera position 2 3 Connect the power cable from the camera to the Power Adapter Plug the power adapter to an outlet or surge protector 1 2 ...

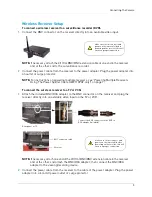
Page 17: ... Attach the included BNC RCA adapter to the BNC connector on the receiver and plug the receiver directly into an available video input on the TV or VCR NOTE If necessary attach one end of the 3ft 1m BNC BNC extension cable to the receiver and at the other end attach the BNC RCA adapter then connect the BNC RCA adapter to the viewing recording device 2 Connect the power cable from the receiver to t...

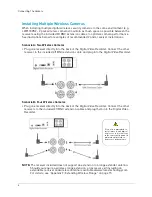
Page 18: ...ded 3ft BNC extension cable and plug into the Digital Video Recorder Scenario B Four Wireless Cameras Plug one receiver directly into the back of the Digital Video Recorder Connect the other receivers to the included 3ft BNC extension cables and plug them into the Digital Video Recorder NOTE The receiver included does not support an extension to a range extender antenna Should you require a wirele...

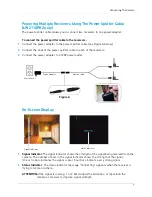
Page 19: ...wer outlet On Screen Display 1 Signal Indicator The signal indicator shows the strength of the signal being received from the camera The number of bars in the signal indicator shows the strength of the signal One or no bars indicates the signal is poor Four bars indicate a very strong signal 2 Status Indicator The status indicator message Connecting appears when the receiver is trying to locate a ...

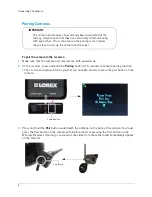
Page 20: ... hold the Pair button underneath the antenna on the back of the camera You must press the Pair button on the camera within 30 seconds of pressing the Pair button on the Wireless Receiver If pairing is successful live video from the camera will immediately appear on the monitor IMPORTANT The camera and receiver have already been pre paired at the factory which means that they are exclusively commun...

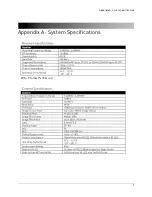
Page 21: ...9 Appendix A System Specifications Appendix A System Specifications FPS Frames Per Second ...

Page 22: ...ignal allowed by authorities around the Globe When an image is captured by the camera it is instantly converted from an analog to digital signal and packaged into small packets With each successful transmission via the 2 MHz paths discussed above the packets of information containing images are delivered to the receiver and decoded into analog information The information can then be displayed on d...

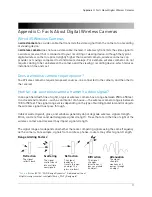
Page 23: ...ical wireless camera has a range between 250 to 450 feet In a closed environment such as an interior of a house the wireless camera range is between 100 to 150 feet The signal range varies depending on the type of building materials and or objects the wireless signal must pass through Cubical walls drywall glass and windows generally do not degrade wireless signal strength Brick concrete floors an...

Page 24: ... only the camera can follow through the pairing function FHSS makes digital wireless signals secure private and interference free How many frames per second should I expect from a digital wireless camera Current Lorex digital wireless cameras offer 10 30 FPS Frames Per Second performance Actual frame rate depends mainly on signal strength and resolution see the chart above Most digital wireless ca...

Page 25: ...en the receiver and camera Try switching to QVGA mode Resolution will be reduced but video frame rate will increase The picture appears to be unsharp When viewing on a large screen TV or monitor especially high definition televisions the picture mightseemunsharpasthecameraislimitedtoVGA resolution 640x480 pixels while the TV or monitor supports a much higher resolution For best performance use wit...

Page 26: ...ons between the camera and receiver Obstructions include walls buildings trees and certain electronic devices Materials containing moisture i e wet leaves may also act as an obstruction Q What is pairing A Pairing is an electronic handshake between digital wireless devices Pairing allows the devices to communicate exclusively with each other Q Can digital wireless cameras be paired to more than on...

Page 27: ... range extender accessory kit includes a 20ft cable and a higher power indoor outdoor antenna which allows you to reposition the antenna outdoors for direct line of sight with the camera OR simply to get around objects which are blocking the wireless signal e g metal walls Find an example below of a typical situation in which a range extender kit is used to achieve line of sight to improve signal ...

Page 28: ...16 Appendix F Extending Wireless Range ...

Page 29: ...anty lasts so this limitation may not apply to you Some states do not allow the exclusion or limitation of incidental or consequential damages so the above warranty may not apply to you This limited warranty gives you specific legal rights and you may also have other rights that vary from state to state Obtaining Service In order to obtain service please make sure that you have registered your pro...

Page 30: ...r original des droits spécifiques et il se peut que d autres droits variant d un état ou d une province à l autre puissent lui être conférés Obtention du service Si l acheteur a besoin de service pour son produit selon les termes de cette garantie limitée il doit fournir à Lorex une copie de la facture d achat affichant clairement la date et l endroit où le produit a été acheté Sans cette preuve d...

Page 31: ......

Page 32: ... R14 PROTECT EVERYTHING THAT MATTERS Parking Lot LBC6050 Office LNZ4001 Home LDC6050 Restaurant Home Office LW2902 Add wired or wireless cameras to expand the Envelope of Protection for your business your home and your family Nursery LW2003 Backyard LW2201 LW2702 Front Door LW2301 Drive Way CVC6950B Convenience Store LW2110 Special offer Coupon MLLLLDCG CM OOJICORN ...

Reviews: