background image

DIGITAL VIDEO RECORDER 


69


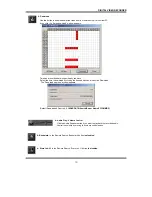
[NOTE 1] 


1. In case of the QLR1660 Server Network is set with 

Static IP address

,  

you should enter ‘

Static IP address

’ of QLR1660 Server to connect in ‘

IP/Product No’

 section. 

2. In case of the QLR1660 Server Network is set with 

Dynamic IP address or Private IP address (IP Sharer)

,  

you should enter ‘

Product Number’ 

of QLR1660 Server to connect in ‘

IP/Product No’

 section. 

3. In case of the QLR1660 Server Network is set with 

PPPoE connection (Dial-up connection)


you should enter IP address ‘

[100.0.0.1]’ 

of QLR1660 Server to connect in ‘

IP/Product No’

 section. 


[NOTE 2]    

<* The ‘Dial-up Connection’ Network Setting of Computer for QLR1660, refer the ‘PPPoE Manual’ included   

inside the Install CD by all means.> 

1. In case of network connection by ‘Dial-up Connection’, the Server Address is specified by [100.0.0.1]. 
2. The ‘Dial-up Connection’ is the Point to Point Communication. So, ‘Dial-up Connection’ can connect the only one   

QLR1660 Client with the only one QLR1660 Server. 


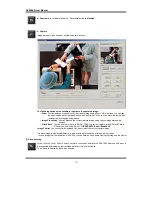
Local


setup login password

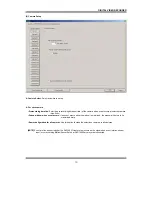
: Changes the client local setup login password by clicking ‘Change’. 


        [NOTE] 

The default password for the local setup login of Client is ‘1111’


Confirm password

: Check to confirm password before you execute the following 

                      – Setup, Search, Stop Schedule Record, Shut-down. 

Summary of Contents for QLR1660

Page 1: ...16 CHANNEL DIGITAL NETWORK SURVEILLANCE SYSTEM Instruction Manual English Version1 0 MODEL QLR1660 www lorexcctv com Copyright 2007 Lorex Technology Inc ...

Page 2: ...instruction manual may cause harmful interference to radio communications However there is no guarantee that interference will not occur in a particular installation Operation of this equipment in a residential area is likely to cause harmful interference in which case that you will be required to correct the interference at one s own expense CAUTION CHANGES OR MODIFICATIONS NOT EXPRESSLY APPROVED...

Page 3: ...d tripod bracket or table recommended by the manufacturer or sold with the product Any mounting of the product should follow the manufacturer s instructions and should use a mounting accessory recommended by the manufacturer 8 Handling A product and cart combination should be moved with care Quick stops excessive force and uneven surfaces may cause the product and cart combination to overturn 9 Ve...

Page 4: ...etup Mode System Setup Camera Setup Schedule Record Setup Motion Setup Sensor Setup Speaker Relay out Setup Mail Setup User Registration Setup 21 26 27 32 33 35 37 38 39 41 SECTION 4 HOW TO USE QLR1660 SEARCH 1 2 3 Main Interface Window Local Search Mode Remote Search Mode 43 48 54 SECTION 5 HOW TO USE QLR1660 CLIENT 1 2 2 1 2 2 3 Main Interface Window Remote View Mode Local Setup Mode Connecting ...

Page 5: ...lay Output Resolution QLR1660 1 card 4 8 16 120 100 4 8 4 QLR1660 2 2 SD cards 8 16 240 200 8 16 8 320x240 640x240 640x480 Recording Rate is the maximum frame rate in case of 320x240 resolution IO board Audio Sensor Relay I O D Sub Ports Video Input Output D Sub Ports Real Time Display Card Connector Tele switch Connection pin 6pin Reset pin for Watchdog 4pin QLR1660 card ...

Page 6: ...or the correct functioning of the QLR1660 system If you are unsure of your specific PC configuration please refer to your hardware vendor for more information 3 Package Contents Your QLR1660 package includes the following 1 2 Video Card s for QLR1660 QLR1660 Software CD Including Driver Application Software and User Manual QLR1660 User Manual 26 pin D sub type Video Input Output Cable and 26 pin D...

Page 7: ...eo capture card that supports to 4 8 16 ports 1 Remove the computer cover 2 Insert the QLR1660 video capture card into the available PCI expansion slot 3 Replace the computer cover and reconnect all cables 4 Turn on the computer power Windows will automatically detect the existing QLR1660 card 5 Now insert the CD and install the driver for QLR1660 Refer to II 2 QLR1660 Driver Installation Audio Se...

Page 8: ...pin 4pin for watch dog It should be connected to the motherboard s reset jumper and computer s reset switch Your motherboards RESET pin position might be different from the illustration below Please refer to your motherboard user manual for the actual NOTE In case QLR1660 2 with two video capture cards the cable should be connected to the reset pin 4pin for watch dog of master card among two cards...

Page 9: ...I 1 Pan Tilt Zoom Camera Installation REFERENCE Video Output is connected to CCTV monitor for spot and only channel 1 is displayed into monitor 1 3 Audio External Sensor Relay Installation Each system can come with D sub type 26 pin I O connector cable enabling user to connect audio inputs and sensor inputs and relay outputs Audios sensors and relays need to be connected according to the numerical...

Page 10: ... computer after you have inserted the QLR1660 cards to the PCI slot Windows will automatically detect the existing card and the following message dialog appears automatically The first time you install the video card Insert the QLR1660 Software CD and select Install from a list or specific location Advanced Click the Next button 2 Ensure that the driver CD is in the drive and select Search removab...

Page 11: ...n the Software CD Select the driver for your QLR1660 card from the list Click also Next button here Video driver for QLR1660 QLR1660 2 WJ2160 Video Capture Device Ver5 0 4 When the driver is located the below screen will be shown Click the Continue Anyway button to proceed ...

Page 12: ...r installation finished click the Finish button 6 You need to continue installing the audio driver Select Install the software automatically Recommended and click the Next button Audio driver for QLR1660 QLR1660 2 WJ2160 Audio Capture Device Ver5 0 ...

Page 13: ...button to proceed 9 After the audio driver installation finished click the Finish button For QLR1660 you are asked to repeat the procedures 4 times and for QLR1660 2 8 times Video driver for QLR1660 QLR1660 2 WJ2160 Video Capture Device Ver5 0 Audio driver for QLR1660 QLR1660 2 WJ2160 Audio Capture Device Ver5 0 ...

Page 14: ...lowing figure 3 QLR1660 Software Installations Server Client Search NOTE You will need the product s serial number to complete the installation of the software The serial number may be found on the CD ROM 1 Begin the software installation by double clicking the Setup exe icon in Install directory on the provided CD ...

Page 15: ... dialog click the Next button 3 Select Component dialog appears Choose one among 4 options that you want to install Click Next button 4 Customer Information dialog appears Enter your or your company s name and the product Serial Number Click Next button ...

Page 16: ...ation Location dialog appears Select folder where Setup will install files Click Next button CUASE The default installation directory is C Program Files VISTAPRO When install is complete the following icons will be displayed on the desktop ...

Page 17: ...Start Copying Files dialog appears Click the Next button 8 If installing the files is finished you choose whether or not register the QLR1660 Server on Startup Menu 9 After this if the following dialog appears click the Yes button here REFERENCE If DirectX 8 1 software is already installed it is installation procedure of from 9 to 12 will be omitted ...

Page 18: ...es button here 11 Click also Yes button here 12 Click OK button Now you have successfully installed the DirectX8 1 for QLR1660 system REFERENCE If DirectX 8 1 software is first installed your computer with Windows 98 or ME will be restarted ...

Page 19: ...ur computer Choose Yes I want to restart my computer now and click OK button to finish setup 14 After a moment computer restarts and operates the QLR1660 Server system And QLR1660 server will be displayed automatically on the main screen QLR1660 Server icon Client icon Search icon ...

Page 20: ...gram the main interface screen will open as shown below There are several view modes for efficient monitoring such as single channel division screen multi channel and auto rotation view modes Launch the QLR1660 Server program by double clicking the QLR1660 Server icon on the desktop Channel Screen Screen Window ...

Page 21: ...d of administrator is master Log View Shows event logs You can see the details by double clicking mouse on the viewer You can see the log list by day because of saving list daily The operation information of start end system connection disconnection changing system configuration start stop recording etc is recorded with time Setup button Click here to enter the Setup Mode NOTE The default ID and p...

Page 22: ...ation Color Control buttons Clicking the Color tab brings up the picture adjustment controls You are able to control the brightness contrast hue and saturation of the video image Audio Speaker On Off Volume Control buttons Use for full duplex audio communication with the QLR1660 Client system Clicking the speaker button enables you to listen to the sound that is transmitted from the connected QLR1...

Page 23: ... will be displayed on the camera screen Channel Select buttons Group buttons A B By clicking each group button A B displays 8 channel select buttons belongs to each group Channel Select buttons 1 16 You are able to display each channel in the one channel mode by clicking buttons Screen division buttons You can see the screen by various division modes of 1 4 6 9 10 13 16 channels with these buttons...

Page 24: ...creen 13 channels display Two 13 division screens of A 1 13ch B 4 16ch are alternated by clicking By double clicking a small channel on the screen the channel are displayed on the middle large screen 16 division screen 16 channels display 16 division screen of 1 16ch is displayed by clicking By double clicking a channel on the screen One channel screen of the channel and 16 division screen are cha...

Page 25: ...p mode You will be prompted to enter your User ID and Password before proceeding to Setup mode In the setup mode the following two buttons are displayed These buttons is privileged only to administrator Save configuration as You can save the current system configuration to a data file of CBF Config Backup File format Load configuration You can load the system configuration from a data file of CBF ...

Page 26: ...cord Motion Detect Sensor Detect Audio set Enable Recording in recording R HDD Overwrite Enable the HDD to overwrite when full On When the selected record drive is full when free space is under 500MByte the QLR1660 will begin overwriting the drive from the beginning Whenever free space is under 500MByte the QLR1660 system creates the free space of 2 0Gbyte by erasing oldest data to save new record...

Page 27: ... selected channel In search mode a white line at timetable indicates an audio file is recorded NOTE 1 Audio recording depends on the video recording of associated channel Namely the audio is only recorded when video is being recorded for the associated camera 2 For full duplex audio communication with the QLR1660 Client system the amplified microphone has to be connected to QLR1660 card and the au...

Page 28: ...ossible to network only through IP Server IP Address Shows the IP address of Server is appointed from the computer Static IP address Dynamic IP address PPPoE IP address The QLR1660 Client and Search can connect to the QLR1660 Server remotely using Server IP or Product number In case of the QLR1660 Server is connected to network using IP Sharer the appointed Private IP address will be displayed in ...

Page 29: ...orded data Adds removes conveniently using Add all Remove all Add Remove buttons Select the Backup Drive Select the backup drive in which the selected file will be saved Backup file list Shows the information file info source path of backup file Shows the total size of selected backup files and the free size of selected drive Reserve backup You can set the backup schedule in advance Delete all Del...

Page 30: ...P Settings of your Computer should be set to Use the Static IP because this Computer is used as the Virtual Server for QLR1660 2 Internet Gateway IP Sharer Setting You should set Virtual Server Setting required for QLR1660 Server in your Internet Gateway IP Sharer Port Numbers for Video and Audio and P T Z camera and Remote Search of QLR1660 Server will be each fixed 2000 2001 2002 2003 as the vid...

Page 31: ...ration Recording video quality Setup the recording video quality of selected camera Record maximum possible frames Setup the record maximum frame rate of selected camera 1 30 fps Record all frames when event occurs If checked it records all frames of video of selected camera when event occurs at selected camera Pre alarm recording duration Enter the pre alarm recording duration time of selected ca...

Page 32: ...ecord mode Then the selected record mode is assigned at the appointed time Continuous Record continuously the monitoring video Motion Record when motion occurs in the appointed motion detection region Sensor Record when the associated external sensor input is activated Event M or S Record when event motion detection or sensor input occurs Erase Not record but only monitoring Recording mark R is di...

Page 33: ...ill take place unless manually initiated You can specify the holiday as desired Select the date and click Add Then the date lists in the holiday list To remove the date Select the date at the holiday list and click Remove 2 4 Motion Setup Camera select Select a camera to setup ...

Page 34: ...dragging on the viewer as desired Test start Start the test of the motion detection on the viewer Test stop Stop the test The Motion Detect symbol is displayed on screen when motion occurs in the selected regions Camera association Select cameras to be associated and recorded together when motion occurs at this camera NOTE This association will not affect cameras configured to record upon Sensor i...

Page 35: ...duration that will occur when this input is triggered 1 60 sec Camera association Select cameras to be associated and recorded together when this sensor input is activated Output association Select the output condition s that will occur when this input is activated Speaker out If selected the speaker will be activated according to Speaker Relay out setup when this input is triggered Mail out If se...

Page 36: ...on sensor will be operated according to Setup in here when event occurs Relay out Relay out Enable If checked the relay output is enabled Description A description of the relay or function may be entered in this location Working time Schedule the time frame during which the relay will be able to activate Relay duration Set the duration that the relay will activate when an alarm occurs 1 60 sec Del...

Page 37: ...mation Enter the name mail address and SMTP Server of sender SMTP Simple Mail Transfer Protocol Server It is the server to send the e mail to other computer If not known this may be obtained from the Internet Service Provider My server requires authentication If required check this and set the logon information for your SMTP server Enter your account name and password correctly to logon your outgo...

Page 38: ...ails Sets the minimum interval between two consecutive e mails 1 60 min Delay for capturing image after alarm Sets the delay time for capturing an image after an event occur 0 60 sec Recipients Information Enter the mail address of a recipient and click Add It will then be added to the list Send test mail Use this option to send a test message to the recipient ...

Page 39: ...ystem remotely from the Client or Search program A user must be set up in the area in order to gain remote access Clicking ADD or MODIFY brings up the window below User ID Enter user s ID to use Password Enter the password Confirm password Enter again the password Level Select the user authority level NOTE Default ID and password Administrator ID admin PW master Power user ID power PW 1111 User ID...

Page 40: ...before you execute the following Setup Search Stop Schedule Record Shut down Server Search Client Level System Setup Network video port number Backup Filtering User Registration Setup Search Stop Schedule Rec Shutdown Remote Search Download Connection Remote Setup User NO NO NO YES YES YES NO Power User NO NO YES YES YES YES NO Administrator YES YES YES YES YES YES YES ...

Page 41: ...60 Search program Launch the search program by double clicking the QLR1660 Search icon on the desktop or by clicking the Search button from the QLR1660 Server main interface window or QLR1660 Client main interface window 1 Main Interface Window The recorded video data can be searched by date specific camera channel and time The image displayed on the screen is captured and stored to a file of JPEG...

Page 42: ...e zoom region become expand narrow as clicking Also can move the region red rectangular by dragging with the mouse Clicking the calendar button returns to calendar mode Local Search button Loads data from the local hard disk of the PC During the Local Search this button is disabled During the Remote Search use this button to return to the Local Search mode Remote Search button Connects to a remote...

Page 43: ...playing by Play button Screen Division buttons You can see the screen by various division modes of 4 8 9 10 13 16 channels with these buttons 4 division screen 4 channels display Four 4 division screens of A 1 4ch B 5 8ch C 9 12ch D 13 16ch are alternated by clicking 8 division screen 8 channels display Two 8 division screens of A 1 8ch B 9 16ch are alternated by clicking 9 division screen 9 chann...

Page 44: ...red segment or by scrolling using the scroll key from left to right selected time indicator blue line The colors of the bar indicate various types of recording Green Continuous Recording Red Motion Detection Orange Sensor Pink Pre recording White line Audio Recording Select button by Event Use to see the recorded data by event A Display all types of recording C Display only Continuous Recording da...

Page 45: ...to save the recording as an AVI video clip Panorama button Using this button video will be able to be played back image by image Capture button Use the Capture button to save or print individual images Shutdown button Exit the Search system by clicking this button ...

Page 46: ...ce by name of connected Server Click OK after choosing drive and directory for local searching In case of Remote Search you can search only Server directory of the connected QLR1660 Server computer Default Server Directory C XDVRDATA Server 2 Selecting date to search In calendar select the date you want to search by clicking the day in the window Calendar The Calendar shows dates that have recorde...

Page 47: ...clicking By double clicking a channel on the screen One channel screen of the channel and division screen are changed alternately Time Indicator Display the real time of the recorded data is on playback Data of current time blue line Channel Select Select the channel for playback by 1 channel mode By moving scroll bar located in right of timetable use can see channel buttons from 1 to 16 Timetable...

Page 48: ...C and S REC data you can search only motion data among the recording data separately within desired region In M REC data you can search the recorded motion data only within desired region among the motion detect region set in motion setup panel of the Server a Click the Setup button to enter the Smart Search setup panel b In the Smart Search section set the region to smart search and the show area...

Page 49: ...oom region become expand narrow as clicking Also you can move the region red rectangular by dragging with the mouse Clicking the calendar button returns to calendar mode During play Zoom in out buttons is disabled Audio Play Volume Control Click the Audio Speaker button if you want to playback the recorded audio Control the volume by moving the volume control button Bookmark Click the bookmark ico...

Page 50: ...IVX Codec for playback of full motion video and audio file have to be installed on your computer Please install these codecs These Codecs are available to be downloaded as freeware search the web for DIVX or visit http www divx com The PLAYBACK Codecs do not come installed with the software you are required to download these from the web Panorama Panorama allows reviewing of images frame by frame ...

Page 51: ... by dragging using mouse Image Processing You can process the current capture image using various image processing buttons Print Save You can print out or save to BMP or JPEG the current capture image Default Saved Directory on searching Server C XDVRDATA Server SnapShot Image Control You can control Brightness Contrast Hue of the current capture image Capture image is displayed differently in siz...

Page 52: ... IP address or Private IP address IP Sharer you should enter Product Number of QLR1660 Server to connect in IP Product No section 3 In case of the QLR1660 Server Network is set with PPPoE connection Dial up connection you should enter IP address 100 0 0 1 of QLR1660 Server to connect in IP Product No section NOTE 2 The Dial up Connection Network Setting of Computer for QLR1660 refer the PPPoE Manu...

Page 53: ...A 1 4ch B 5 8ch C 9 12ch D 13 16ch are alternated by clicking 8 division screen 8 channels display Two 8 division screens of A 1 8ch B 9 16ch are alternated by clicking 9 division screen 9 channels display Two 9 division screens of A 1 9ch B 8 16ch are alternated by clicking 10 division screen 10 channels display Two 10 division screens of A 1 10ch B 7 16ch are alternated by clicking 13 division s...

Page 54: ...m in out buttons Jump button Channel Select button Quad button Pause tool Backward one frame Forward one frame Go to Last frame Jump Play images frame by frame using Pause tool Use the Jump button to go to a specific time Click the Jump button specify time to search and click OK How to play the Audio recording data After selects only one channel being audio data recorded you make play with play bu...

Page 55: ...oad by clicking the desired block and then click Download The Download progress window appears Default Downloaded Directory C XDVRDATA Search Server Name YYYYMMDD Audio Play Volume Control Click the Audio Speaker button if you want to playback the recorded audio Control the volume by moving the volume control button Bookmark In the Remote Search Bookmark button is disabled Store to AVI In the Remo...

Page 56: ...ing various image processing buttons Print Save You can print out or save to BMP or JPEG the current capture image Default Saved Directory on searching Server C XDVRDATA Server SnapShot Image Control You can control Brightness Contrast Hue of the current capture image Capture image is displayed differently in size according to resolution of image on the viewer In case image that the resolution is ...

Page 57: ...the desktop The functions controls within this window are nearly identical to the Server Window functions Minimize button Click to minimize the screen to the taskbar System Status Date and Time Status Display Current HDD Storage Status Used The Recycle HDD icon is shown if in overwrite mode Server Connection Status Displays the Server name and network speed Log View Shows event logs You can see th...

Page 58: ...les you to listen to the sound transmitted from the connected QLR1660 Server Control the volume by moving the volume control button Audio Speaker On Off Volume Control buttons NOTE For full duplex audio communication with the QLR1660 Server system Audio recording and transferring in System setup panel have to be enabled And the Microphone have to be connected to sound card of computer and the Micr...

Page 59: ...he screen the channel are displayed on the left large screen 9 division screen 9 channels display Two 9 division screens of A 1 9ch B 8 16ch are alternated by clicking By double clicking a channel on the screen One channel screen of the channel and 9 division screen are changed alternately 10 division screen 10 channels display Two 10 division screens of A 1 10ch B 7 16ch are alternated by clickin...

Page 60: ...erver connected Click this button to call the server for an audio session The Calling message window is displayed on the Server PC Full Screen Mode Click the right mouse button on the screen to change to full screen mode To convert back to the regular screen click the right mouse button again ...

Page 61: ...tem Dialog box of QLR1660 Client appears In this dialog click Local and click OK To enter the Local Setup mode panel input the client setup login password set in server registration setup panel of Client Setup mode and click OK In the setup mode the following two buttons are displayed When it s connected with the QLR1660 Server these are disabled Save configuration as You can save the current syst...

Page 62: ...ve to be used for recording HDD Overwrite Enable the HDD to overwrite when full When the selected record drive is full when free space is under 500MByte the DVR will begin overwriting the drive from the beginning Whenever free space is under 500MByte the DVR system creates the free space of 2 0GByte by erasing oldest data to save new recording data NOTE In case of unchecked if recording stop on ac...

Page 63: ... is recorded NOTE 1 Audio recording depends on the video recording of the associated channel Namely the audio is only recorded when video is being recorded at the associated camera 2 For full duplex audio communication with the QLR1660Server system the a Microphone has to be connected to sound card of computer and the Microphone In at the Volume Control setup of windows must be muted Speaker out I...

Page 64: ...ntrol window shown And click Advanced and check 2 Microphone Boost of Other Controls section in the Advanced Controls for Microphone Click Close 5 Check Mute of Microphone section in the Master Volume window shown Then you can do the audio communication with QLR1660 server system ...

Page 65: ...x 5sec Popup window when event occurs If an event occurs while the window is minimized the window will return to its maximized state Same configuration for all cameras Use this option to make the selections common to all cameras NOTE Event motion sensor input at the QLR1660 Client system occurs on the signal when event motion sensor input occur according Motion Sensor Setup at QLR1660 Server syste...

Page 66: ...elected record mode is assigned at the appointed time Continuous Record continuously the monitoring video Event M or S Record when event motion detection or sensor input occurs Erase Not record but only monitoring Recording mark R is displayed on screen of each camera when it is recording NOTE Event motion sensor input at the QLR1660 Client system occurs on the signal when event motion sensor inpu...

Page 67: ...cted holidays no recording will take place unless manually initiated You can specify the holiday as desired Select the date and click Add Then the date lists in the holiday list To remove the date Select the date at the holiday list and click Remove ...

Page 68: ...ormation Enter the information of QLR1660 Server you want to connect to Name Address IP number or Product Number Port Number When the Search tries to connect to QLR1660 Server you have only to input the video port number 2000 User Information Enter the User ID is you would like to use when logging into the DVR This user name must be enabled in the Server setup You can modify or delete the informat...

Page 69: ...0 Server to connect in IP Product No section NOTE 2 The Dial up Connection Network Setting of Computer for QLR1660 refer the PPPoE Manual included inside the Install CD by all means 1 In case of network connection by Dial up Connection the Server Address is specified by 100 0 0 1 2 The Dial up Connection is the Point to Point Communication So Dial up Connection can connect the only one QLR1660 Cli...

Page 70: ...d button User Information Enter the User ID and Password that is registered in the Local setup information Click Connect to log into the remote server If the Network Connection is successful between the Client and Server a Connected message appears and Network connection server name network speed status is shown on the LOG viewer on the main screen The Connection button will be changed to a blue c...

Page 71: ... successful the setup window will appear Most settings can be changed in this setup window with the exceptions shown below The following options cannot be setup remotely System Setup Record drive Product number IP address Enable auto register to IP server Network video port number Backup Network filtering Camera Setup PTZ camera section camera type camera switch ID Motion Setup Test start stop but...

Page 72: ...the number of a channel of QLR1660 when installed ex In case of 8 channels QLR1660 Channel Dome ID Switch Camera Channel QLR1660 Channel Dome ID Switch Camera Channel 1 1 5 5 2 2 6 6 3 3 7 7 4 4 8 8 1 2 Example of Matching QLR1660 with Camera channels Speed Dome Camera P T Z camera Pin QLR1660 Computer D Rx Tx TD Tx RD RS 485 RS 232C RS 232C to RS 485 Converter pin all available D Rx all available...

Page 73: ...ion of Sensor connecting wire Connection wire that has small internal resistance is recommended Please refer to the following 1 Number of Sensor 8 ea 2 Voltage between sensor input and GND when sensor input is opened 5 Volt 3 Terminal voltage High stand by Low Activated 4 Max resistance for activation 500 Ohm 3 Example of operation test of external devices including a Light D sub type I O connecto...

Page 74: ...efault ports 4 Can I change the display screen resolution of computer while QLR1660 is running If you changed the screen resolution while QLR1660 is running the QLR1660 system will be stopped abnormally You must change it after shutdown the QLR1660 program 5 It appears that the QLR1660 server system impacts with the mother board of the computer Some mother board of VIA chipset could impact with th...

Page 75: ...It s all on the web Product Information User Manuals Quick Start Guides Specification Sheets Software Upgrades Firmware Upgrades Lorex Technology Inc VISIT wwwlorexcctv com www lorexcctv com ...

Reviews: