Camera Overview
Quick Start Guide
HD Wi-Fi Outdoor Security Camera
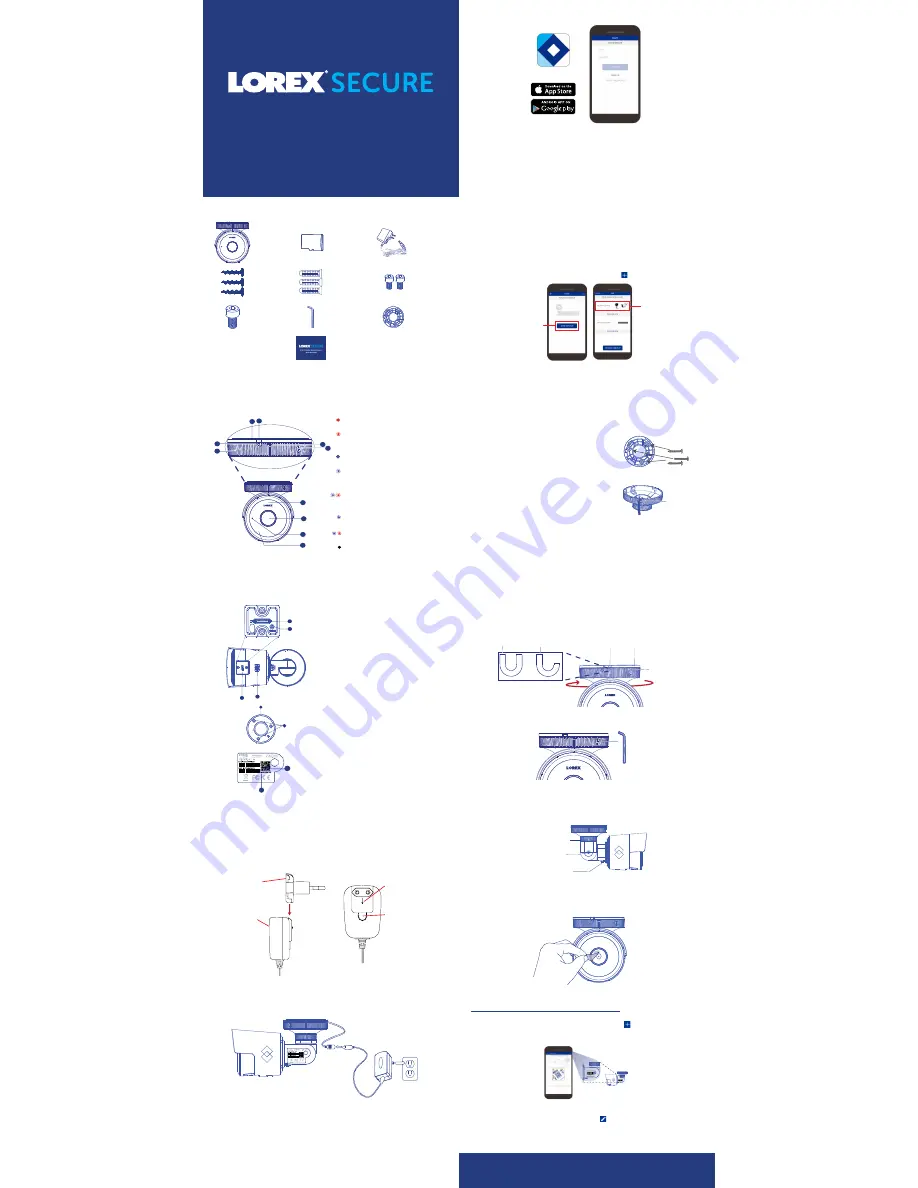
What’s Included
1 HD Wi-Fi
Outdoor
Security
Camera
1 microSD Card
(Pre-installed)
1 Power
Adapter
Quick Start
Guide and Safety
Information
3 Mounting
Screws
3 Drywall
Anchors
1 Allen Key
2 Spare
Screws for
microSD Cover
Setup Instructions
Step One:
Initial Setup
Step Two:
Setting Up Your Camera
Step Three:
Installing Your Camera
NOTE:
If Bluetooth (BLE) is not supported on your mobile device, follow the setup
instructions in the “
Wi-Fi Setup (For Android Users Only)
” section.
Loosen the Adjustment ring to
adjust the horizontal position
Loosen with the included Allen key to
adjust the vertical position
Loosen with the included Allen key to
level the camera
Step Four:
Finishing Up
• If you are running cables
through
a wall
or ceiling, feed the camera power cable
through the mounting base.
• If you are running cables
along
a wall or
ceiling, run the power cable through the
cable notch as shown.
IMPORTANT:
We recommend that you set up the camera in a location with a
strong Wi-Fi signal. You can check this with the Wi-Fi signal strength indicator
on your mobile device.
1.
Status LED
2. Camera Lens
3. Microphone
4. Night Vision LEDs
11. microSD Card Memory Slot
12. Reset Button
13. microSD Card Slot Cover
14. Speaker
17. QR Code
18. Device ID
5. Mounting Base
6. Mounting Base Marker
7. Lock Position
15. Mounting Base
16. Mounting Holes
Add Camera
Scan the QR code using your mobile device
Center the QR code inside the frame
Make sure that your camera is turned on
and has a working internet connection
Se
rial:
12
345
6789
01
2
Wi-Fi Setup (For Android Users Only)
If Bluetooth (BLE) is not supported on your mobile device, follow these setup instructions:
NOTES:
• If you cannot scan the camera’s QR code, tap to enter the camera’s Device ID
manually. See the “
Camera Overview
” section for Device ID location.
• If your mobile device has Bluetooth turned on but your camera’s Device ID does not
show up on the screen, tap “
CAN’T FIND YOUR DEVICE?
”. Scan the QR code and
follow the on-screen instructions to complete setup.
1. Tap
ADD DEVICE
, then tap
HD WiFi Camera
.
If this is not the first device on your account, tap and then tap
HD WiFi
Camera
.
2. Scan the QR Code as shown below.
1
2
3
4
5 6
7
9
8
10
1 Camera-Base
Locking Screw
(Pre-installed)
8. Unlock Position
9. Camera Base
10. Camera-Base
Locking Screw
IMPORTANT:
Make sure to fully tighten the adjustment screws after setting the
position.
Cable Notch
Steady Red:
Camera is starting up or
resetting.
Slow-Flashing Red:
The router or
network that the camera is connected
to is down. Check your router settings.
Steady Blue:
Camera is connected to
FLIR Cloud services.
Fast-Flashing Blue:
Firmware upgrade
in progress. DO NOT UNPLUG YOUR
CAMERA
.
Fast-Flashing Blue and Red:
Firmware is
downloading and update will begin shortly.
DO NOT UNPLUG YOUR CAMERA
.
Slow-Flashing Blue:
Camera setup in
progress.
Slow-Flashing Blue and Red:
Camera is
ready for setup.
LED Off:
Camera is in privacy / covert
mode, or is turned off.
NOTE:
Refer to your mobile device’s user guide for instructions on turning on
Bluetooth.
1. Make sure your mobile device’s Bluetooth is turned on.
CAUTION:
Make sure the power connector is protected from the elements when
installing.
1 Mounting
Base
11
12
13
14
17
18
15
16
NOTE:
Make sure to securely connect the camera power cable to the power
adapter to ensure weatherproof seal.
NOTE:
During the setup process, the camera and the mobile device must be
within a few feet of each other. The power outlet does not have to be near the
location where you want to install the camera.
English / Español
NOTE:
Camera configuration, memory card size, power adapter, power adapter plugs, and the
number of accessories may vary by model. Please refer to your package for specific details.
Your accessories might appear different from the ones depicted in this guide.
NOTE:
If you already have an existing FLIR Cloud account, enter your email
address and password and tap
LOG IN
.
1. Attach the relevant power adapter plug to the included power adapter. Push
the power adapter plug into the power adapter body until you hear a click.
Power
adapter plug
Power
adapter body
To remove the power
adapter plug, press
down on the button
while pulling up on the
plug.
Ensure the arrow
symbol on the power
adapter plug points
down.
For FAQs, setup guides, and support videos visit
lorextechnology.com
© 2017, FLIR Systems, Inc.
FXCX3_LS_QSG_EN_SP_R1
Mounting
Base
Marker
Mounting
Base
Camera Base
Lock Position
Unlock Position
2. Connect the camera cable to the included power adapter, and connect the
power adapter to a power outlet.
3. Download the Lorex Secure app to your mobile device, then launch the app.
4. Tap
SIGN UP
and enter your email address and password to create a new
FLIR Cloud account.
2. Tap
ADD DEVICE
, then tap
HD WiFi Camera
.
If this is not the first device on your account, tap and then tap
HD WiFi
Camera
.
3. Follow the on-screen instructions to complete setup.
4. Unplug camera once setup is complete.
1. Set the mounting base in the desired mounting location and mark holes for
screws using the mounting base.
2. Drill the holes, then attach the mounting base
to the mounting surface using the included
screws and drywall anchors (optional).
3. Connecting power cable:
4. Connect the included power adapter to the camera power cable.
5. Plug in the power adapter to a power outlet.
6. Position the camera base such that the unlock position aligns with the
mounting base marker. Twist the camera clockwise such that the lock
position aligns with the mounting base marker.
7. Secure the camera and the mounting base by tightening the camera-base
locking screw (pre-installed) using the included Allen key.
1. Adjust the camera angle:
2. Remove the protective film from the lens cover after you have finished the
installation.
Lorex Secure
Tap
ADD DEVICE
Tap
HD WiFi
Camera
3. Follow the on-screen instructions to complete setup.


