background image


Changing the Camera Address Settings 


9

Changing the Camera Address Settings 

NOTE: 

This is only applicable when using the BNC Adaptor cable. CH1 is the only available channel if 

using the DIN Connection.  
 
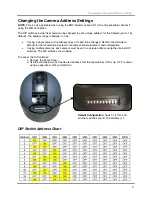
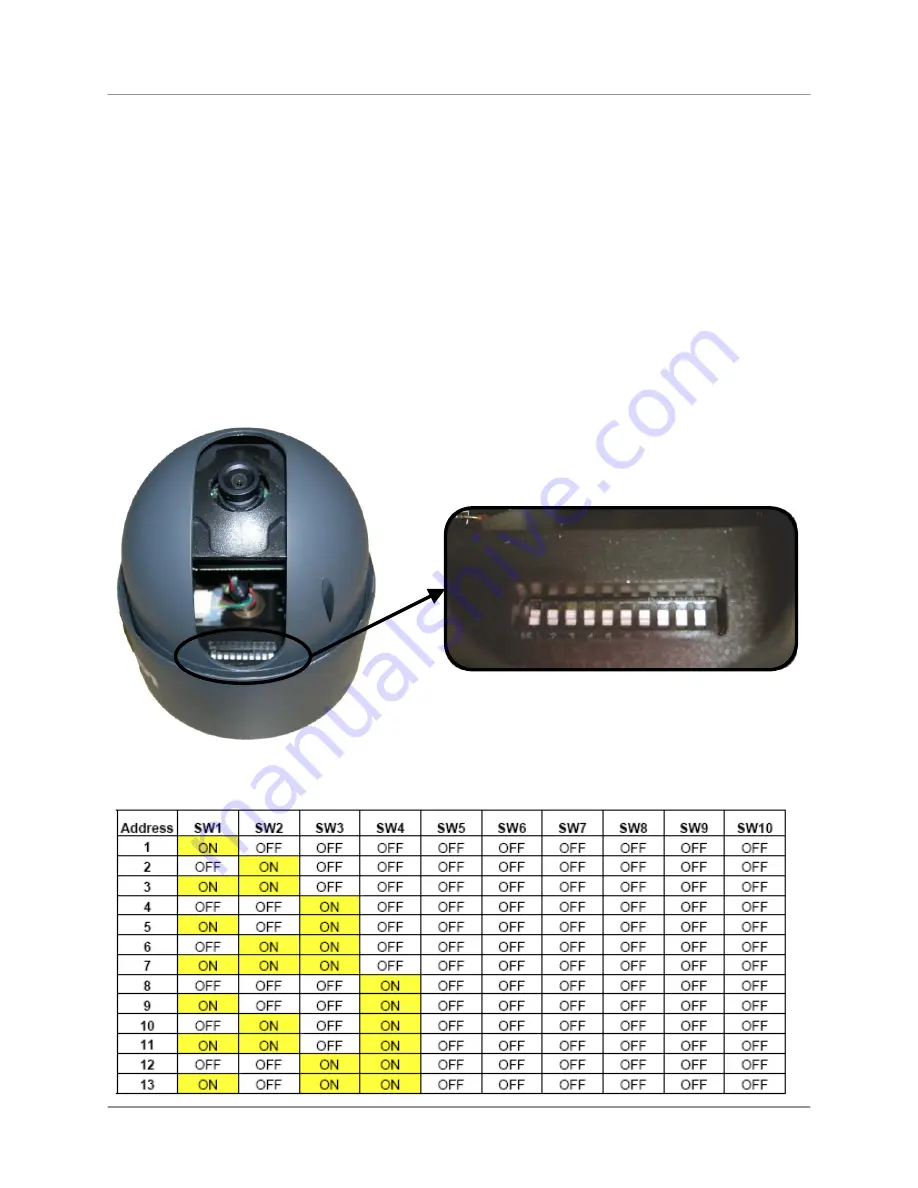
The DIP switches inside the camera can be changed to set a unique address for the Camera (set to 1 by 
default). The address range is between 1~255: 


If using a single camera, the address does not need to be changed. Refer to the Hardware 
Manual for the Observation System for camera channel placement and configuration. 


If using multiple cameras, each camera must be set to a unique address using the internal DIP 
switches. The DIP switches shown below. 

 
To access the DIP switches: 

1. Remove the Dome Cover.    
2. Use the chart below to set the desired address. Set the dip switches (ON is up;  OFF is down)    
    using a paperclip or other pointed tool. 


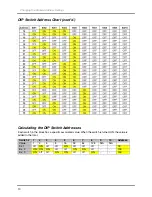
DIP Switch Address Chart

Default Configuration

: Switch 1 is ON, and 

all other switches are off. The address is ‘1’ 

Summary of Contents for SG7381

Page 1: ...Copyright 2007 Lorex Technology Inc 1 3 CCD COLOR PAN TILT DOME CAMERA WITH 3x DIGITAL ZOOM Instruction Manual www lorexcctv com English Version1 1 MODEL SG7381...

Page 2: ...www lorexcctv com CAUTION RISK OF ELECTRIC SHOCK DO NOT OPEN CAUTION TO REDUCE THE RICK OF ELECTRIC SHOCK DO NOT REMOVE COVER OR BACK NO USER SERVICABLE PARTS INSIDE REFER SERVICING TO QUALIFIED SERVI...

Page 3: ...er there is no guarantee that interference will not occur in a particular installation If this equipment does cause harmful interference to radio or television reception which can be determined by tur...

Page 4: ...8 Connectivity Diagram 8 Changing the Camera Address Settings 9 DIP Switch Address Chart 9 Calculating the DIP Switch Addresses 10 Technical Specifications 11 Dimensions 11 Camera Features High Resol...

Page 5: ...YOUR PACKAGE TO CONFIRM THAT YOU HAVE RECEIVED THE COMPLETE SYSTEM INCLUDING ALL COMPONENTS SHOWN ABOVE 1 x MINI COLOR PAN TILT DOME CAMERA 1 x MOUNTING BRACKET 1 x HARDWARE MANUAL 1 x 65 DIN EXTENSI...

Page 6: ...ra Cable and the DIN Extension cable are pointed together when connecting the cable If the pins in the DIN Connector are bent the Camera will NOT function 2 Attach the adaptor plate on the ceiling usi...

Page 7: ...unting bracket must be attached to a structural object such as a ceiling rafter which will support the weight of the camera 3 Twist the base of the dome camera on to the adaptor plate on the ceiling D...

Page 8: ...ecting to BNC Connectivity Diagram Connections White RS 485 Black RS 485 Note Additional settings are required on the Observation System to control the PTZ Please refer to the Observation System Hardw...

Page 9: ...a the address does not need to be changed Refer to the Hardware Manual for the Observation System for camera channel placement and configuration If using multiple cameras each camera must be set to a...

Page 10: ...sses Each switch in the block has a specific associated value When the switch is turned ON the value is added to the total Switch 1 2 3 4 5 6 7 8 9 10 Address Value 1 2 4 8 16 32 64 128 N A N A Ex 1 o...

Page 11: ...imum Illumination 1 0 lux F1 2 Video Output 1 0V p p 75 ohms Power Requirement From monitor via cable when using DIN only From power adaptor when using the DIN to BNC RS 485 Adaptor cable Operating Te...

Page 12: ...12 It s all on the web Product Information User Manuals Quick Start Guides Specification Sheets Software Upgrades Firmware Upgrades Lorex Technology Inc VISIT www lorexcctv com www lorexcctv com...

Reviews: