Connect to the camera using the free Lorex Home app on your iPhone® or
Android™ phone.
1. Connect the camera cable to the included USB adapter and plug into a
nearby outlet.
2. Download and install the free
Lorex Home
app from
the App Store or Google Play Store.
3. Tap the Lorex Home icon to launch the app. Tap
Sign
up
, then follow the on screen prompts to create an
account. Record your account details below:
W261AS_QSG_EN_R2
STEP 1:
Connecting to Lorex Home
To connect your camera to Lorex Home:
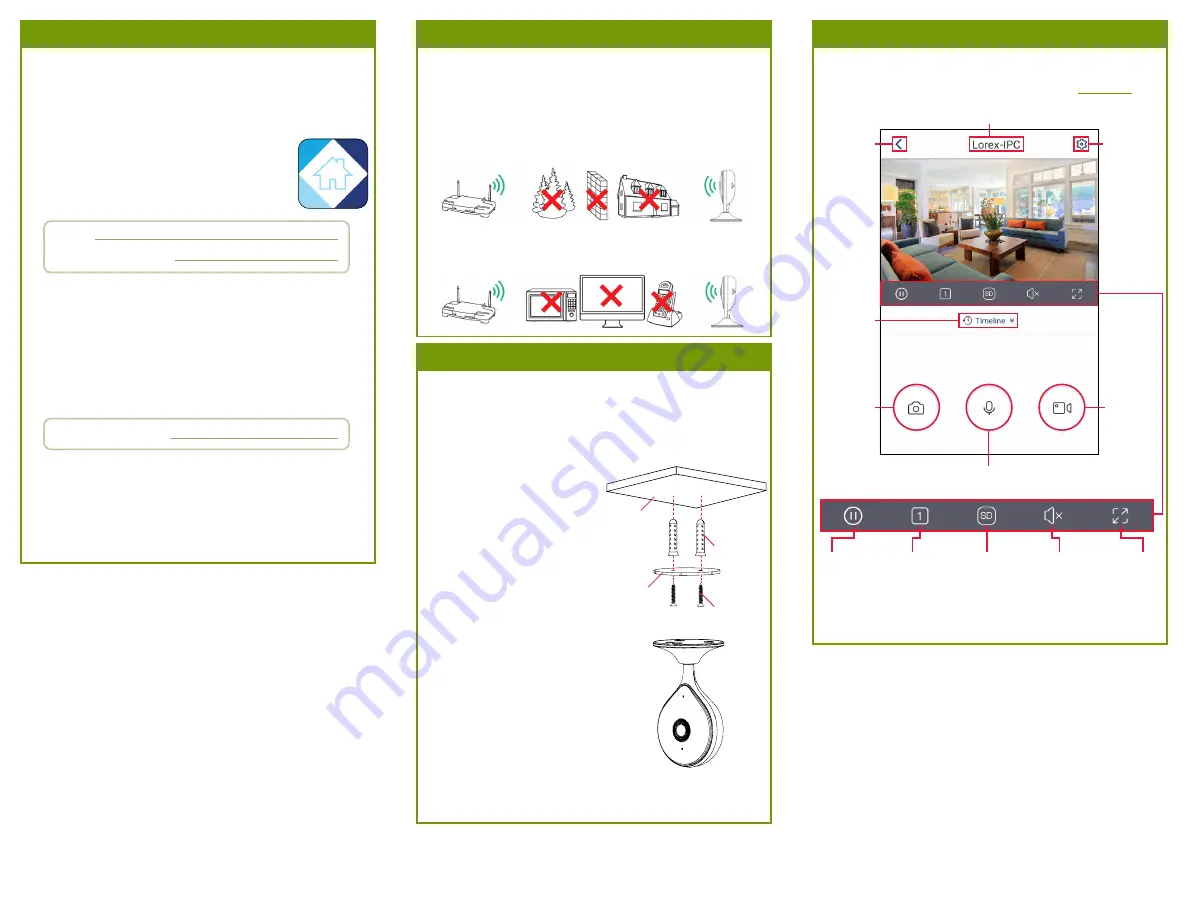
Back to
previous
screen
Device
settings
Device name
Pause / Play
Fullscreen
Viewing
modes
Mute /
Unmute
Streaming
quality*
Play back
recorded
video
Snapshot
Manual
recording
2-way audio: tap to speak, tap again to disable
STEP 2B:
Wall/Ceiling Mounting
(Optional)
The camera is ready at this point to be placed on any surface and begin
monitoring if you would like to keep the placement of your camera flexible.
You also have the option to mount the camera to an indoor wall or ceiling
using the included mounting accessories. Use the included double-sided
tape to mount the camera with no drilling required, or follow the steps
below for permanent mounting.
To mount the camera:
1. Mark the camera’s mounting
position using the included
mounting template.
2. Drill holes where marked on
the mounting template.
NOTE:
Insert the optional
plastic mounting anchors if
needed.
Plastic
anchors
Mounting
surface
Mounting
screws
Magnetic
mounting plate
4.
Once the status LED on the camera is flashing green and the startup
chime sounds, tap
+
.
5. Scan the QR code on the back of the camera using your mobile device’s
camera.
NOTE:
If your mobile device cannot scan the QR code, tap
Manually
enter Device ID
.
6. Create a secure password for the camera. Record your camera
password below:
Email:
Account Password:
Overview of Lorex Home App
Overview of the live viewing screen and controls in the Lorex
Home app. For complete instructions on using the app, see the
Lorex Home app manual on your product page at
lorex.com
.
Camera Password:
7. Select your Wi-Fi network from the list, then enter the password to
connect your camera to the Internet.
8. Once the status LED on the camera is solid green, tap
Next
to add the
camera to your Lorex Home account.
9.
Set a name for the camera and configure date & time preferences,
then tap
Complete
to finish the setup.
• Place the camera as close to your Wi-Fi router or access point as
possible.
• Reduce the number of obstructive materials between the camera and
the router or access point. Concrete, brick, metal and wood are the most
common materials in your house that can cause poor signal strength.
To ensure the best possible wireless performance, it is recommended to
keep the following installation tips in mind when choosing a location for
the camera:
• Other electronic devices such as microwaves, TVs, cordless phones,
and baby monitors can cause signal interference. It is recommended to
install the camera as far away from these devices as possible.
STEP 2A:
Installation Tips
* Change the streaming quality to
SD
(Standard Definition) to conserve
bandwidth while watching live video. This will not impact the quality of
recorded video.
the Device Settings screen of the Lorex Home app to flip the camera
image (see ‘Overview of Lorex Home App’ for details).
3. Position the holes in the
magnetic mounting plate over the
mounting points.
4. Attach the magnetic mounting plate to
the mounting surface using the included
mounting screws.
5. Place the camera base on the magnetic
mounting plate to secure it to the mounting
surface. Adjust the camera’s position as
needed.
NOTE:
If you are installing the camera on a
ceiling, use the
Image Rotation
feature on


