3.
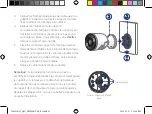
Remove the 4 pre-inserted plugs from the ceiling/
table mounting bracket.
4.
Attach the camera to the ceiling/table mounting
bracket using the threaded insert at the rear of the
camera. Rotate the camera clockwise until attached,
then use the wrench to tighten the adjustable nut in
place.
5.
Place the bracket over the drilled holes. Using a
screwdriver and the provided screws, secure the
bracket to the surface.
6.
Rotate the adjustable ring counter-clockwise to
loosen and adjust the camera to the desired position,
then tighten to secure.
Optional:
•
Feed the camera cable through the hole at the base
of the bracket or
the mounting surface.
•
Open the camera’s settings in the app and enable
Image Rotation
to flip the camera image.
W482CAD_QSG_TRILINGUAL_R1.indd 15
W482CAD_QSG_TRILINGUAL_R1.indd 15
2021-05-27 2:51:05 PM
2021-05-27 2:51:05 PM

