background image

Contenu de l’emballage

Dimensions

Caméra avec montage mural

• 

Hauteur : 78 mm (3,1 po)

• 

Largeur : 78 mm (3,1 po)

• 

Longueur : 128 mm (5,0 po)

Caméra avec montage au plafond

• 

Hauteur : 107 mm (4,2 po)

• 

Largeur : 78 mm (3,1 po)

• 

Longueur : 132 mm (5,2 po)

Ancrages (x8) 

Vis (x8)

Adaptateur 

d’alimentation 

(x1)

Câble d’extension 

résistant aux intempéries 

de 3 m (9,8 pi) (x1)

Support de 

fixation au mur 

(x1)

Support de montage 

au plafond/table (x1)

Attache-câbles 

(x4)

Caméra Wi-Fi


2K (x1)

Clé (x1)

Gabarit de 

montage (x1)

Plaque de montage 

(x1)

Remarque :

 Le contenu correspond à une (1) caméra 

Carte mémoire  

pré-insérée (x1)

1

W482CAD_QSG_TRILINGUAL_R1.indd   21

W482CAD_QSG_TRILINGUAL_R1.indd   21

2021-05-27   2:51:08 PM

2021-05-27   2:51:08 PM

Summary of Contents for W482CAD Series

Page 1: ...2K Wi Fi Camera Quick Start Guide W482CAD Series lorex com En W482CAD_QSG_TRILINGUAL_R1 indd 1 W482CAD_QSG_TRILINGUAL_R1 indd 1 2021 05 27 2 50 35 PM 2021 05 27 2 50 35 PM ...

Page 2: ...How to get started with your 2K Wi Fi Camera Thank you for your purchase W482CAD_QSG_TRILINGUAL_R1 indd 2 W482CAD_QSG_TRILINGUAL_R1 indd 2 2021 05 27 2 50 35 PM 2021 05 27 2 50 35 PM ...

Page 3: ...ing Some channels on the 5GHz Wi Fi band are restricted in Canada This means certain Wi Fi networks may not be available to connect to during setup Audio recording without consent is illegal in certain jurisdictions Lorex Corporation assumes no liability for use of its products that does not conform with local laws Safety precautions Read this guide carefully and keep it for future reference Follo...

Page 4: ...view Status Indicator Camera Setup App Live View 1 2 3 4 5 Camera Placement 6 Wall Mounting Ceiling Mounting 8 9 Optimize Motion Detection 7 W482CAD_QSG_TRILINGUAL_R1 indd 4 W482CAD_QSG_TRILINGUAL_R1 indd 4 2021 05 27 2 50 35 PM 2021 05 27 2 50 35 PM ...

Page 5: ... x8 Power Adapter x1 9 8 ft 3m Weatherproof Extension Cable x1 Wall Mounting Bracket x1 Ceiling Table Mounting Bracket x1 Cable Clips x4 2K Wi Fi Camera x1 Wrench x1 Mounting Template x1 Mounting Plate x1 Note The following contents is based on 1 camera Pre inserted Memory Card x1 1 W482CAD_QSG_TRILINGUAL_R1 indd 5 W482CAD_QSG_TRILINGUAL_R1 indd 5 2021 05 27 2 50 43 PM 2021 05 27 2 50 43 PM ...

Page 6: ...8m USB power cord 5 Threaded insert for mounting 6 Speaker 7 MicroSD slot card included 8 Pairing reset button 9 QR code FRONT SIDE BOTTOM 1 2 7 8 6 5 4 3 9 2 W482CAD_QSG_TRILINGUAL_R1 indd 6 W482CAD_QSG_TRILINGUAL_R1 indd 6 2021 05 27 2 50 46 PM 2021 05 27 2 50 46 PM ...

Page 7: ... flashing Ready to connect to network solid Factory reset flashing Disconnected from network alternating Firmware update in progress 3 W482CAD_QSG_TRILINGUAL_R1 indd 7 W482CAD_QSG_TRILINGUAL_R1 indd 7 2021 05 27 2 50 46 PM 2021 05 27 2 50 46 PM ...

Page 8: ...extension cable to the camera s cable 2 Download the Lorex Home app by scanning the QR code 3 Open the Lorex Home app and sign in or create an account 4 Tap in the app then follow the in app instructions to complete the device setup Ensure you update to the latest app and camera firmware version 4 W482CAD_QSG_TRILINGUAL_R1 indd 8 W482CAD_QSG_TRILINGUAL_R1 indd 8 2021 05 27 2 50 49 PM 2021 05 27 2 ...

Page 9: ... settings Pause play Fullscreen view Video quality SD HD Viewing modes Play back recorded videos Audio on off 5 W482CAD_QSG_TRILINGUAL_R1 indd 9 W482CAD_QSG_TRILINGUAL_R1 indd 9 2021 05 27 2 50 49 PM 2021 05 27 2 50 49 PM ...

Page 10: ... common materials in your house that can cause poor signal strength Other electronic devices such as microwaves TVs cordless phones and baby monitors can cause signal interference It is recommended to install the camera as far away from these devices as possible Camera Placement 6 W482CAD_QSG_TRILINGUAL_R1 indd 10 W482CAD_QSG_TRILINGUAL_R1 indd 10 2021 05 27 2 50 50 PM 2021 05 27 2 50 50 PM ...

Page 11: ...ht vision will also impact the accuracy and distance of detection Optimal accuracy for objects within 5ft to 50ft 1 5 15m Distance Angle the camera around 30 60 down from the level position Angle Install the camera between 8 16ft 2 5 5m off of the ground Height Levelled to the ground 8 16 ft 5 50 ft 7 W482CAD_QSG_TRILINGUAL_R1 indd 11 W482CAD_QSG_TRILINGUAL_R1 indd 11 2021 05 27 2 50 52 PM 2021 05...

Page 12: ... bit drill 2 holes over the triangle symbols on the template Optional Drill 15 64 6mm holes for the anchors To wall mount the camera Screws Anchors Optional Mounting surface Mounting template Mounting plate Adjustable nut Camera Wall mounting bracket 8 W482CAD_QSG_TRILINGUAL_R1 indd 12 W482CAD_QSG_TRILINGUAL_R1 indd 12 2021 05 27 2 50 57 PM 2021 05 27 2 50 57 PM ...

Page 13: ...nsert at the rear of the camera Rotate the camera clockwise until attached then tighten into place with the adjustable nut 6 Adjust the camera to the desired angle Note If the camera is not holding in place or difficult to adjust unplug the camera and slide the bracket up to detach from the mounting plate Tighten or loosen the 3 screws at the back of the mounting bracket to adjust accordingly Repe...

Page 14: ...emplate onto the desired location Note Ensure an outlet is nearby and keep in mind the cable lengths 2 Using a 15 64 6mm drill bit drill 4 holes over the X symbols on the template Optional Drill 15 64 6mm holes for the anchors To ceiling mount the camera 9 W482CAD_QSG_TRILINGUAL_R1 indd 14 W482CAD_QSG_TRILINGUAL_R1 indd 14 2021 05 27 2 51 03 PM 2021 05 27 2 51 03 PM ...

Page 15: ...drilled holes Using a screwdriver and the provided screws secure the bracket to the surface 6 Rotate the adjustable ring counter clockwise to loosen and adjust the camera to the desired position then tighten to secure Optional Feed the camera cable through the hole at the base of the bracket or the mounting surface Open the camera s settings in the app and enable Image Rotation to flip the camera ...

Page 16: ...pment should be installed and operated with minimum distance 20cm between the radiator your body Copyright 2021 Lorex Corporation As our products are subject to continuous improvement Lorex reserves the right to modify product design specifications and prices without notice and without incurring any obligation E OE All rights reserved Need help Visit help lorex com for up to date information and r...

Page 17: ... indd 16 W482CAD_QSG_TRILINGUAL_R1 indd 16 2021 05 27 2 51 05 PM 2021 05 27 2 51 05 PM The user manual for local area network devices shall contain instructions related to the restrictions mentioned in the above sections namely that i the maximum antenna gain permitted for devices in the bands 5250 5350 MHz and 5470 5725 MHz shall comply with the e i r p limit and ii the maximum antenna gain permi...

Page 18: ...Caméra Wi Fi 2K Guide de démarrage rapide Série W482CAD lorex com Fr W482CAD_QSG_TRILINGUAL_R1 indd 17 W482CAD_QSG_TRILINGUAL_R1 indd 17 2021 05 27 2 51 06 PM 2021 05 27 2 51 06 PM ...

Page 19: ...Comment faire les premiers pas avec votre caméra Wi Fi 2K Merci pour votre achat W482CAD_QSG_TRILINGUAL_R1 indd 18 W482CAD_QSG_TRILINGUAL_R1 indd 18 2021 05 27 2 51 06 PM 2021 05 27 2 51 06 PM ...

Page 20: ...u Canada Cela signifie que certains réseaux Wi Fi peuvent ne pas être disponibles pour la connexion pendant l installation L enregistrement audio sans consentement est illégal sur certains territoires Lorex Corporation décline toute responsabilité concernant l usage de produits non conformes aux lois locales Mesures de sécurité Lisez attentivement ce guide et gardez le pour consultation ultérieure...

Page 21: ...la caméra Visionnement de l application en direct 1 2 3 4 5 Placement de la caméra 6 Montage au mur Installation de la caméra au plafond 8 9 Optimisation de la détection de mouvement 7 W482CAD_QSG_TRILINGUAL_R1 indd 20 W482CAD_QSG_TRILINGUAL_R1 indd 20 2021 05 27 2 51 06 PM 2021 05 27 2 51 06 PM ...

Page 22: ... x8 Adaptateur d alimentation x1 Câble d extension résistant aux intempéries de 3 m 9 8 pi x1 Support de fixation au mur x1 Support de montage au plafond table x1 Attache câbles x4 Caméra Wi Fi 2K x1 Clé x1 Gabarit de montage x1 Plaque de montage x1 Remarque Le contenu correspond à une 1 caméra Carte mémoire pré insérée x1 1 W482CAD_QSG_TRILINGUAL_R1 indd 21 W482CAD_QSG_TRILINGUAL_R1 indd 21 2021 ...

Page 23: ... 2 pi 5 Encart fileté pour le montage 6 Haut parleur 7 Fente de carte micro SD carte incluse 8 Bouton de jumelage de réinitialisation 9 Code QR AVANT CÔTÉ PARTIE INFÉRIEURE 1 2 7 8 6 5 4 3 9 2 W482CAD_QSG_TRILINGUAL_R1 indd 22 W482CAD_QSG_TRILINGUAL_R1 indd 22 2021 05 27 2 51 09 PM 2021 05 27 2 51 09 PM ...

Page 24: ...r la connexion au réseau permanent Réinitialisation des réglages d usine clignotement Déconnecté du réseau alternance Mise à niveau du micrologiciel en cours 3 W482CAD_QSG_TRILINGUAL_R1 indd 23 W482CAD_QSG_TRILINGUAL_R1 indd 23 2021 05 27 2 51 09 PM 2021 05 27 2 51 09 PM ...

Page 25: ...e de la caméra 2 Téléchargez l application Lorex Home en balayant le code QR 3 Ouvrez l application Lorex Home et connectez vous ou créez un compte 4 Appuyez sur dans l application puis suivez les instructions qui y sont intégrées pour terminer la configuration de l appareil Assurez vous d avoir la dernière version de l application et du micrologiciel de la caméra 4 W482CAD_QSG_TRILINGUAL_R1 indd ...

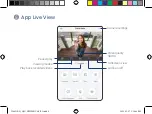
Page 26: ...éra Pause et lecture Affichage en mode plein écran Qualité de la vidéo SD HD Modes d affichage Lecture de vidéos enregistrées Audio activé désactivé 5 W482CAD_QSG_TRILINGUAL_R1 indd 25 W482CAD_QSG_TRILINGUAL_R1 indd 25 2021 05 27 2 51 11 PM 2021 05 27 2 51 11 PM ...

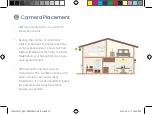
Page 27: ...ns qui affectent la qualité du signal dans une maison D autres appareils électroniques comme les fours à micro ondes les téléviseurs les téléphones sans fil et les interphones de surveillance pour bébé peuvent perturber le signal Il est conseillé d installer la caméra aussi loin que possible de ces appareils Placement de la caméra 6 W482CAD_QSG_TRILINGUAL_R1 indd 26 W482CAD_QSG_TRILINGUAL_R1 indd ...

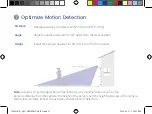
Page 28: ... nocturne influence également la précision et la distance de la détection Précision optimale pour les objets à une distance de 1 5 à 15 m 5 à 50 pieds Distance Orientez la caméra de 30 à 60 vers le bas par rapport à la position de niveau Angle Installez la caméra entre 2 5 à 5 m 8 et 16 pi du sol Hauteur Levelled to the ground 8 16 ft 5 50 ft 7 W482CAD_QSG_TRILINGUAL_R1 indd 27 W482CAD_QSG_TRILING...

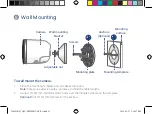
Page 29: ...de 6 mm 15 64 po percez 2 trous au dessus du symbole du triangle sur le gabarit Optionnel Percez des trous de 6 mm 15 64 po pour les ancrages Installation de la caméra au mur Vis Ancrages facultatifs Surface de montage Gabarit de montage Plaque de montage Écrou de réglage Caméra Support de montage mural 8 W482CAD_QSG_TRILINGUAL_R1 indd 28 W482CAD_QSG_TRILINGUAL_R1 indd 28 2021 05 27 2 51 13 PM 202...

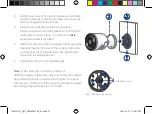
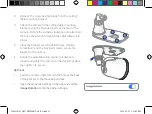
Page 30: ... caméra dans le sens des aiguilles d une montre jusqu à ce qu elle soit fixée puis serrez en place en utilisant l écrou réglable 6 Réglez la caméra dans l angle souhaité Remarque Si la caméra ne tient pas en place ou est difficile à régler débranchez la caméra et faites glisser le support vers le haut pour la détacher de la plaque de montage Serrez ou desserrez les trois vis à l arrière du support...

Page 31: ...é Remarque Assurez vous qu une prise de courant se trouve à proximité et tenez compte de la lon gueur des câbles 2 À l aide d une mèche de forage de 6 mm 15 64 po percez quatre trous au dessus des symboles X sur le gabarit Optionnel Percez des trous de 6 mm 15 64 po pour les ancrages Pour installer la caméra au plafond 9 W482CAD_QSG_TRILINGUAL_R1 indd 30 W482CAD_QSG_TRILINGUAL_R1 indd 30 2021 05 2...

Page 32: ...rcés À l aide d un tournevis et des vis fournies fixez le support à la surface 6 Tournez la bague de réglage dans le sens des aiguilles d une montre pour relâcher et ajuster la caméra à la position souhaitée puis serrez pour la sécuriser Optionnel Faites passer le câble de la caméra à travers le trou à la base du support ou la surface de montage Ouvrez les paramètres de la caméra dans l applicatio...

Page 33: ... du produit ses caractéristiques et son prix sans préavis et sans aucune obligation E OE Tous droits réservés Besoin d aide Consultez la page help lorex com pour obtenir des informations et des ressources à jour Téléchargez les guides de produits Regardez des vidéos pratiques Trouvez des conseils en matière de dépannage et des FAQ connexes W482CAD_QSG_TRILINGUAL_R1 Enregistrez votre produit Veuill...

Page 34: ...Cámara 2K con Wi Fi Guía de inicio rápido Serie W482CAD lorex com Es W482CAD_QSG_TRILINGUAL_R1 indd 33 W482CAD_QSG_TRILINGUAL_R1 indd 33 2021 05 27 2 51 15 PM 2021 05 27 2 51 15 PM ...

Page 35: ...Cómo comenzar a usar su cámara 2K con Wi Fi Gracias por su compra W482CAD_QSG_TRILINGUAL_R1 indd 34 W482CAD_QSG_TRILINGUAL_R1 indd 34 2021 05 27 2 51 15 PM 2021 05 27 2 51 15 PM ...

Page 36: ...mara está funcionando Algunos canales de la banda wifi de 5 GHz están restringidos en Canadá Esto significa que es posible que ciertas redes wifi no estén disponibles para conectarse durante la configuración La grabación de audio sin consentimiento previo es ilegal en ciertas jurisdicciones Lorex Corporation no asume responsabilidad alguna por el uso de sus productos de modos que no cumplan con la...

Page 37: ...do Configuración de la cámara Visualización en vivo en la aplicación 1 2 3 4 5 Colocación de la cámara 6 Soporte de pared Montaje en techo 8 9 Optimiza la detección de movimiento 7 W482CAD_QSG_TRILINGUAL_R1 indd 36 W482CAD_QSG_TRILINGUAL_R1 indd 36 2021 05 27 2 51 15 PM 2021 05 27 2 51 15 PM ...

Page 38: ...e corriente x1 Cable de extensión resistente a la intemperie de 9 8 ft 3 m x1 Soporte de montaje de pared x1 Soporte de montaje de tech mesa x1 Sujetadores de cable x4 Cámara 2K con wifi x1 Llave inglesa x1 Plantilla de montaje x1 Placa de montaje x1 Nota El siguiente contenido se basa en una cámara Tarjeta de memoria preinsertada x1 1 W482CAD_QSG_TRILINGUAL_R1 indd 37 W482CAD_QSG_TRILINGUAL_R1 in...

Page 39: ...B de 9 2 ft 2 8 m 5 Inserto roscado para montaje 6 Altavoz 7 Ranura microSD tarjeta incluida 8 Botón de emparejamiento reinicio 9 Código QR PARTE FRONTAL LATERAL INFERIOR 1 2 7 8 6 5 4 3 9 2 W482CAD_QSG_TRILINGUAL_R1 indd 38 W482CAD_QSG_TRILINGUAL_R1 indd 38 2021 05 27 2 51 15 PM 2021 05 27 2 51 15 PM ...

Page 40: ...Listo para conectarse a la red encendido fijo Restablecimiento de fábrica parpadeante Desconectado de la red alternante Actualización de firmware en curso 3 W482CAD_QSG_TRILINGUAL_R1 indd 39 W482CAD_QSG_TRILINGUAL_R1 indd 39 2021 05 27 2 51 16 PM 2021 05 27 2 51 16 PM ...

Page 41: ...e a la intemperie al cable de la cámara 2 Descargue la aplicación Lorex Home escaneando el código QR 3 Abra la aplicación Lorex Home e inicie sesión o cree una cuenta 4 Pulse en la aplicación luego siga las instrucciones en la aplicación para completar la configuración Asegúrese de actualizar a la última versión de firmware de la aplicación y de la cámara 4 W482CAD_QSG_TRILINGUAL_R1 indd 40 W482CA...

Page 42: ...Pausar reproducir Visualización de pantalla completa Calidad del video SD HD Modos de visualización Reproducción de videos grabados Audio encendido apagado 5 W482CAD_QSG_TRILINGUAL_R1 indd 41 W482CAD_QSG_TRILINGUAL_R1 indd 41 2021 05 27 2 51 16 PM 2021 05 27 2 51 16 PM ...

Page 43: ...unes en su casa que pueden causar una baja intensidad de la señal Otros dispositivos electrónicos como los microondas televisores teléfonos inalámbricos y monitores para bebés pueden causar interferencia de la señal Se recomienda instalar la cámara lo más lejos posible de estos dispositivos Colocación de la cámara 6 W482CAD_QSG_TRILINGUAL_R1 indd 42 W482CAD_QSG_TRILINGUAL_R1 indd 42 2021 05 27 2 5...

Page 44: ...ién afectará la precisión y la distancia de detección Precisión óptima para objetos dentro de una distancia de entre 5 y 50 ft 1 5 a 15 m Distancia Incline la cámara entre 30 y 60 hacia abajo desde la posición de nivel Ángulo Instale la cámara a una distancia de entre 8 y 16 ft 2 5 a 5 m del suelo Altura Levelled to the ground 8 16 ft 5 50 ft 7 W482CAD_QSG_TRILINGUAL_R1 indd 43 W482CAD_QSG_TRILING...

Page 45: ...orificios sobre los símbolos triangulares de la plantilla Opcional Taladre orificios de 15 64 in 6 mm para los anclajes Para montar la cámara sobre la pared Tornillos Anclajes opcional Superficie de montaje Plantilla de montaje Placa de montaje Tuerca ajustable Cámara Soporte de montaje de pared 8 W482CAD_QSG_TRILINGUAL_R1 indd 44 W482CAD_QSG_TRILINGUAL_R1 indd 44 2021 05 27 2 51 16 PM 2021 05 27 ...

Page 46: ...posterior de la cámara Gire la cámara en sentido horario hasta que quede acoplada luego ajuste en su lugar con la tuerca ajustable 6 Ajuste la cámara al ángulo que desee Nota Si la cámara no se sostiene en su lugar o es difícil de ajustar desconecte la cámara y deslice el soporte hacia arriba para separarlo de la placa de montaje Ajuste o afloje los tres tornillos en la parte posterior del soporte...

Page 47: ...ación deseada Nota Asegúrese de que haya una toma cerca y tenga en cuenta las longitudes de los cables 2 Con una broca de 15 64 in 6 mm taladre cuatro orificios sobre los símbolos X en la plantilla Opcional Taladre orificios de 15 64 in 6 mm para los anclajes Para montar la cámara en el techo 9 W482CAD_QSG_TRILINGUAL_R1 indd 46 W482CAD_QSG_TRILINGUAL_R1 indd 46 2021 05 27 2 51 17 PM 2021 05 27 2 5...

Page 48: ...orados Usando un destornillador y los tornillos provistos asegure la placa de montaje a la superficie 6 Gire el anillo ajustable en sentido antihorario para aflojar y ajustar la cámara a la posición deseada luego ajuste para asegurar Opcional Alimente el cable de la cámara a través del orificio en la base del soporte o de la superficie de montaje Abra la configuración de la cámara en la aplicación...

Page 49: ...o las especificaciones y los precios de los productos sin previo aviso y sin contraer ninguna obligación Excepto errores y omisiones Todos los derechos reservados Necesita ayuda Visite help lorex com para obtener información y recursos actualizados Descargue las guías de los productos Vea videos instructivos Encuentre sugerencias para la resolución de problemas y preguntas frecuentes relacionadas ...

Reviews: