5
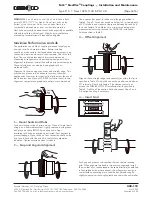
— Pack With Grease And Assemble Covers
Pack the spaces between and around the grid with as much
lubricant as possible and wipe off excess flush with top of grid.
Position seals on hubs to line up with grooves in cover.
Position gaskets on flange of lower cover half and assemble
covers so that the match marks are on the same side (see
above). If shafts are not level (horizontal) or coupling is to be
used vertically, assemble cover halves with the lug and match
mark UP or on the high side. Push gaskets in until they stop
against the seals and secure cover halves with fasteners,
tighten to torque specified in Table 2. Make sure gaskets stay
in position during tightening of fasteners
.
CAUTION:
Make
certain lube plugs are installed before operating.
ANNUAL MAINTENANCE
For extreme or unusual operating conditions, check coupling
more frequently.
1. Check alignment per steps on Page 3. If the maximum op-
erating misalignment limits are exceeded, realign the cou-
pling to the recommended installation limits. See Table 2
for installation and operating alignment limits.
2. Check tightening torques of all fasteners.
3. Inspect seal ring and gasket to determine if replacement is
required. If leaking grease, replace.
4. When connected equipment is serviced, disassemble the
coupling and inspect for wear. Replace worn parts. Clean
grease from coupling and repack with new grease. Install
coupling using new gasket as instructed in this manual.
Periodic Lubrication
The required frequency of lubrication is directly related to the type
of lubricant chosen, and the operating conditions. Steelflex
couplings lubricated with common industrial lubricants, such as
those shown in Table 1, should be relubed annually. The use of
Falk Long Term Grease (LTG) will allow relube intervals to be
extended to beyond five years. When relubing, remove both lube
plugs and insert lube fitting. Fill with recommended lubricant until
an excess appears at the opposite hole.
CAUTION:
Make
certain all plugs have been inserted after lubricating.
Coupling Disassembly And Grid Removal
Whenever it is necessary to disconnect the coupling, remove
the cover halves and grid. A round rod or screwdriver that will
conveniently fit into the open loop ends of the grid is required.
Begin at the open end of the grid section and insert the rod or
screwdriver into the loop ends. Use the teeth adjacent to each
loop as a fulcrum and pry the grid out radially in even,
gradual stages, proceeding alternately from side to side.
Rexnord Industries, LLC, Coupling Group
428-110
5555 S. Moorland Rd., New Berlin, WI 53151-7953 USA Telephone : 262-796-4060
May 2004
Fax: 262-796-4064 e-mail: info@rexnord.com web: www.rexnord.com
Supersedes 2-03
Installation and Maintenance
•
Falk™ Steelflex
®
Couplings
(Page 4 of 6)
Type T10
•
Sizes 1020–1140 & 20–140
VERTICAL COUPLINGS
MATCH MARK
LUG UP
MATCH MARK
MATCH MARK
Summary of Contents for CD-1261
Page 1: ... 0 1 2121 3 4 1 5 6 ...
Page 2: ... ...
Page 3: ... ...
Page 4: ... ...
Page 5: ... ...
Page 6: ... 0 1 2 3 4 5 6 5 6 7 1 1 5 6 5 6 5 6 1 0 0 ...
Page 7: ... ...
Page 8: ... 0 1 2 0 3 0 ...
Page 9: ... ...
Page 10: ... 0 12 2 0 3 4 5 5 5 0 0 ...
Page 11: ... 6 12 0 0 7 5 5 0 8 0 8 5 0 50 9 4 12 0 0 9 4 0 9 64 0 5 0 0 1 0 0 ...
Page 12: ... 0 2 0 0 3 0 6 6 6 6 6 0 0 0 5 5 0 6 0 ...
Page 14: ... ...
Page 15: ... 0 0 1 1 2 1 1 3 0 4 5 1 0 1 0 0 2 1 2 1 0 0 0 2 1 1 1 1 1 0 0 0 1 0 0 0 1 0 1 6 1 1 ...
Page 17: ... 1 0 3 0 0 1 1 1 71 0 0 1 1 1 0 1 1 ...
Page 18: ... ...
Page 25: ... 8 ...
Page 28: ... 1 7 4 0 4 1 4 1 1 4 1 1 1 4 85 4 4 1 4 1 4 0 6 4 1 1 1 01 0 1 4 6 4 1 1 4 L 1 ...
Page 29: ... 4 ...
Page 30: ... 0 1 2 3 24 3 5 6 4 5 6 4 5 5 1 5 4 74 8 5 9 1 4 27 3 5 4 74 8 5 5 29 13 27 3 1 29 13 5 1 ...
Page 31: ... 8 8 80 1 2 3 5 6 4 5 6 4 5 5 1 5 A 9 1 B 4 27 3 888 7 8 0 B 4 C D 5 29 13 B 27 3 888 7 29 13 ...
Page 32: ... 4 24 3 5 6 4 5 6 4 5 5 4 7 M 7 4 7 N 2 0 7 2 M 0 N M ...
Page 35: ... 8 G 8 0 G 4 88 8E 1 2 3 5 6 4 5 6 4 5 5 1 4 1 4 27 3 1 088 7 5 4 1 5 29 13 H 27 3 088 7 ...
Page 36: ... E 5 ...
Page 37: ... 9 4 5 H 0 1 2034 2034 2034 2034 0 5 1 6 71 6 1 2 1 1 1 0 1 81 1 9 9 ...
Page 38: ... 1 5 1 5 1 3 05 3 1 0 1 1 6 A 6 1 A 6 B 1 6 B 6 1 1 1 6 6 6 2 9 0 6 ...
Page 39: ... 0 ...
Page 40: ... 0 0 ...
Page 42: ......
Page 43: ... 0122 3 4 5 6 4 4 4 4 5 4 4 4 4 4 7 7 4 4 6 4 4 5 5 4 5 8 8 3 5 3 5 3 5 3 5 5 ...
Page 44: ... 0 0 0 0 0 0 0 0 0 0 1 1 2 3 0 3 3 0 0 33 0 3 0 3 3 0 ...
Page 46: ... 011 2 3 3 4 3 2 5 5 6 ...
Page 47: ... 011 2 3 4 5 3 6 3 7 7 2 4 ...
Page 48: ... 00 1 2 3 4 3 5 5 5 5 5 3 1 1 2 2 6 1 1 1 5 5 7 5 5 5 5 ...
Page 49: ... 0122 3 4 5 6 7 4 8 4 4 8 4 4 8 5 5 5 5 5 5 5 5 5 5 5 5 ...
Page 50: ... 0 11 2 2 2 2 2 3 4 5 0 5 3 6 7 6 6 8 9 8 9 6 6 8 9 0 1 1 1 1 1 8 9 1 1 1 5 ...
Page 51: ... 011 2 3 4 5 4 2 2 2 6 2 6 6 3 3 3 3 3 3 3 ...
Page 53: ... 011 2 3 4 5 4 2 6 33 2 33 6 6 6 ...
Page 54: ... 011 2 3 3 3 3 4 5 4 33 2 33 6 3 3 3 ...
Page 56: ... 0122 3 4 5 6 7 8 4 4 5 8 4 4 8 9 9 9 8 4 4 4 88 8 8 8 ...
Page 57: ... 0 1 1 1 2 1 3 1 1 1 0 1 1 1 4 1 1 ...
Page 58: ... ...
Page 59: ... ...
Page 96: ...Bearing Maintenance Guide x Lubrication x Troubleshooting ...
Page 97: ......
Page 98: ......
Page 99: ......
Page 100: ......
Page 101: ......
Page 102: ......
Page 103: ......
Page 104: ......
Page 105: ......
Page 106: ......
Page 107: ......
Page 108: ......
Page 109: ......
Page 110: ......
Page 111: ......
Page 112: ......
Page 113: ......
Page 114: ......
Page 115: ......
Page 116: ......
Page 117: ......
Page 118: ......
Page 119: ......
Page 120: ......
Page 121: ......
Page 122: ......
Page 123: ......
Page 124: ......
Page 125: ......
Page 126: ......
Page 165: ... 0 0 1 2 3 4 5 6 52 3 52 3 7 8 4 6 52 4 6 1 9 9 9 9 9 ...
Page 166: ... 0 5 9 9 2 2 4 6 4 6 4 6 7 8 7 8 2 4 6 4 7 8 7 8 2 4 6 4 6 52 A ...
Page 167: ... 0 0 1 2 1 2 3 4 2 1 2 3 4 ...
Page 168: ... 0 2 1 2 3 3 4 2 1 2 3 4 2 ...
Page 194: ......
Page 195: ......
Page 196: ......
Page 218: ......
Page 219: ......
Page 234: ...15 Notes Model 121 Regulators Brochure ...
Page 236: ......


