S E T- U P A N D O P E R A T I O N
R 1 7 2 2 1 4 C H A N N E L R E M O T E C O N T R O L
F O R U S E W I T H R 1 7 1 0 M O T O R
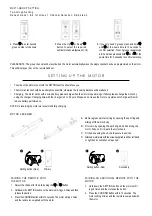
PLEASE NOTE: The group channel will be recorded on the motor automatically when the single channel has been programmed on the motor
This will display as (AL) on the remote handset.
4. Press to enter second
group number of channels.
6. If you only need 2 groups press and hold
and at the same time for 3 seconds to
confirm selection. To set 3 groups repeat steps
4 & 5 and then press and hold and at the
same time for 3 seconds to confirm selection.
5. Press the Up or Down
button to select the required
number of channels (between 1-14)
MULTI-GROUP SETTING
Two-Group Setting
Repeat steps 1 & 2 for Group 1 Channel Selection. Skip step 3.
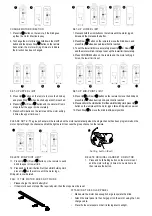
A. Remove grease protector ring by opening the split ring and
sliding off the motor body
B. Fit crown by opening the split ring and slide along the
motor body until it meets the motor head.
C. Fit the drive using the cir-clip to secure in position.
D. Attached motor plate with the screws supplied in either left hand
or right hand orientation as required.
• The side of the motor mount with the SETTING button should face you.
• The motor antenna should be as straight as possible; otherwise the receiving distance will be reduced.
• Charging - The motor works with a Li-ion battery, please charge when the motor stops working or falters please charge the motor by
using the charger. Charging time with the charger is 5 to 6 hours. Please do not leave the motor on permanent charge as this will
reduce battery performance.
NOTE: On receiving the motor we recommend fully charging.
MOTOR ASSEMBLY
PAIRING AN ADDITIONAL REMOTE WITH THE
MOTOR
1. Hold down the SETTING button on the motor until it
jogs 2 times and then release the button.
2. Press the CONFIRM button within 10 seconds. The
motor will jog 2 times and the remote is now paired with
the motor.
PAIRING THE REMOTE WITH
THE MOTOR
1. Select the channel for the blind using the or button.
2. Hold down the SETTING button on the motor until it jogs 2 times and then
release the button.
3. Press the CONFIRM button within 10 seconds. The motor will jog 2 times
and the remote is now paired with the motor.
Setting button (Red)
Setting button (Red)
Primary
Secondary
1
1
2
2
S E T T I N G U P T H E M O T O R
Summary of Contents for R1722
Page 4: ...Oct 2017 ...


