background image

49

ABSCHNITT 4:  ANWENDUNGSBEISPIEL

Montage - und Wartungsanleitung

!

!
!

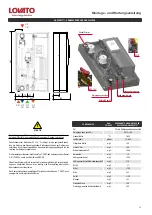
VORPRÜFUNGEN

Vor jeder Arbeit ist die Verpackung sorgfältig zu entfernen und der Gerätezustand zu überprüfen. Bei Feststellung von Fehlern oder Schäden nicht instal

-

lieren oder versuchen zu reparieren. Die Verpackung gesetzlich und vorschriftsgemäß entsorgen.

Das Produkt wird vom Hersteller auf Dichtheit geprüft und geliefert. Transport sowie ein langes Lager-Aufbewahren kann zu einer Undichtheit führen. Aus 

diesem Grund übernimmt der Hersteller keine Verantwortung bei eventuellem Flüssigkeitsauslauf oder damit verbundenen Problemen. Es wird deswegen 

dazu empfohlen, während das Einfüllen die Anlage, den Kreislauf auf Dichtheit zu prüfen


Bei allen Arbeiten muss das Gerät ausgeschaltet und der Netzstecker ausgezogen sein.

Die Installation muss in Übereinstimmung mit den Gesetzen und Regelungen des jeweiligen Landes ausgeführt werden

Die Verantwortung des Herstellers beschränkt sich auf die Lieferung des Gerätes. Ihre Anlage muss fachgerecht nach den in diesen Anweisungen enthal

-

tenen Vorschriften und nach den Regeln des Metiers, von qualifiziertem Personal realisiert werden; das Personal handelt nach den Vorschriften seines 

Unternehmen, die dafür geeignet sind, die gesamte Verantwortung für die Anlage in ihrer Gesamtheit zu tragen. 

!

!
!
!

MONTAGE UND INBETRIEBNAHME

Vor der Montage unbedingt folgendes einhalten.

Das Modul ist für die Wasserverteilung i geeignet. Eine andere Benutzung ist unsachgemäß. Die Installation soll gemäß des jetzigen Standes der Technik 

ausgeführt werden. 


Ihre Anlage muss fachgerecht nach den in diesen Anweisungen enthaltenen Vorschriften und nach den Regeln des Metiers, von qualifiziertem Personal 

realisiert werden; das Personal handelt nach den Vorschriften seines Unternehmen, die dafür geeignet sind, die gesamte Verantwortung für die Anlage 

in ihrer Gesamtheit zu tragen.

Lagerungsort soll trocken und frostbeständig. Das Modul gegen Wasserspritze bewahrt werden; die Raumtemperatur während des Betriebs darf nicht 

40°C überschreiten.

Die Anlageverrohrungen gemäß Angaben unter Abschnitt 3 verbinden.


Mit Aufmerksamkeit behandeln

!

!
!

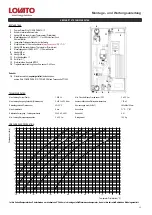
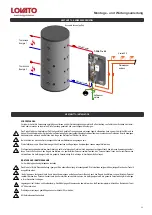
ABSCHNITT 5: INSTALLATION

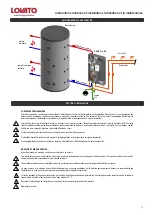
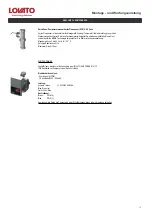
Thermische 

Energie 2

Thermische 

Energie 1

Kaltwasser 

einlass

Rücklauf 

Primär

Vorlauf Primär

Uscita ACS

Warmwasser 

auslass

Accumulo tecnico (puffer)

T-FAST ie 40

Summary of Contents for 49060463

Page 1: ...one Assembling instructions and maintenance Montage und Wartungsanleitung Instructions relatives l installation l utilisation et la maintenance T FAST ie40 Modulo di produzione ACS DHW production modu...

Page 2: ...LICAZIONE SEZIONE 5 INSTALLAZIONE SEZIONE 6 MESSA IN FUNZIONE installazione e messa in funzione kit ricircolo collegamento elettrico kit ricircolo SEZIONE 7 COLLEGAMENTO ELETTRICO SEZIONE 8 TABELLA PA...

Page 3: ...suo impianto va realizzato in modo conforme alla regola dell arte secondo le prescrizioni delle presenti istruzioni e le regole della professione da personale qualificato che agisce a norma di impres...

Page 4: ...lu circuito primario Valvola a sfera DN20 M F 1 con calotta Maniglia rossa Maniglia blu Rubinetto di carico scarico da Valvola di sfiato aria automatico G 1 4 Regolatore elettronico mod MFWC Misurator...

Page 5: ...i carico scarico 5 Valvola sfiato aria 6 Kit ricircolo 7 Vortex flow sensor 8 Valvola a sfera DN20 con termometro 9 Valvola di sicurezza 10 Valvola a sfera DN20 2 10 1 4 7 3 4 5 6 8 8 9 10 4 Installaz...

Page 6: ...rollare e serrare ulteriormente tutti i raccordi a vite Altrettanto importante fare una prova di tenuta prova a pressione durante la messa in servizio Attenzione il superamento dei valori della tabell...

Page 7: ...io Il suo impianto va reallizzato in modo conforme alla regola dell arte da personale qualificato che agisce per aziende che si assumono l intera responsabilit dell impianto realizzato MONTAGGIO E MES...

Page 8: ...site asole nella parte posteriore del modulo Successivamente la sciar scivolare verso il basso fino al completo inseriento delle viti nelle asole 3 Successivamente stringere le viti della staffa metal...

Page 9: ...uito primario e sfiatare l aria presente attraverso la valvola sfiato C 2 Riempire il circuito secondario sanitario utilizzando gli appositi rubinetti di carico scarico 1 e 2 3 Controllare la tenuta i...

Page 10: ...alla centralina seguendo lo schema elettrico raffigurato nel paragrafo succes sivo Impostare i parametri di funzionamento del kit vedi capitolo regolazione elettronica Aprire i rubinetti rif 1 e rif...

Page 11: ...PT1000 accumulo S4 optional PT1000 primario S3 PT1000 acqua fredda S2 PT1000 ricircolo S1 optional VFS verde Linea principale fase L pompa primario Linea principale neutro N pompa primario Pericolo La...

Page 12: ...off 5 4 Antibloccaggio quotidiano settimanale off off 6 FUNZIONI SPECIALI 6 1 Pompa V1 Pompa primario 6 1 1 Tipo pompa 0 10V PWM PWM 1 6 1 2 Pompa solare heating profilo 1 11 manuale HEATING 6 1 3 Se...

Page 13: ...unzione parallelo V2 selezionare ON menu 6 6 5 2 impostare 15 s menu 6 6 5 3 impostare 15 s Entrare nel menu 6 8 Segnale V2 selezionare ON nel menu 6 8 1 1 Nel menu 6 8 1 2 scegliere la modalit di fun...

Page 14: ...isuratore di portata temperatura VORTEX FLOWSENSOR VFS 2 40 l min CIRCOLATORE CIRCUITO PRIMARIO High efficiency circulator of the secondary circuit Wilo YONOS PARA RS 15 1 7 Le curve caratteristiche d...

Page 15: ...15 Installazione uso e manutenzione...

Page 16: ...CTION 5 INSTALLATION SECTION 6 MODULE START UP recirculation kit installation and start up recirculation kit electrical connection SECTION 7 ELECTRICAL CONNECTION SECTION 8 DIGITAL CONTROLLER INITIAL...

Page 17: ...responsibility is limited to providing the equipment Its installation should be made in conformity with the rules of art according to the requirements of these instructions and the rules of their prof...

Page 18: ...lack handle with blue thermometer primary circuit Ball valve DN20 M F 1 with nut Red handle Blue handle Load drain tap Robocal air vent G 1 4 MFWC digital controller Vortex flow sensor 2 40 l min Comp...

Page 19: ...drain tap 5 Manual air vent 6 Recirculation kit 7 Vortex flow sensor 8 DN20 ball valve with thermometer 9 Safety valve 10 DN20 ball valve 2 10 1 4 7 3 4 5 6 8 8 9 10 4 Assembling instrunctions and ma...

Page 20: ...e test during the operation Exceeding above listed limits may cause damages to module and impair warranty terms consequently IMPORTANT SECTION 3 DIMENSION AND CONNECTION Recirculation inlet DCW inlet...

Page 21: ...must be done in compliance with the local regulations The responsibility of the manufacturer shall be limited to the products The installation must be carried out by qualified personnel ASSEMBLING AND...

Page 22: ...rews as indicated in the picture 4 ATTENTION HANDLE IT WITH CARE t FAST IE 40 back detail 2 Fix No 3 plugs on the wall picture 2 respecting the distance as shown in rif 2a Install the module on the th...

Page 23: ...B 2 C 1 1 Open the ball valves A e B Fill the primary circuit and venting the air through the air vent C 2 Fill the secondary circuit hygenic water through the load unload caps 1 e 2 3 Check the hydra...

Page 24: ...owing the wiring diagram in the next section In order to set the parameters see the chapter Electronic regulation Impostare i parametri di funzionamento del kit vedi capitolo regolazione elettronica O...

Page 25: ...puffer S4 optional PT1000 primary circuit S3 PT1000 DCW S2 PT1000 Recirculation S1 optional VFS green phase line L pompa primario Neutral line N pompa primario Protective ground GND Danger main side...

Page 26: ...2 Limescale protection on off off 5 3 Self adapting set point on off off 5 4 Anti lock daily weekly off off 6 SPECIAL FUNCTION 6 1 Pompa V1 6 1 1 Pump type 0 10V PWM PWM 1 6 1 2 Pump solar heating pro...

Page 27: ...ft side of the screen Enter to menu 6 6 Relay 2 then menu 6 6 5 parallel function V2 select ON menu 6 6 5 2 then set 15 s menu 6 6 5 3 then set 15 s Enter to menu 6 8 Signal V2 select ON in the menu 6...

Page 28: ...re flow rate gauge VORTEX FLOWSENSOR VFS 2 40 l min PRIMARY circuit circulator High efficiency circulator of the secondary circuit Wilo YONOS PARA RS 15 1 7 Check the characteristic curves of the circ...

Page 29: ...29 Assembling instrunctions and maintenance...

Page 30: ...SERVICE Installation et mise en service kit de recirculation Branchement lectrique kit de recirculation avec r gulateur lectronique MFWC SECTION 7 BRANCHEMENT LECTRIQUE MFWC SECTION 8 Tableau des para...

Page 31: ...producteur est limit e la fourniture de l appareillage Son installation doit tre r alis e en conformit avec les r gles de l art selon les prescriptions des instructions pr sentes et les r gles du m t...

Page 32: ...Vanne bille DN20 M F 1 avec ecrou Poig ee rouge Poig ee bleu Robinet de remplissage vidange da Vanne de purge de l air manuelle G 1 4 R gulateur lectronique MFWC Mesureur de d bit et de la temp rature...

Page 33: ...eur 4 Robinet de remplissage et de vidange 5 Vanne d vent de l air 6 Kit de recirculation 7 Vortex flow sensor 8 Vanne bille DN20 avec thermom tre 9 Vanne de s curit 10 Vanne bille DN20 2 10 1 4 7 3 4...

Page 34: ...ipement m me Installer une vanne de non retour et un vase d expansion l entr e de l eau froide EFS Dans le cas de pr sence d eau d une duret sup rieure 25 30 Fr nous recom mandons un traitement opport...

Page 35: ...ation doit tre effectu e par du personnel qualifi MONTAGE ET MISE EN SERVICE Avant de proc der au montage veuillez vous conformer ce qui suit Le module est con u pour la distribution d eau technique d...

Page 36: ...isser vers le bas jusqu la compl te mise en place des vis dans les boutonni res 3 Puis serrer les vis du support sur le devant du module en utilisant les trous pr vus cet effet comme indiqu sur la fig...

Page 37: ...ns le circuit travers les vannes de purge C 2 Remplir le circuit secondaire sanitaire en utilisant les robinets appropri s d alimentation de vidange 3 V rifier l tanch it du module 4 Alimenter en nerg...

Page 38: ...ur Wilo YONOS PARA 15 7 PWM2 4 Doigt de gant pour sonde de recirculation S2 Clapet anti retour INSTALLATION ET MISE EN SERVICE KIT De Recirculation DANGER APPAREIL SOUS TENSION 1 2 3 Q l h P m H 2 O A...

Page 39: ...T1000 eau potable froide S2 PT1000 recirculation S1 optional VFS vert Conducteur Ph Principale L pompe primaire Conducteur Ph Neutre N pompa primaire Danger C t secteur 230 VCA Tensions r seau 230VAC...

Page 40: ...arge marche arr t arr t 5 4 Protection antiblocage journalier hebdomandaire arr t arr t 6 Fonc sp cifiques 6 1 Param tres pompe V1 Pompe primaire 6 1 1 Type de pompe 0 10V PWM PWM 1 6 1 2 Pompe solar...

Page 41: ...ion parall le V2 s lectionner ON menu 6 6 5 2 puis r gler 15 s menu 6 6 5 3 puis r gler 15 s Entrer dans le menu 6 8 Signal V2 s lectionner ON dans le menu 6 8 1 1 Menu 6 8 1 2 s lectionner le mode de...

Page 42: ...00 C Temps de r ponse imm diate 1 s Pression maximale 16 bar Indicateur de temp rature d bit VORTEX FLOWSENSOR VFS 2 40 l min CIRCULATEUR DE CIRCUIT PRIMAIRE Circulateur haute efficace sur le circuit...

Page 43: ...43 Instructions relatives l installation l utilisation et la maintenance...

Page 44: ...LATION ABSCHNITT 6 INBETRIEBNAHME installazione e messa in funzione kit ricircolo collegamento elettrico kit ricircolo ABSCHNITT 7 ELEKTRISCHE VERBINDUNG ABSCHNITT 8 MFWC ELEKTRONISCHE EINSTELLUNG ABS...

Page 45: ...en Anweisungen dieser Anleitung und den Vorschriften Ihres Berufes durch qualifiziertes Personal sowie durch fachkundigUnternehmen welche die volle Verantwortung f r die gesamten Anlage bernehmen Die...

Page 46: ...lauer Thermometer Prim rkreis Messingkugelventil DN20 M F 1 berwurfmutter Handgriff Rot Handgriff Blau Ein Auslasshahn Entl fter G 1 4 Elektronischen Kontrolle MFWC Traglastmessvorrichtung Vortex flow...

Page 47: ...Valvola sfiato aria 6 Zirkulationseinheit 7 Vortex flow sensor 8 Messingkugelventil DN20 mit Thermometer 9 Valvola di sicurezza 10 Messingkugelventil DN20 2 10 1 4 7 3 4 5 6 8 8 9 10 4 Montage und War...

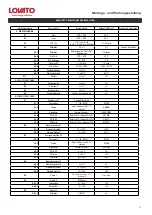
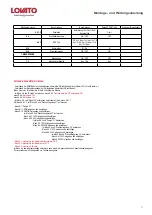
Page 48: ...me durchzuf hren Das berschreiten dieser spezifischen Werte kann zu Sch den an T_FAST ie und unweigerlich zum Garantieverfall f hren Wichtig KOMPONENTEN MAS SEINHEIT GRENZWERTE W RMETAUSCHER KUPFER SC...

Page 49: ...en Vorschriften und nach den Regeln des Metiers von qualifiziertem Personal realisiert werden das Personal handelt nach den Vorschriften seines Unternehmen die daf r geeignet sind die gesamte Verantwo...

Page 50: ...ls der entsprechenden Schlitzen an der R ckseite aufh ngen Dann das Modul nach unten verschieben bis die Schrauben in den Schlitzen komplett verschraubt sind 3 Dann die Schrauben am Hinterteil in den...

Page 51: ...chen A e B Prim rklreislauf einf llen und Luft auslassen 2 Sekund rkreislauf einf llen indem die entsprechenden Ein Auslassh hne verwendet 1 e 2 3 Hydraulische Dichtigkeit des Moduls kontrollieren 4 M...

Page 52: ...en siehe Bild rechts und an die Steuereinheit befestigen gem Schaltplan im n ch sten Abschnitt Die die Betriebsparameter des Zirkulationssets einstellen wie im Kapitel Steuerelektro nik beschrieben H...

Page 53: ...er S2 PT1000 prim r PT1000 Zirkulation optionale Signal Zirkulationpumpe PWM2 Signal Prim rpumpe PWM2 Netz Au enleiter pompa primario Netz Au enleiter pompa primario Gefahr Netzseite 230 VAC Netzspann...

Page 54: ...lich wochentlich off off 6 Sonderfunktionen 6 1 Pumpentyp V1 Pumpe Prim rkreis 6 1 1 Pumpentyp 0 10V PWM PWM 1 6 1 2 Pumpe solar heizen profil 1 11 manuell HEIZEN 6 1 3 Signalform Normal invertiert in...

Page 55: ...und Signal V2 aufmachen selezionare ON nel menu 6 8 1 1 Nel men 6 8 1 2 Im Men 6 2 und Drehzahlregelung V1 aufmachen Men 6 1 Pumpe V1 Men 6 1 1 PWM eingeben und best tigen Men 6 1 2 HEATING eingeben...

Page 56: ...fortige Reaktionszeit 1 s Maximaler Druck 16 bar Durchfluss Temperaturmesser Vortex Flowsensor VFS 2 40 l min PUMPEN PRIM R High efficiency circulator of the secondary circuit Wilo YONOS PARA RS 15 1...

Page 57: ...57 Montage und Wartungsanleitung...

Page 58: ...tions www lovatospa com LOVATO S p A Via Selva 4 a 37040 Gazzolo d Arcole VERONA ITALY 22003740 Rev 3 10 2017 39 045 618 2012 fax 39 045 618 2017 mail info lovatospa com www lovatospa com web lovatosp...

Reviews: