40
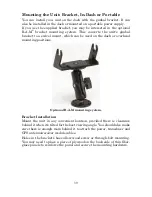
Install the gimbal bracket. Orient the bracket so the arms slope to-
ward the front of your unit.
Drill a 1-inch (25.4 mm) hole in the dash for the power, transducer and
antenna cables. The best location for this hole is immediately under the
gimbal bracket location. This way, the bracket can be installed so that
it covers the hole, holds the cables in position and results in a neat in-
stallation. Some customers, however, prefer to mount the bracket to the
side of the cable hole — it's a matter of personal preference.
Front view (left) and side view (right) showing dimensions of the LMS-
520c and LMS-525cDF sonar/GPS units mounted on gimbal bracket.
Millimeter
[Inch]
23.4
[0.92]
72.9
[2.87]
137.9
[5.43]
56.9
[2.24]
Front
157.9
[6.22]
173.9
[6.85]
Summary of Contents for LMS-520C
Page 10: ...viii Notes ...
Page 22: ...12 Notes ...
Page 56: ...46 Notes ...
Page 114: ...104 Notes ...
Page 202: ...192 Notes ...
Page 216: ...206 Notes ...
Page 246: ...236 Notes ...

