background image

18  | LP Morgan Installation Instructions

LP Morgan Flipper Manual

The multiflip bracket is an accessory that allow you to install the Flipper into  
an angled ceiling or even a wall. 
You do not need to use the multilfip if installing into a horizontal ceiling or tabletop.

Mulitiflip

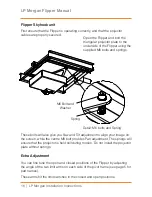
Position of Adjuster Arm determines 
stopping angle of Flipper

Remove one of the limit arms (the one that sets the open position and attach 
it to the multiflip bracket as shown, using the supplied M6 x 10 Bolt.

Attach the mutliflip bracket to the Flipper as shown, using another of the  
M6 x 10 Bolts.

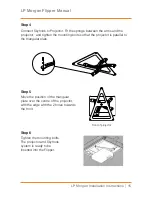
Step 1

Step 2

Summary of Contents for Flipper

Page 1: ...LP Morgan Flipper User Manual www lpmorgan com au...

Page 2: ...n in this document is subject to change without notice Herma Technologies All rights reserved This document is protected against unauthorised copying electronic or otherwise Trademarks used in this te...

Page 3: ...ou many years of trouble free service from your new Flipper On Safety Check that the operating voltage of your unit is identical with the voltage of your local power supply If voltage adaptation is re...

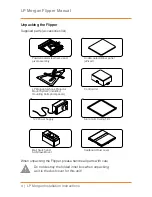
Page 4: ...r panel affixed Aluminium Ceiling Trim Powdercoated steel frame and pivot assembly Wall Switch and Architrave Mount Cardboard Dust cover LP Morgan Skyhook Projector Mount System including mounting bol...

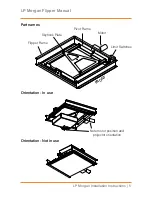
Page 5: ...allation Instructions 5 LP Morgan Flipper Manual Part names Flipper Frame Skyhook Plate Pivot Frame Motor Limit Switches FRONT Orientation In use Orientation Not in use Note motor position and project...

Page 6: ...6 LP Morgan Installation Instructions LP Morgan Flipper Manual Dimensions D E C F G Back View Closed Position Top View Closed Position A B C Front...

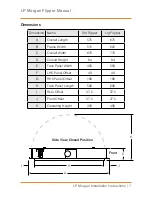
Page 7: ...s Dimension Name Std Flipper Lrg Flipper A Overall Length 575 675 B Frame Width 515 625 C Overall Width 670 770 D Closed Height 84 84 E Face Panel Width 450 550 F LHS Panel Offset 40 40 G RHS Panel Of...

Page 8: ...e screen and the distance from the screen depends on the projector s throw distance Work out the maximum and minimum throw distances for the projector and place the Flipper somewhere in between It is...

Page 9: ...to match The Ceiling trim we supply will leave a 2mm clearance on all sides of this face panel If you choose not to use this ceiling trim you should be aware that you will need to allow more clearanc...

Page 10: ...s been designed to be compatible with just about any installation situation You should be able to adapt the Flipper to suit your specific installation requirements The Flipper frame is designed to sit...

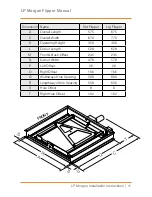
Page 11: ...th 575 675 C Overall Width 670 770 K Operating Height 350 400 L Cutout Length 528 628 M Front Back Offset 23 5 23 5 N Cutout Width 478 578 P Left Offset 26 26 O Right Offset 166 166 Q Widthways Hole S...

Page 12: ...circuiting is 12V however Herma will not accept responsibility for damage incurred by faulty or incorrect wiring The motor limit switches and power supply are supplied pre wired into the control box I...

Page 13: ...s our Installer s Kit LPM43INSKIT Use a small flat screwdriver to prise open the motor and mains terminals Wiring Diagram 12V Positive 12V Negative Motor Blue Motor Brown AUX JACK EYE JACK Switch Comm...

Page 14: ...nting bolts suit your projector and set others aside They are no longer required If your projector has only 3 mounting holes remove one of the adjustable arms Undo the M8 Nyloc nut remove an arm and r...

Page 15: ...dge with the 2 holes towards the front Tighten the mounting bolts The projector and Skyhook system is ready to be inserted into the Flipper Front of projector Connect Skyhook to Projector Fit the spri...

Page 16: ...ings First ensure that the Flipper is operating correctly and that the projector cables are properly secured Open the Flipper and bolt the triangular projector plate to the underside of the Flipper us...

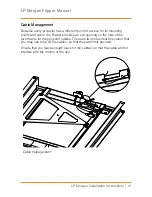
Page 17: ...g points and cable the Flipper provides an exit opening on the side of the pivot frame for the projector cables There are two holes near this cutout that you may use to tie off the cables so that they...

Page 18: ...to use the multilfip if installing into a horizontal ceiling or tabletop Mulitiflip Position of Adjuster Arm determines stopping angle of Flipper Remove one of the limit arms the one that sets the op...

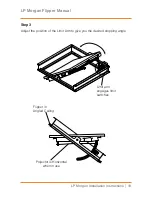
Page 19: ...n Instructions 19 LP Morgan Flipper Manual Limit arm engages limit switches Flipper in Angled Ceiling Projector is Horizontal when in use Adjust the position of the Limit Arm to give you the desired s...

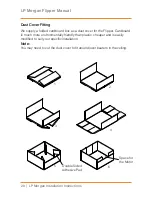
Page 20: ...oard box as a dust cover for the Flipper Cardboard is much more environmentally friendly than plastic cheaper and is easily modified to suit your specific installation Note You may need to cut the dus...

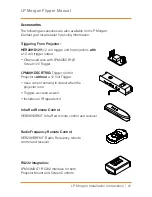
Page 21: ...nit for Projectors without a 12 Volt Trigger Uses current sensing to detect when the projector is on Triggers a screen as well Includes an IR repeater kit Radio Frequency Remote Control HER20HDRFKIT R...

Page 22: ...If you have integrated the Flipper into a control system eg Projector triggering IR repeating Crestron AMX etc then the problem is most likely with the control system Check that the right signal is ge...

Page 23: ...Technologies Herma will not be responsible for any consequential damages during or following installation procedures Herma is not responsible for any freight costs relating to repair or replacement E...

Page 24: ...ic 3072 Phone 61 3 9480 6233 Fax 61 3 9480 6533 Email info herma com au www lpmorgan com au For more information on our range of products please visit www lpmorgan com au or contact your local LP Morg...

Reviews: