background image

 installation instructions  |  

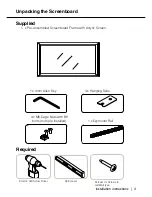
Unpacking the Screenboard

1 x 4mm Allen Key

4 x Hanging Tabs

Required

Supplied

At least 3 x Screws to 
suit Wall type.

Spirit Level

Electric drill Screw Driver

4 x M6 Cage Nuts with BH 

bolts (nuts pre installed)

1 x Ezymount Rail

1  x Pre-Assembled Screenboard Frame with Acrylic Screen.

Summary of Contents for Screenboard

Page 1: ...LP Morgan user manual www lpmorgan com au Galleria Tuff Screenboard...

Page 2: ...t Herma the Herma Logo Galleria LP Morgan and LP Morgan logo are registered trademarks of Herma Technologies Other trademarks and trade names may be used in this document to refer to either the entiti...

Page 3: ...x 4mm Allen Key 4 x Hanging Tabs Required Supplied At least 3 x Screws to suit Wall type Spirit Level Electric drill Screw Driver 4 x M6 Cage Nuts with BH bolts nuts pre installed 1 x Ezymount Rail 1...

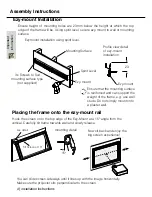
Page 4: ...supplied Ezy mount Spirit Level Mounting Surface Ensure that the mounting surface is reinforced and can support the weight of the frame e g use wall studs Do not simply mount onto a plaster wall Placi...

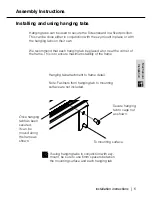
Page 5: ...end that each hanging tab be placed at or near the corner of the frame This is to ensure maximum stability of the frame To mounting surface Hanging tab attachment to frame detail Note Fastners from ha...

Page 6: ...tant note Never use scourers or abrasives to clean your screen To avoid damage to your projection and whiteboard surface do not use cleaning agents that Are abrasive You can damage the A R coatings Co...

Page 7: ...sponsible for any consequential damages during or following installation procedures The user is responsible for any freight costs relating to repair or replacement Equipment must be returned to Herma...

Page 8: ...provide information on your product If we can be of any further help please contact us Factory 4a 6 Albert Street Preston Vic 3072 Phone 61 3 9480 6233 Fax 61 3 9480 6533 Email info herma com au Web w...

Reviews: