background image

LRP GRAVIT GPS VISION


2.4GHZ F.H.S.S.

ninger kan eventuelt ødelegge produktet. Dette produktet eller andre elektroniske komponenter 

må aldri komme i berøring med vann, olje, drivstoffer eller andre elektrisk ledende væsker, da 

disse kan inneholde mineraler som korroderer de elektroniske kretsene. Ved kontakt med disse 

stoffene må driften stoppes omgående og produktet må tørkes grundig. Ta alltid batteriet ut av 

produktet eller koble produktet fra strømkilden, hvis produktet ikke er i bruk. Unngå kortslutning, 

overbelasting og å bruke batteriet eller enkelte celler med feil polstilling. Dette kan føre til brann 

eller eksplosjon.  Aldri åpne en akkumulator, et batteri eller enkelte celler.  Batteriet må lades opp 

under oppsikt.  Under oppladning må batteriet befinne seg på et ikke brennbart, varmebestan

-

dig underlag. Dessuten må det ikke befinne seg brennbare eller lett antennelige gjenstander i 

nærheten av batteriet.  Den maksimale ladnings-/utladningsstrømmen som blir anbefalt av må 

ikke overskrides.  Et NiMH/LiPo-batteri må ikke under noen omstendigheter utlades fullstendig!  

Batteriet må ikke komme i berøring med ild, vann eller andre væsker.  Utfør oppladning kun i 

tørre rom.  Bruk for LiPo-batterier kun ladnings-/utladningsapparater som er spesifisert for denne 

batteritypen. Bruk aldri ladnings-/utladningsapparater som er spesifisert for NiCd/NiMH-batterier.  

LiPo batteriets utside må ikke skades. Vær derfor særdeles oppmerksom på at skarpe gjen-

stander som kniver, verktøy, karbonfiberkanter eller lignende ikke skader batteriet.  Pass på at 

batteriet ikke blir skadet ved å la det falle ned, ved å slå på det, bøye det eller lignende.  Skadede 

celler må ikke brukes lenger. Hvis cellene viser tegn på skade, er deformert eller lignende, skal 

de ikke brukes lenger.  Senderen må alltid slås på først, før mottakeren eller hastighetsregula-

toren slås på. Mottakeren kunne motta interferenssignaler, gi full gass, og skade modellen din. 

Når du slå av, må du bruke den omvendte rekkefølgen. Slå først av mottaker og hastighetsregu-

lator, deretter slås senderen av. Ulike batterityper eller nye og brukte batterier må ikke benyttes 

sammen.  Dekk aldri til viften eller produktets kjølekanaler. Sørg for en god luftsirkulasjon rundt 

om produktet.  Koble alle delene til utstyret omsorgsfullt sammen. Hvis forbindelsene løsner seg 

på grunn av vibrasjoner, kan du miste kontrollen over modellen.  Produsenten er ikke ansvarlig 

for skader som oppstår på grunn av at sikkerhetsanvisningene og advarslene ikke følges. Bruk 

kun originale reservedeler.  

niederländisch

Geen speelgoed. Niet geschikt voor kinderen onder 14 jaar. Product buiten het bereik van 

kinderen bewaren. Volg beslist de navolgende instructies op, omdat deze het product kunnen 

vernielen en uw garantie uitsluiten. Het niet naleven van deze instructies kan materiële en per-

soonlijke schade en zwaar persoonlijk letsel veroorzaken! Laat het product nooit zonder toezicht 

zolang het ingeschakeld, in gebruik of met een stroombron is verbonden. In het geval van een 

defect kan dit tot brand aan het apparaat en de omgeving leiden. Vermijd het verkeerd aansluiten 

of het aansluiten aan een elektrische pool. Alle kabels en verbindingen moeten goed zijn geï-

soleerd. Kortsluitingen kunnen het product eventueel verwoesten. Dit product of andere elektro-

nische componenten mogen nooit met water, olie, brandstoffen of andere elektrische geleidende 

vloeistoffen in aanraking komen, omdat deze mineralen kunnen bevatten, die elektronische 

circuits laten korrideren. In geval van contact met deze stoffen moet u onmiddellijk de werk-

zaamheden stoppen en het product zorgvuldig drogen. Haal altijd de accu uit het product c.q. 

onderbreek de stroomtoevoer, als het product niet wordt gebruikt. Vermijd kortsluiting, overlading 

en het aansluiten van de accu of afzonderlijke cellen aan een elektrische pool. Dit kan tot brand 

of explosie leiden.  Open nooit een accu, een batterij of afzonderlijke cellen.  Laad de accu alleen 

onder toezicht.  Tijdens het laden moet de accu zich op een niet brandbare, hittebestendige op-

pervlakte bevinden. Bovendien mogen er zich geen brandbare of licht ontvlambare voorwerpen 

in de buurt van het product bevinden.  Overschrijd nooit de maximale laad-/ontlaadstroom, die 

door wordt aanbevolen.  Een NiMH/LiPo accu mag in geen geval diep worden ontladen.  De 

accu mag niet met vuur, water of andere vloeistoffen in aanraking komen.  Het laadproces alleen 

in droge ruimtes uitvoeren.  Gebruik voor het laden van LiPo-accus alleen laad-/ontlaadinrichtin-

gen, die voor dit type accu worden gespecificeerd. Gebruik in geen geval NiCd/NiMH laad-/

ontlaadinrichtingen.  De buitenhuid van de LiPo accu mag niet worden beschadigd. Let er dus 

beslist op, dat geen scherpe voorwerpen zoals messen, gereedschap, carbonkanten of derge-

lijke de accu kunnen beschadigen.  Let erop, dat de accu niet door vallen, slagen, verbuigen of 

dergelijke wordt beschadigd.  Beschadigde cellen mogen niet meer worden gebruikt. Indien de 

cellen vervormingen, optische beschadigingen of dergelijke vertonen, mogen deze niet meer 

worden gebruikt.  Schakel altijd eerst uw zender in, voordat u de ontvanger of snelheidsregelaar 

inschakelt. De ontvanger zou stoorsignalen op kunnen vangen, volgas geven en uw model be-

schadigen. Bij het uitschakelen houdt u de omgekeerde volgorde aan. Eerst ontvanger en snel-

heidsregelaar uitschakelen en dan de zender uitschakelen. Er mogen geen verschillende types 

batterijen of nieuwe en gebruikte batterijen samen worden gebruikt.  Blokkeer nooit de ventilator 

of de luchtspleten van het product. Zorg voor een goede luchtcirculatie rond om het product.  

Sluit alle onderdelen van de uitrusting zorgvuldig aan. Indien de verbindingen door vibraties 

losraken, kunt u de controle over het model verliezen.  De fabrikant kan niet verantwoordelijk 

worden gesteld voor schade, die ontstaan door het niet-naleven van de veiligheidsinstructies en 

waarschuwingen. Gebruik alleen originele onderdelen.  

litauisch

Tai nėra žaislas. Netinka vaikams iki 14 metų. Laikykite gaminį vaikams nepasiekiamoje vietoje. 

Prašom laikytis toliau pateikiamų nurodymų, priešingu atveju - Jūsų gaminys gali sugesti ir Jūs 

prarasite teisę į garantiją.  Nesilaikant šių nurodymų, galima padaryti materialinės ir asmeninės 

žalios bei rimtų kūno sužeidimų.  Niekada nepalikite gaminio be priežiūros, kol jis yra įjungtas, 

naudojamas arba sujungtas su elektros šaltiniu. Jei būtų defektų, dėl to gaminys gali užsidegti 

pats arba sukelti gaisrą aplink.  Venkite netinkamų sujungimų arba polių sumaišymo. Visi laidai ir 

sujungimai turi būti gerai izoliuoti. Dėl trumpo jungimo gaminys gali sugesti. Ant šio gaminio arba 

kitų elektronikos komponentų negali patekti vandens, tepalo, degalų arba kitų elektrai laidžių 

skysčių, nes juose gali būti mineralų, kurie gali suardyti elektros grandinę. Jei taip atsitiktų, ne

-

delsiant išjunkite prietaisą ir jį kruopščiai išdžiovinkite. Visada išimkite iš gaminio bateriją arba 

išjunkite  jį  iš  elektros  tinklo,  jei  jo  nebenaudojate.  Venkite  baterijos  ar  atskirų  jos  elementų 

trumpų jungimų, perkrovų ir polių sumaišymo. Dėl to gali kilti gaisras ar sprogimas.  Niekada 

neatidarinėkite baterijos ar atskiro jos elemento.  Įkraunamų baterijų nepalikite be priežiūros.  

Įkrovimo metu baterija turi būti ant nedegaus, atsparaus karščiui pakloto. Be to arti baterijos 

neturi būti jokių degių ar greitai užsiliepsnojančių objektų.  Užtikrinkite, kad jokiomis aplinkybėmis 

nebūtų viršijama maksimali rekomenduojama įkrovimo/iškrovimo srovė.  Jokiu būdu negalima 

leisti, kad NiMH/LiPo baterija išsikrautų taip smarkiai, kad pasiektų gilios iškrovos tašką.  Bateri

-

jos negali pasiekti ugnis, ant jos negali patekti vandens ar kitų skysčių.  Įkraukite tik sausose pa

-

talpose.  Naudokite tik gamintojo nurodytus įkroviklius/ iškroviklius, skirtus LiPo baterijoms. Nie

-

kada nenaudokite įkroviklių/iškroviklių, skirtų NiCd/NiMH baterijoms!  LiPo baterijos išorė turi būti 

be jokių pažeidimų. Todėl ypač saugokite, kad jokie aštrūs daiktai, pvz. peiliai, įrankiai, anglinio 

pluošto kraštai, nepažeistų baterijos.  Ypač atkreipkite dėmesį, kad LiPo baterija nebūtų pažeista 

numetus, sutrenkus, suspaudus ar panašiai.  Pažeistų elementų naudoti nebegalima. Jei matosi, 

kad elementas pažeistas, pasikeitė jo forma ar panašiai, jo naudoti nebegalima.  Visada pirmi

-

au įjunkite siųstuvą, prieš įjungdami imtuvą ar greičio reguliatorių. Imtuvas gali sugauti trukdžio 

signalus, įjungti didžiausią pagreitėjimą ir sugadinti Jūsų modelį. Kai išjungiate, būtinai darykite 

tai atvirkštine tvarka. Pirmiausia išjunkite imtuvą ir greičio reguliatorių, tada išjunkite siųstuvą. 

Tuo pačiu metu nenaudokite skirtingų tipų baterijų ir nemaišykite naudotų su naujomis.  Niekada 

neužblokuokite gaminio ventiliatoriaus arba aušinimo plyšių. Užtikrinkite, kad aplink gaminį, kai 

jis naudojamas, gerai cirkuliuotų oras.  Atidžiai ir stropiai sujunkite visas įrangos dalis. Jei dėl 

vibracijos kuri nors dalis atsipalaiduos, galite prarasti savo modelio kontrolę.  Gamintojas negali 

būti laikomas atsakingu už žalą, kuri atsirado, nes buvo neatsižvelgiama į įspėjimus ir nesilaiko

-

ma saugos nurodymų. Naudokite tik originalias atsargines dalis.  

lettisch

Šī nav rotaļlieta. Nav piemērota bērniem, kas jaunāki par 14 gadiem. Sargāt ierīci no maziem 

bērniem. Obligāti ievērojiet tālāk sniegtos norādījumus, jo tie var sabojāt ierīci, un garantijas 

saistības vairs nebūs spēkā. Šo noteikumu neievērošana var radīt materiālos zaudējumus un 

nodarīt kaitējumu cilvēkiem, kā arī kļūt par smagu traumu cēloni !  Nekad neatstājiet ierīci bez 

uzraudzības, kad tā ir ieslēgta, darbojas vai ir pievienota strāvas avotam. Bojājuma gadījumā 

ierīce  vai  tās  apkārtne  var  aizdegties.  Nepieļaujiet  ierīces  nepareizu  pieslēgšanu.  Ievērojiet 

polaritāti. Visiem pieslēguma vadiem jābūt pienācīgi izolētiem. Noteiktu apstākļu ietekmē, rodo

-

ties īssavienojumam, ierīce var tikt sabojāta. Šī ierīce, kā arī citi elektroniskie komponenti nekad 

nedrīkst nonākt saskarē ar ūdeni, eļļām, degvielu vai citiem elektrovadītspējīgiem šķidrumiem, jo 

tie var saturēt minerālvielas, kas var radīt koroziju elektroniskajās komutācijas shēmās. Nonākot 

saskarē ar šīm vielām, nekavējoties jāpārtrauc ierīces ekspluatācija, un ierīce rūpīgi jānožāvē. 

Ikreiz izņemiet no savas ierīces bateriju vai atvienojiet to no strāvas avota, kad tā netiek iz

-

mantota. Nepieļaujiet bateriju vai atsevišķu šūnu īssavienojumus, pārlādēšanu, kā arī apgrieztu 

polaritāti. Tas var kļūt par ugunsgrēka izcelšanās vai eksplozijas iemeslu.  Nekad neatveriet 

akumulatorus, baterijas vai atsevišķas to šūnas.  Kad notiek uzlāde, nekad neatstājiet bateriju 

bez uzraudzības.  Uzlādes laikā baterijai jāatrodas uz nedegoša, karstumizturīga paliktņa. Ba

-

terijas tuvumā nedrīkst atrasties degoši vai viegli uzliesmojoši priekšmeti.  Nekādā gadījumā 

nepārsniedziet firmas ieteikto maksimālo uzlādes vai izlādes strāvu.  Nekādos apstākļos nedrīkst 

pieļaut NiMH/LiPo bateriju pilnīgu izlādēšanos.  Baterija nedrīkst nonākt saskarē ar uguni, ūdeni 

vai citiem šķidrumiem.  Uzlādes procesu drīkst veikt tikai sausās telpās.  LiPo bateriju uzlādei 

izmantojiet tikai tādas uzlādes vai izlādes ierīces, kas paredzētas šī veida baterijām. Nekādā 

gadījumā  neizmantojiet  NiCd/NiMH  bateriju  uzlādes  vai  izlādes  ierīces.    LiPo  bateriju  ārējo 

apvalku nedrīkst sabojāt. Obligāti sekojiet, lai baterija netiktu sabojāta ar asiem priekšmetiem, 

kā, piem., nažiem, instrumentiem, oglekļa šķiedras malām vai tml.  Sekojiet, lai baterija netiktu 

sabojāta nokrītot zemē, trieciena vai deformācijas rezultātā un tml.  Bojātas šūnas vairs nedrīkst 

izmantot.  Ja  šūnām  konstatējama  deformācija,  vizuāli  saskatāmi  bojājumi  vai  tml.,  tās  vairs 

nedrīkst izmantot.  Ikreiz pirms uztvērēja vai ātruma regulatora ieslēgšanas vispirms ieslēdziet 

savu raidītāju. Uztvērējs varētu uztvert traucējumu signālus, uzdot pilnu gāzi un sabojāt jūsu 

modeli. Izslēdzot vienmēr ievērojiet apgrieztu secību. Vispirms izslēdziet uztvērēju un ātruma 

regulatoru, tikai pēc tam izslēdziet raidītāju. Vienlaicīgi nedrīkst izmantot dažādu tipu baterijas vai 

jaunas un lietotas baterijas.  Nekad nenobloķējiet ventilatoru vai ierīces dzesēšanas spraugas. 

Rūpējieties par pietiekamu gaisa cirkulāciju ap ierīci.  Pieslēdziet visas iekārtas detaļas rūpīgi. 

Ja kāda savienojuma vieta vibrācijas rezultātā kļūs vaļīga, jūs varat zaudēt kontroli pār modeli.  

Ražotājs nav atbildīgs par zaudējumiem, kas radušies, neievērojot drošības tehnikas noteiku

-

mus un brīdinājuma norādījumus. Izmantojiet tikai oriģinālās rezerves daļas.  

bulgarisch

Това не е играчка. Не е подходящо за деца под 14 години. Съхранявайте продукта на 

места, недостъпни за малки деца. Спазвайте непременно следните указания, защото в 

противен случай продуктът може да се повреди и гаранцията да отпадне. Неспазването 

на указанията може да доведе до материални и човешки щети и до тежки наранявания!  

Не оставяйте никога продукта без наблюдение, докато той е включен в електрическата 

мрежа, докато работи или е под напрежение. В случай на дефект, това може да доведе 

до възпламеняване на продукта или неговата околност. Избягвайте погрешното свързване 

или  размяната  на  полюсите  на  продукта.  Всички  кабели  и  свръзки  трябва  да  бъдат 

добре изолирани. Късото съединение може в някои случаи да повреди продукта. Този 

продукт или други електрически компоненти не трябва никога да влизат в досег с вода, 

масло,  горива  или  други  електропроводими  течности,  тъй  като  те  могат  да  съдържат 

минерали, които са в състояние да корозират интегралните схеми. При контакт с такива 

вещества незабавно преустановете работа и внимателно подсушете уреда. Изваждайте 

акумулаторните батерии от продукта и го изключвайте от източника на ток винаги когато 

той не се използва. Избягвайте късите съединения, презареждането и разменянето на 

полюси на акумулаторите или на отделните клетки. Това може да доведе до възникване на 

пожар или до експлозия.  Не отваряйте акумулатора, батерия или отделна акумулаторна 

клетка.    Зареждайте  винаги  акумулаторните  батерии  под  наблюдение.    По  време  на 

зареждането  батериите  трябва  да  се  разполагат  върху  огнеупорна  и  топлоустойчива 

подложка. Освен това около мястото на зареждане не трябва да има лесно запалими 

предмети.  При никакви обстоятелства не надвишавайте максимално допустимия ток при 

зареждане и разреждане на батериите, препоръчан от.  При никакви обстоятелства не 

допускайте пълно изтощаване на никел-метал-хидридните батерии / литий-полимерните 

батерии.  Батериите не трябва да влизат в досег с огън, вода или други течности.  Процесът 

на зареждане да се извършва само в сухи помещения.  За зареждане на литий-полимерни 

батерии да се използват само зареждащи/разреждащи уреди, които са предназначени за 

този тип акумулаторни батерии. В никакъв случай не използвайте уреди за зареждане 

на  никел-кадмиеви  или  никел-метал-хидридни  батерии.    Външният  слой  на  литий-

полимерните батерии не трябва да се поврежда. Затова внимавайте остри предмети като 

нож, инструменти, въглеродни влакна или други подобни да не повредят повърхността 

на акумулаторните батерии.  Пазете акумулаторната батерия от падане, удар, огъване 

и подобни.  Не трябва да се използват повредени акумулаторни клетки. Ако се установи 

промяна на формата, видими изменения или подобни отклонения, клетките не трябва да 

бъдат използвани.  Включвайте винаги най-напред Вашия предавател преди да включите 

Вашия приемник или разпределител. Получателят може да улови сигнали със смущения, 

да даде пълна газ и да повреди своя модел. При изключване съблюдавайте обратния ред. 

Изключете първо приемника и разпределителя, а след това и предавателя. Не трябва 

да се използват едновременно батерии от различен тип, а също и да се смесват нови и 

употребявани батерии.  Не блокирайте никога вентилатора или отвора на охладителя на 

продукта. Погрижете се да има добра циркулация на въздух около продукта.  Свържете 

внимателно  всички  части  от  оборудването.  Ако  връзките  се  разхлабят  от  вибрации,  е 

възможно да загубите контрола върху модела.  Производителят не носи отговорност за 

щети, причинени в резултат от неспазването на указанията за безопасна експлоатация и 

предупрежденията. Използвайте само оригинални резервни части.  

dänisch

Ikke legetøj. Ikke egnet for børn under 14 år. Opbevar produktet uden for små børns rækkevidde. 

Overhold ubetinget de følgende henvisninger, da dette kan ødelægge Deres produkt og ude-

lukke garantiydelser. Ved manglende overholdelse af disse henvisninger kan der opstå svære 

skader på ting og personer!  Lad aldrig produktet være uden opsyn, så længe det er tilsluttet, i 

drift eller forbundet til en strømforsyningskilde. I tilfælde af en defekt kunne dette forårsage brand 

på produktet eller dets omgivelse. Undgå forkert tilslutning eller omvendt polaritet af produktet. 

Alle kabler og forbindelser skal være godt isoleret. Kortslutninger kan under visse omstændighe-

der ødelægge produktet. Dette produkt eller andre elektroniske komponenter må aldrig komme i 

WARNING NOTES

WARNING NOTES

46

Summary of Contents for gravit GPS

Page 1: ...USER GUIDE LRP GRAVIT GPS VISION 2 4GHZ F H S S ...

Page 2: ...SION Check you camera mount 14 ONLY FOR GRAVIT GPS VISION PRO Gimbal calibration 14 Mount your propellers 15 ATTENTION Check wireless status of your Gravit s camera 15 COMPASS CALIBRATION 16 TAKE OFF PREPARATIONS 17 TAKE OFF 17 BASIC FLIGHT OPERATION 18 Throttle control 18 Yaw control rudder 18 Pitch control elevator 18 Roll control aileron 18 Keep an eye on your status LED 19 LANDING YOUR GRAVIT ...

Page 3: ...mbal Tweaking 32 THE STANDARD CAMERA MOUNT 32 REPLACING PROPELLERS 33 SOFTWARE 33 Disclaimer 33 AutoPilot 34 Frame 34 System 35 Geo Fencing 35 Voltage alarms 35 EndPoint 36 ModeMap 36 Firmware 37 Transmitter calibration 37 IMU Gyro calibration 38 iSmart DV 38 MANUAL IMU AND TX CALIBRATION 38 TROUBLESHOOTING GUIDE 39 SPARE PARTS 40 REPAIR PROCEDURES LIMITED WARRANTY 42 WARNING NOTES 42 GENERAL NOTE...

Page 4: ...LRP GRAVIT GPS VISION 2 4GHZ F H S S 4 ...

Page 5: ...ring your flight Since your Gravit GPS is a very complex quadrocopter with many functions we strongly advise to read through this manual carefully in order to understand all the functions and to get the maximum fun out of your Gravit GPS INTRODUCTION 1x Gravit GPS quadrocopter 1x 8 channel 2 4GHz transmitter 4x black propellers 4x white propellers spare 1x Full HD WiFi action cam 1x Standard mount...

Page 6: ... Altitude Hold GPS mode Transmitting frequency 2 4GHz Flight controller configuration yes Battery technology LiPo Propeller 9443 self tightening Battery capacitiy 3300mAh PLEASE NOTE The Gravit GPS ships in 2 different kinds of configurations a 220720 Gravit GPS Vision Gravit with action cam b 220721 Gravit GPS Vision Pro Gravit with action cam and 2 axis gimbal Depending on the version you have b...

Page 7: ...his LiPo has a capacity of 4400 mAh which will give you extra 4 6 minutes of flight depending on your Gravit version and flying style The tuning LiPo will give you a flight time of awesome 14 18 minutes The order no of the tuning LiPo is 430060 you can buy it from your LRP retailer Flight speed When you first fly your Gravit you may note that the flight speed seems rather slow This is because the ...

Page 8: ... will show this by a continuous yellow light Try to move your Gravit to a different location If the light continues to shine yellow do a compass calibration according to the manual chapter Compass calibration PLEASE NOTE Also check the connector that goes into the compass module on your Gravit s landing feet If this connec tor is not properly seated into the compass module s socket this will also ...

Page 9: ...USB Port Battery compartment WiFi camera Compass module Status LED THE GRAVIT GPS Propeller Brushless Motor Landing feet Battery compartment Camera mount WiFi camera Position lights 9 ...

Page 10: ...eturn to Home don t work 2 blue blinks signalize BALANCE MODE with full satellite lock 1 green blink signalizes ALTITUDE MODE with full satellite lock AND ALL control sticks CENTERED NO MOVEMENT 2 green blinks signalize GPS MODE with full satellite lock AND ALL control sticks CENTERED NO MOVEMENT 3 green blinks signalize AOC MODE HEADLESS CIRCULAR POI CRUISE with full satellite lock AND ALL contro...

Page 11: ...ng the throttle stick forwards the Gavit evenly increases the rotation speed of its two rear rotors By doing so the two rear rotors generate a stronger ascending force than the two front ones and therefore your Gravit pitches forward and flies in the correspondent direction QUADROCOPTER MOVEMENT Movement around vertical axis Yaw Movement around lateral axis Pitch Movement around longitudinal axis ...

Page 12: ...wly and the TX is emitting a continuous beep sound Step 2 The red power LED of your TX blinks faster the bee ping sound stops again Shortly after the TX switches off You should make sure that you replace the batteries as soon as the first low voltage warning kicks in Don t panic At this point in time you will have plenty of time left to safely land your Gravit in case you should be flying at this ...

Page 13: ...function SWA Pos SWB Pos Active flight mode 0 0 BALANCE Mode 0 1 ALTITUDE Mode 0 2 GPS Mode 1 Any AOC Mode 2 Any RTH Those switch assignments may be changed using the soft ware for details check chapter Software For a detailed description of the different flight modes please see chapter The flight modes Charge your flight battery Before the first operation please charge your flight battery To do s...

Page 14: ...p your gimbal without a camera attached to it Otherwise you may seriously dama ge or even destroy the gimbal Also make sure that your Gravit is standing on an even surface and is not moved while performing the gimbal calibration 4 Connect the flight battery to your Gravit and let it initialize 5 When looking on the gimbal from the left side you will see a small black button on the left side of the...

Page 15: ...tors in place Please check the screws on a regular basis Take special care of the motor screws and make sure that they are always suffi ciently tightened Also make sure to tighten the motor screws in a way that the motor will not grind against the plastic arms surrounding it You can check this by manually spinning the motor with you hand Do NOT overt tighten the screws by using too much force just...

Page 16: ...ocess has been finished during initialization the status LED will continuously blink BLUE GREEN RED PAUSE repeat and the Gravit is blinking either blue or blue red SWA SWB Pos 0 2 Wiggle the right 3 position switch SWB of your transmit ter completely up and down quickly until the Status LED of your Gravit GPS is blinking green rapidly leave SWB in top POS 0 after doing so 3 Grab the Gravit on the ...

Page 17: ... should be familiar with the status LED and its blink codes Both of your transmitter switches should be in Pos 0 top Experienced pilots can handle this differently on their own risk Your throttle control stick left stick should be completely down The WiFi of your camera MUST BE disabled You should be comfortable to fly quadrocopters and in case you are NOT you should have someone at your side who ...

Page 18: ...and 150 m in horizontal distance so keep this in mind when flying However those limits can be changed within the software of your Gravit details see chapter Software Throttle control By moving the left control stick up and downwards you control the thrust of your Gravit The lower the stick the lower the thrust and vice versa Depending on the amount of thrust you are providing with your throttle co...

Page 19: ... moment the low voltage warning is triggered the Gravit behaves differently For BALANCE and ALTITUDE mode the Gravit will CONTINUE to fly until the second low voltage warning kicks in When flying in GPS mode the Gravit will instead initiate a Return to home and fly back to its take off position When the second warning kicks in for BALANCE and ALTITUDE mode the Gravit will either return to home OR ...

Page 20: ...ravit suddenly drifts away in any direction because of a gust of wind for example you won t get hit by the Gravit because it will fly drift OVER your head b In case that there should be a noticeable or even strong wind Approach the Gravit with the wind in your BACK NOT in your face By doing so you can avoid the Gravit is accidentally being pushed TOWARDS you by the wind Instead if you approach it ...

Page 21: ...acquired and a new home point was recor ded the Return to Home maneuver may result in the Gravit flying towards an OLD recorded home point This home point may be far away from your last take off position and the Gravit may seem to fly away from your instead of towards you If at any time your feel uncomfortable with the auto landing or notice some unexpected behaviour of the Gravit cancel the Retur...

Page 22: ...ntation in the sky compared to an airplane for example Your Gravit is equipped with very bright LEDs on the bottom side of each arm The front LEDs have green color the rear LEDs have red color Keep this in mind in case you should loose control over the orien tation of your Gravit When you are too far away or when flying in very bright daylight against the sun you will notice that the LEDs are not ...

Page 23: ...ood for flying fast as the flight control ler will not limit the angle of tilt as restrictively as it is done in GPS mode for example Control of your Gravit is just normal standard all stick inputs work like described in the chapter Basic flight operation PLEASE NOTE This mode may NOT be assigned to any other channel switch position it will ALWAYS be selected by SWA 0 and SWB 0 ALTITUDE mode SWA 0...

Page 24: ...ng that your current height is kept In order to enter GPS position hold you have to let go off the right control stick and bring the throttle stick to center neutral Depending on the wind conditions your Gravit may not always manage to stay on spot 100 but it will try its best to compensate for any unwanted change in position as good as possible Return to Home mode RTH SWA 2 and SWB ANY The Return...

Page 25: ... you have to push the right control stick to the right which equals clockwise to slow down the flight you have to push the stick to the left which equals counter clockwise If you slow down the flight the Gravit will eventually come to a standstill and if you keep on pushing the stick into the same direction the Gravit will start to fly COUNTER CLOCKWISE Moving throttle up and down increases and de...

Page 26: ...r decrease the speed and it can me moved to the left or right to yaw turn into the appropriate direction right control stick left and right replaces the function of left control stick left and right To exit CRUISE mode simply switch to a different flight mode other than AOC MANUAL mode PLEASE NOTE When switching to MANUAL mode the status LED of your Gravit will give out NO signal at all If sticks ...

Page 27: ...ption in the options settings menue see Camera settings as well as for taking a picture and to start and stop recor ding a movie In addition it enables and disables the WiFi of your came ra when it is being pressed and held for 2 seconds see WiFi function 3 UP and DOWN button The UP and DOWN buttons on the side of the camera have function to go up and down when you are in a menu thus changing your...

Page 28: ...Color LCD The color LCD is used for making easy adjustments to the camera and for playing back recorded video or photo Charging the camera Before you can use the camera we advise to charge it fully first To charge the camera simply connect the provided Micro USB cable or any other suitable cable you may have at hand to the camera and the power supply Put the power supply into a power outlet The ca...

Page 29: ...e on off mode button once Camera settings To enter the camera settings press the DOWN button when the camera is on There are two settings screens available One is marked with a camera icon That is the screen you are in by default The other is marked with a gear icon To switch to this screen press the OK button DIRECTLY after you have entered the settings menue by pressing the DOWN button You can s...

Page 30: ... in the second row is the password for the wireless access point that the camera is making up and which you will have to enter when connecting to the camera using your smart phone this is 1234567890 as default LRP does NOT recommend to delete or edit this file unless you know what you are doing The other drive contains the data of the Micro SD card you have put into the camera When you browse the ...

Page 31: ...ate You should NOT over tighten the 2 screws that hold the camera with force as this could damage the camera s housing But the camera should be kept safe in its cage Can the gimbal move freely Check if the gimbal can roll freely before turning on the Gravit Is the gimbal attached tightly to the bottom side of the copter Are all 4 silicone dampers correctly sitting in the mounting plates holes Are ...

Page 32: ...f your gimbal depends on many factors and you will notice that the video footage is not always exactly the same quality wise For example things like environmental influences like tempe rature and wind have a strong impact on the performance of your gimbal and thus on the quality of your video footage In order to get the best out of your gimbal you can experiment with the following settings 1 The 4...

Page 33: ...is app is available for Android and iOS and can be downloaded either from the Google Play Store or from Apple s app store This app must be installed on your smartphone if you want to access your Gravit s action cam via wireless LAN see section iSmart DV in this chapter PLEASE NOTE DISCLAIMER The iSmart DV app and the Flight Tools 2 0 software and its authors are not associated with LRP electronic ...

Page 34: ...o your inputs If the values are set TOO HIGH then the Gravit becomes twitchy and nervous If the values are set TOO LOW the Gravit will become sluggish and and unresponsive LRP recommends leaving the settings at default In case you should wish to experiment with the settings do so carefully and change ONLY ONE value at a time The go out and fly your Gravit to get a feel for the results Don t forget...

Page 35: ...untries or areas the maximum flight height may be restricted Please check with your local authorities for details b When flying the Gravit too far away you may loose it out of sight In this case initiate a Return to home RTH by switching the SWA of your TX to the lowest Pos 2 c In some countries you may NOT allowed to fly the Gravit out of your line of sight So if you fly it too far away you might...

Page 36: ...nd SWB switches as shown in the diagramme below SWA Pos SWB Pos Active selected channel 0 0 CH5 A 0 1 CH5 B 0 2 CH5 C 1 ANY CH6 B 2 ANY CH6 C As you can see you will have the 3 channels 3 switch positions CH5 B CH5 C and CH6 B for free assignment LRP s advise on how to handle flight mode assignments Basically the flight mode assignment should be planned carefully in advance and according to your o...

Page 37: ...se upgrades should become available for your Gravit they will be distributed in other form and will be availa ble from the LRP homepage along with a description of HOW to do the firmware upgrade Again do NOT use the upgrade button in the software Data The Data tab is being used to keep track on the sensors of your flight controller and for calibrating your IMU as well as your transmitter Transmitt...

Page 38: ... detail Depending on the language settings of your smartphone the app will adjust its language to match the smartphone s langu age if possible Although doing IMU and TX calibration via the Flight Tools 2 0 software see chapter Software is the most convenient way to get the job done it could be necessary to do those cali brations manually that is without the software from time to time When you are ...

Page 39: ...e Compass Calibration The Gravit is drifting strongly or is flying into any direction by herself Probably the transmitter is not correctly calibrated Calibrate your transmitter see Soft ware and MANUAL IMU and TX calibration The Gravit is tipping over when I try to take off Probably you are not applying enough throttle Make sure you are in BALANCE Mode and apply throttle very quickly upon take off...

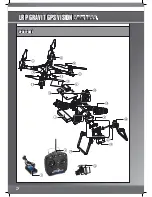
Page 40: ...LRP GRAVIT GPS VISION 2 4GHZ F H S S SPARE PARTS 1 11 11 12 12 14 18 7 8 6 13 16 5 19 21 20 9 10 22 15 4 3 40 ...

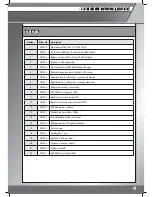
Page 41: ...counter clockwise 8 222847 Propeller black 1x clockwise 1x counter clockwise 9 222848 Cage for Action cam incl mount 10 222849 ESC 20A for motor green LEDs 11 222850 Brushless motor clockwise CW 12 222851 Brushless motor counter clockwise CCW 13 222852 GPS module incl compass 14 222853 Wireless Lan Action Cam 1080p 15 222854 2 axis brushless gimbal incl mount 16 222855 Shielding pad for GPS module...

Page 42: ...er ausschalten dann Sender ausschalten Ungleiche Batterietypen oder neue und gebrauchte Batterien dürfen nicht zusammen verwendet werden Blockieren Sie niemals den Lüfter oder die Kühlschlitze des Produkts Sorgen Sie für gute Luftzirkulation um das Produkt Schließen Sie sämtliche Teile der Ausrüstung sorgfältig an Falls sich die Verbindungen durch Vibrationen lösen können Sie die Kontrolle über da...

Page 43: ... de ventilación o de refrigeración del aparato Asegúrese de que el aparato disponga de una buena circulación de aire Conecte todos los elementos del equipo minuciosamente En caso de que las conexiones se soltaran por causa de las vibraciones es posible que pierda el control sobre el modelo El fabricante no asume la responsabilidad por daños ocasionados por la inobservancia de las medidas de seguri...

Page 44: ...ğlantılar vibrasyondan kay naklanarak çözülürlerse model üzerindeki kontrol kaybedilebilir Üretici emniyet talimatlarının ve uyarıların dikkate alınmamasından kaynaklanan hasarlardan sorumlu tutulamaz Sadece orijinal yedek parça kullanınız tschechisch Toto není hračka Nevhodné pro děti do 14 let Uchovávejte výrobek mimo dosah malých dětí Bezpodmínečně dodržujte následující pokyny aby nemohlo dojít...

Page 45: ...i doar piese de schimb originale portugiesisch Nenhum brinquedo Não apropriado para crianças com menos de 14 anos Mantenha o produto fora do alcance de crianças pequenas Preste muita atenção às seguintes indicações visto poderem destruir o produto e anular a garantia A não observância destas indicações pode causar danos materiais e pessoais assim como ferimentos graves Mantenha o produto sob vigil...

Page 46: ...ą ar greičio reguliatorių Imtuvas gali sugauti trukdžio signalus įjungti didžiausią pagreitėjimą ir sugadinti Jūsų modelį Kai išjungiate būtinai darykite tai atvirkštine tvarka Pirmiausia išjunkite imtuvą ir greičio reguliatorių tada išjunkite siųstuvą Tuo pačiu metu nenaudokite skirtingų tipų baterijų ir nemaišykite naudotų su naujomis Niekada neužblokuokite gaminio ventiliatoriaus arba aušinimo ...

Page 47: ...asutatud patareisid Ärge kunagi blokeerige toote ventilaatorit ega jahu tusavasid tagage toote ümber hea õhuvahetus Kinnitage hoolikalt kõik varustuse osad Kui ühendused vibratsiooni tõttu lahti tulevad võite kaotada mudeli üle kontrolli Tootja ei vastuta kahjustuste eest mis on tekkinud ohutusjuhiste ja hoiatuste eiramise tagajärjel Kasutage üks nes originaalvaruosi finnisch Tämä ei ole lelu Ei a...

Page 48: ...24 0900 LRP GMBH 0 49eur Minute aus dem deutschen Festnetz Mobilfunkpreise können abweichen Technik Service Hotline für A 0900 270 313 0 73eur Minute aus dem österreichischen Festnetz Mobilfunkpreise können abweichen info LRP cc www LRP cc HA00084 2016 by LRP electronic GmbH LRP GRAVIT GPS VISION 2 4GHZ F H S S ...

Reviews: