SCHNELLSTART
QUICK START
DÉPART RAPIDE
INICIO RÁPIDO
INIZIO RAPIDO
Flugsteuerung
HINWEIS: Sollten Sie eine Mode 1 Fernsteuerung benutzen, so sind Gas- und Nick-
Steuerung seitenverkehrt zur obigen Beschreibung. Details hierzu entnehmen Sie bitte
Kapitel „Unterschiede der Sender Mode 1 und Mode 2“.
Um mit der Gravit herumzufliegen benutzen Sie die folgenden Knüppel-Befehle:
- Um Höhe zu gewinnen oder zu verlieren, bewegen Sie den Gasknüppel hoch bzw.
runter (Wenn Sie den Gasknüppel in der Mittelstellung belassen, wird die Gravit auf
der augenblicklichen Höhe verweilen und diese halten)
- Um die Gravit um die eigene Achse rotieren zu lassen (YAW), bewegen Sie den
linken Steuerknüppel nach links oder rechts
- Um seitwärts zu fliegen (ROLL), bewegen Sie den rechten Steuerknüppel nach
rechts oder links
- Um vorwärts oder rückwärts zu fliegen (NICK), bewegen Sie den rechten Steuer-
knüppel nach vorne bzw. hinten.
BITTE BEACHTEN SIE: Je weiter Sie den jeweiligen Steuerknüppel aus seiner neu-
tralen Mittelposition in die entsprechende Richtung bewegen, desto schneller wird
diese Bewegung ausgeführt. Denken Sie daran, wenn Sie mit der Gravit fliegen.
Unterspannungswarnung
Behalten Sie während Ihres Fluges immer ein wachsames Auge auf den vier LEDs an
der Unterseite der 4 Arme Ihrer Gravit. Wenn die Batterie zuneige geht, fangen die 4
LEDs an, kontinuierlich mit einer Frequenz von 2Hz (2x pro Sekunde) zu blinken, um
Ihnen anzudeuten, daß der Flugkakku bald leer ist. Es ist nun an der Zeit, die Gravit
zu landen.
Ihre Gravit landen
Um Ihre Gravit zu landen, können Sie entweder den Gasknüppel nach unten bewegen,
bis die Gravit den Boden erreicht hat. HALTEN Sie den Knüppel in der untersten
Stellung bis die Motoren abgeschaltet haben.
Oder Sie drücken einfach die Auto-Land-Taste an Ihrer Fernsteuerung und lassen
die Gravit alleine landen. Nachdem die Gravit via Auto-Land-Funktion gelandet ist,
schalten sich die Motoren selbst aus.
Stellen Sie bei beiden Landearten sicher, daß Sie auf einer ebenen, flachen Fläche lan-
den. Ansonsten kann es dazu kommen, daß die Gravit umkippt und Schaden nimmt.
- Nach dem Landen schalten Sie den Quadrocopter bitte zuerst aus, danach die
Fernsteuerung.
- Überprüfen vor dem erneuten Fliegen Sie Ihre Gravit und laden Sie Ihren Flugakku
wieder auf.
Viel Spaß beim Fliegen!
- Before taking off, please check your model for defective or loose parts. You should
never fly with a defective aircraft, as this may result in damage to persons or pro-
perty. Please look out for an area as open and wide as possible for your first flight
and never fly in small, cramped rooms.
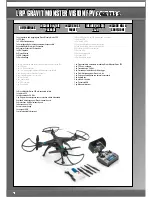
- Next, please insert 6 AA (rechargeable) batteries into the transmitter
- Now please charge your flight battery. To do so, please connect your provided
charger to a suitable USB-power supply.
PLEASE NOTE:
THE USB-CHARGER PROVIDED WITH THIS PRODUCT MAY ONLY BE USED WITH
AN EXTERNAL, DEDICATED USB-POWERSUPPLY WTH 5V AND MIN. 1000mA
CHARGING CURRENT!
Do NOT use the USB-charger on a USB-Port of your PC, Laptop, Tablet (or similar
device), as this might damage the USB-port and your PC/Laptop.
LRP does NOT take any responsibility for damage resulting directly or indirectly from
the wrong usage of the USB-charger.
- The LED of the charger should be green. Next, plug your flight battery‘s balancer
cable into the charger‘s connector. The charger‘s LED will go out, indicating that
the battery is charging. When the battery is fully charged (which can take up to
5 hours), the LED changes to green color again. You can now disconnect and use
your battery.
- Next, please connect your battery to the Gravit Monster. Make sure the Gravit is tur-
ned „“off““ when doing so. Then close the battery compartment again (see picture).
- Next, turn on your transmitter. The red power-LED will start to blink.
- Put the Gravit on a flat and even surface (best on the floor) and turn the power on.
- The LEDs in the Gravit’s arms will start to blink quickly and go solid after a short
time. Your TX and the Gravit are now bound.
- Now move the throttle stick of your transmitter (right stick for MODE1, left stick for
MODE2-TXs) completely upwards (TX peeps 1x) and back downwards again (TX
peeps 1x).
- In order to use the wireless video transmission from your Gravit‘s camera to your
smartphone, please download our app called „LRP Gravit Monster Vision FPV“ from
either Google Play (Android-device) or Apple‘s app-store (iOS-device). Do not yet
start the app.
- In case you want to use the video transmission feature of the Gravit, turn on the
wireless lan of your smartphone and connect to the access-point which the camera
has initiated. The name of the access-point is “HQ-XXXXXX”. Then start your app
on your smartphone to display the received the video signal. For details on all
functions of the app, please refer to page 20.
- The Gravit is now ready to fly!
Taking off
In order to start the motors, please move the left control stick to the 5-o‘clock-positi-
on and the right control stick to the 7-o‘clock-position at the same time (see picture).
Hold the sticks in this position for 1 second and then let go off them.
The rotors will start to turn at idle speed. In case you don‘t want to fly, push and hold
the left control stick completly down to cut the motors again. To have the Gravit take
off, apply throttle above the center-position to increase the rotation speed of the mo-
tors. The Gravit will take-off. As soon as the Gravit is in the air, let go off the throttle
stick again. The Gravit will hover in the air, trying to hold its current height.
When you move the throttle stick above the middle position, the Gravit will gain in
height, if you pull the throttle below the middle position, the Gravit will loose height.
When the stick is a middle position, the Gravit will try to hold its current height again.
Flight control
PLEASE NOTE: In case that you have a MODE1 transmitter to control your Gravit,
throttle and elevator (PITCH) control will work side-reversed to the description above.
For further details on MODE1 and MODE2 transmitter differences, please consult the
appropriate chapter “Transmitter Mode 1 and Mode 2 differences”.
To fly around with your Gravit, use the following stick commands:
- To gain and loose in height, move the throttle stick up and down (letting loose of the
control stick will result in the Gravit hovering at the current height)
- To rotate left and right around the own axis (YAW), move the left control stick to the
left and right
-To fly sideways to the left or right, move the right control stick to the left and right
(ROLL)
- To fly forwards and backwards, move the right control stick up and down (PITCH)
PLEASE NOTE: The further you deflect a stick from its neutral middle position to any
direction, the faster the movement will be. Keep this in mind when flying your Gravit!
Low-battery-warning
During your flight, always have a watchful eye on the four LEDs on your Gravit‘s
arms‘ bottom side. When the battery is running low, the 4 LEDs start to blink conti-
nuously at a rate of 2Hz (2 times per second) to indicate the low battery voltage. It is
now time to land.
Landing your Gravit
To do so, either lower the throttle until the Gravit has landed on the ground. CONTI-
NUE to hold the throttle at the lowest position until the motors have shut off.
Or simply press the Auto-Land-button on your TX to have the Gravit land on her own.
After the Gravit has landed via Auto-Land feature, the motors are cut automatically.
On both types of landing, please make sure that you are landing on a flat and even
surface. Otherwise, the Gravit my tip over during her attempt to land and get
damaged.
- After landing, switch off your Gravit first, then switch off your transmitter.
11


