2. installation tips
3. wires & installation
1. connections & explanations
user manual
• Position the speed-control and capacitor where they are protected in the event of a crash and gives you easy
access to the connectors and buttons.
• Mount the speedo and capacitor using the supplied thick/black doubled-sided tape
• Make sure there is enough clearance between the speed-control, power-wires, antenna and receiver. Avoid
any direct contact between power components, the receiver or the antenna as this can cause interference. If
interference occurs, position the components at a different place in the model.
• The aerial should be run vertically up and away from the receiver. Avoid contact with any parts made of carbon
fibre or metal. If the aerial is too long, don’t coil up the excess length. See also the instructions supplied with
your radio control system.
• Because of the physical principles of brushless technology, the speed-controls do get a little hotter then brushed
systems. Therefore it is required to let the speed-control cool down completely after every run.
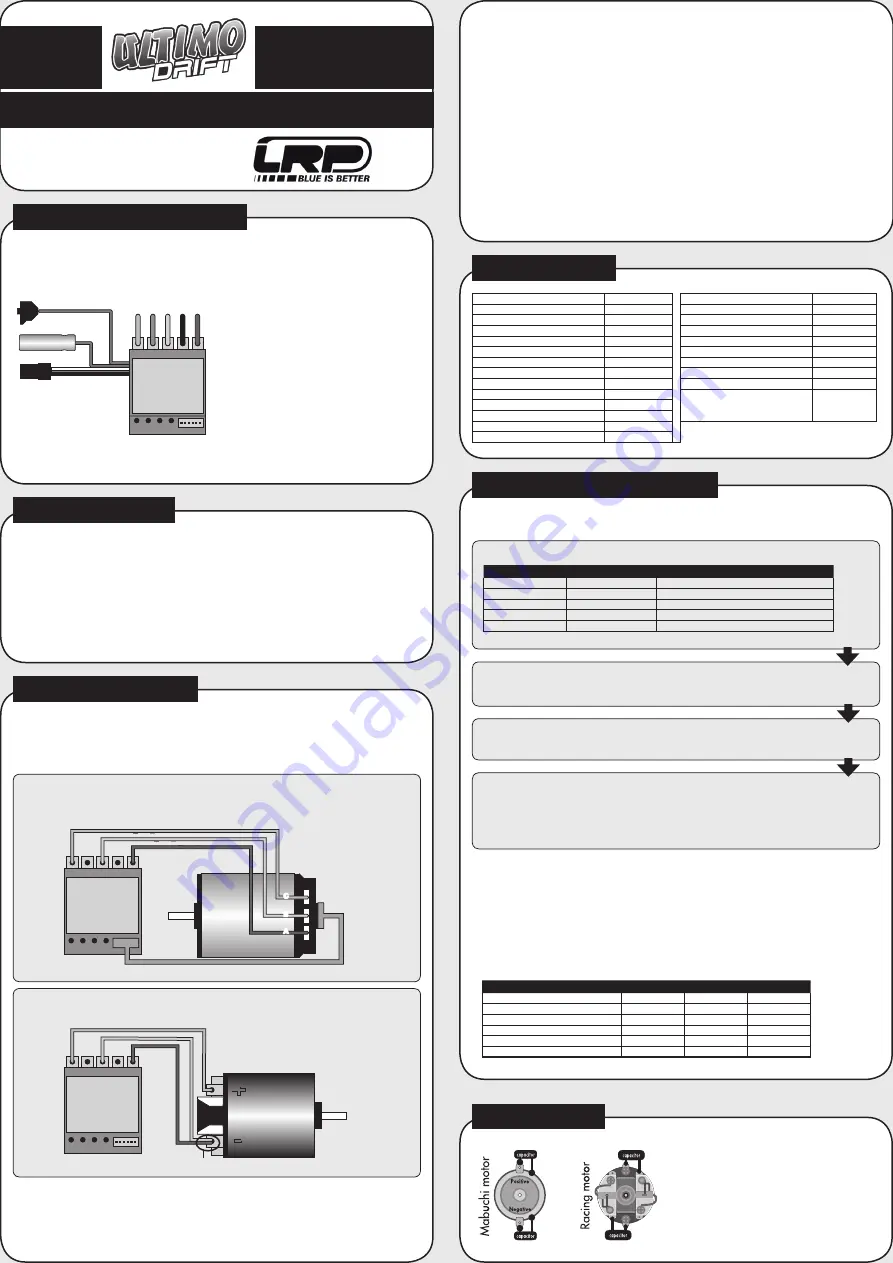
RECEIVER CONNECTING WIRE: The
Ultimo Drift
is equipped with an LRP Multicon receiver wire.
As supplied, it will easily fit in all ordinary recei-
vers. Make sure you connect it to receiver with
correct polarity and use channel 2.
SENSOR CONNECTOR: The bi-directional mul-
tipole sensor wire connects the speed-control
and the motor. Always use the sensor wire and
do not alter or modify this cable! There are repla-
ceable/optional hall sensor wires available, please
refer to complete line-up under point 6 „Spare- &
Optional-Parts“.
POWER WIRES: For maximum performance,
flexible silicone power wires without any con-
nectors are used. The unique splitted solder-tabs
allow easy and convenient replacement of the
power wires. Nevertheless some soldering skills
are required. Avoid soldering longer then 5sec per
soldering joint to prevent possible damage to the
speed-control due to overheating of the compon-
ents! There are full replacement power wire sets
available, please refer to complete line-up under
point 8 „Spare- and Optional Parts“.
Bru Brushed
yes
B.E.C.
6.0V/3.0A
Bru Brushed Adaptation
Automatic
High Frequency
yes
Forward/Brake
yes
Sensored Brushless System
yes
Forward/Brake/Reverse
yes
Multi-Protection-System
yes
Case Size
33.1x37.6x14.9mm
4, 5, 6 cell optimised
yes
Weight (excl. wires)
24.5g
Internal-Temp-Check System
yes
Voltage Input
4.8-7.4V
Sensored Brushless System
yes
Typ. Voltage Drop* @20A (
Brushless
) 0.017V / phase
Power Wires
2.6mm²
Rated Current* (
Brushless
)
300A / phase
Blue metalised case
yes
Compatible winding styles (
Brushless
) Star
4 adj. Modes (AutoCell System, Fwd/
Brk + Fwd/Brk/Rvs, Power Profiles,
Automatic-Brake)
yes
Rec. Motor Limit (
Brushless
)
over 5.5T
Typ. Voltage Drop* @20A (
Brushed
)
0.013V
Rated Current* (
Brushed
)
300A
Rec. Motor Limit (
Brushed
)
over 7T
The
Ultimo Drift
comes supplied with 2.6mm² flexible silicone power-wires without connectors. Be very careful
with the correct wire sequence/colors since an incorrect connection may damage the speed-control! Avoid crea-
ting solder bridges on the solder-tabs and isolate all connections carefully.
• Doublecheck all connections before connecting the speed-control to a battery.
CAUTION: If battery is connected with reversed polarity it will destroy your speed-control!
• Red power-wire
Speedo BAT+ to battery „Plus“
• Black power-wire
Speedo BAT- to battery „Minus“
• The speed-control is now ready to be set-up (see section 5).
RA00133
*Transistors rating at 25°C junction temperature
Specifications subject to change without notice.
LRP electronic GmbH
Wilhelm-Enssle-Str. 132-134
73630 Remshalden, Germany
info@LRP.cc - www.LRP.cc
Dear Customer,
thank you for your trust in this LRP product. By purchasing a LRP Ultimo Drift speed-control, you have chosen one
of the most advanced and successful speed-controls of today. This speed-control with all of its high-tech features
and specially selected electronic components is one of the best speed-controls currently available on the market.
• 4 speed controls in 1 (Brushless, Brushed, Fwd/Brk/Rvs, Fwd/Brk)
• 4 fully adjustable modes
• AutoCell System
• Sensored Design
• Internal-Temp-Check system
• Advanced Digital
• 4, 5, and 6 cell optimised
• Small and Lighweight
• Large SuperLow ESR power capacitor
• IceDrive Design
• 2.6mm² Power-Wires
Please read the following instructions carefully before you start using your speed control. This user guide contains
important notes for the safety, the use and the maintenance of this product. Thus protecting yourself and avoid damages
of the product.
Proceed according to the user guide in order to understand your speed control better. Please take your time as you will
have much more joy with your product if you know it exactly.
This user manual shall be kept in a safe place. If another customer is using this product, this manual has to be handed
out together with it.
In setup mode the
Ultimo Drift
stores every step (e.g. learning your radios neutral and endpoints) when you press
the SET button. All the settings will be stored in the
Ultimo Drift‘s
memory even if it will be disconnected from the
battery.
Description
other names in radio
Required Setting
Throttle Travel
High ATV, EPA
100%
Brake Travel
Low ATV, EPA, ATL
100%
Throttle Exponential
EXP, EXPO
start with 0
Neutral Trim
SUB Trim
centre
Servo Reverse
Throttle Reverse
any setting, don‘t change after set-up procedure!
TRANSMITTER SETTINGS
Setup the following basic functions on your transmitter (if available):
If your transmitter doesn‘t offer any of above functions, it‘s already in „basic setup“ mode.
• Ensure that the speed-control is not connected to the drive battery and is switched off.
• Remove motor pinion or ensure that the wheels of the model are free to rotate.
• Switch the transmitter on and set the transmitter throttle stick to neutral.
• Connect the speed-control to the battery and switch the unit on.
• Hold the SET button pressed for at least 3sec.
You entered setup mode and the SET LED flashes blue (it will flash until the setup is completed).
• Leave transmitter in neutral position and press the SET button once.
Neutral setting is stored , MODE LED flashes yellow and the motor beeps.
• Hold full throttle on transmitter and press the SET button once.
Full-throttle setting is stored, MODE LED flashes red.
• Hold full brake on transmitter and press the SET button once.
Brake setting is stored, LED‘s glow red (MODE) and blue (SET).
• This completes the setup procedure and your
Ultimo Drift
is ready to use.
• If you make a mistake during the setup procedure, don‘t worry: Disconnect the battery for about 10sec and start
again from the first step.
• At the end of each run switch of the car, and then switch off the transmitter.
• At the start of each run switch on the transmitter first, then switch on the car.
• For storage of the car, disconnect the drive battery at any time!
FUNCTION
STATUS
MODE LED
SET LED
Neutral (automatic brake inactive)
--
off
blue
Neutral (automatic brake active)
--
red
off
Forward
partial throttle
yellow
off
Forward
full throttle
yellow
blue
Brake
partial brake
red
off
Brake
full brake
red
blue
CHECKING THE FUNCTIONS:
Check the LED‘s when moving your throttle stick and you will see if everything is setup correctly.
4. specifications
5. radio- / speed-control setup
© LRP electronic GmbH 2009
order.no.::
80460
drift competition speed-control
special drift power- + Brakeprofiles
Brushless & Brushed
Handbrake effect
On/Off - Switch
Receiverwire
Power Capacitor
Hall Sensor
Connector
M
O
T.
C
(O
ra
ng
e)
BA
T
+
(R
ed
)
M
O
T.
B
(Y
el
lo
w
)
BA
T
- (
Bl
ac
k)
M
O
T.
A
(B
lu
e)
BRUSHED MOTOR:
• MOT.A (blue) and MOT.B (yellow) will be the combined „minus“ on the brushed motor.
• MOT.C (orange) wire will be „plus“ on the brushed motor.
BRUSHLESS MOTOR:
• Blue power-wire
Speedo MOT.A to motor „A“
• Yellow power-wire
Speedo MOT.B to motor „B“
• Orange power-wire
Speedo MOT.C to motor „C“
• Connect the hall sensor cable to the speed-control and the motor.
bl
ue
ye
llo
w
or
an
ge
+
-
orange
blue
yellow
Hall Sensor Wire
Together to minus
C + B – A
C
B
A
C + B – A
• Connect the speed-control to the receiver (position: Channel 2)
ONLY FOR BRUSHED MOTORS!
Motors with no
capacitors or not enough capacitors may interfere
with the speed-control. To avoid this, solder the
supplied capacitors to your motor (see picture).
6. suppression


