background image


16

VII. EXERCISE GUIDE

WARM UP STAGE

If you are over 35 years old or have health problem, also it`s your first time do exercise, please consult 
with your doctor or professional people.

Before you use the motorized treadmill, please learn how to control the machine first, know well how to
start, stop, adjust the speed and so on. After that, stand on anti-slip pad both sides and hold the handle
bar with your both hands. Keep the machine at the low speed about 1.0~2 .0 mph, Stand straight and
test the running machine by one foot, after getting used to the speed, you can begin to run and can 
increase speed to 1.9~3.1 mph. Keep the speed about 10 minutes, then stop the machine.

|  EXERCISE GUIDE

EXERCISE STAGE

Learn how to adjust the speed and incline before using. Walk about 0.6 mile at stable velocity, it will 
take you about 15-25 minutes. If walk at 3.0 mph, it will take you about 12 minutes in 0.6 mile. If you feel 
comfortable at the stable velocity, you can add the speed and incline, after 30 minutes, you can have 
good exercise. At this stage, you cannot add the speed or incline too much at one time, it is good for 
your health.

EXERCISE INTENSITY

Warm up at the speed 3.0 mph in 2 minutes, then add the speed to 3.3 mph and keep walking in 2
minutes, then add to 3.6 mph and walk in 2 minutes. After that, add up 0.2mph in each 2 minutes, until
rapid breath but not feel difficulty. Finally, you should slow down the speed step by step for 4Mints.
If you feel it is difficult to increase the speed to strengthening exercise, please increase the incline 
slowly. Increasing the incline slowly will improve the exercise intensity greatly.

Calorie burning---the best effective way

Warm-up for 5 mints by the velocity:2.5-3.0 mph, then slowly increase the speed by 0.2 mph/2Mints,
until up to the stable speed which you feel is Challenging for 45Mints.For improving the intensity
of movement, you can maintain the speed during 1H of TV program, then increase the speed by 0.2 
mph each interval time, after that return to the original speed. You can acquaint the best efficiency of 
workout for calorie burning during the advertisement time and subsequent heart frequency increasing 
time. Finally, you should slow down the speed step by step for 4Mints.

Summary of Contents for Dyna

Page 1: ...es Read all instructions carefully before using this product Retain this owner s manual for future reference NOTE This manual may be subject to updates or changes Up to date manuals are available thro...

Page 2: ...l Information 05 III Important Operating Instructions 07 IV Assembly Instructions 08 V Folding Instructions 11 VI Operation Guide 12 VII Exercise Guide 16 VIII Running Belt Adjustment 19 IX Center the...

Page 3: ...d plush or shag carpet Damage to both carpet and treadmill may result Do not block the rear of the treadmill Provide a minimum of 1 metre clearance between the rear of the treadmill and any fixed obje...

Page 4: ...essive training This appliance is not intended for use by persons including children with reduced physical sensory or mental capabilities or lack of experience and knowledge unless they have been give...

Page 5: ...s well as the safety of others please verify that the power source is correct before plugging the equipment Any incorrect power source could cause significant damage to the equipment and or user GROUN...

Page 6: ...n DANGER NEVER use a ground fault circuit interrupt GFCI wall outlet with this treadmill Route the power cord away from any moving part of the treadmill including the elevation mechanism and transport...

Page 7: ...he belt during slow acceleration is proper after you have learned to operate this machine Always hold on to handrail while making control changes A safety key is provided with this machine Remove the...

Page 8: ...ver 1 60 Right Base Cover 1 5 Allen Wrench 5mm 1pc Wrench with Screwdriver 1pc FIXING TOOLS Do not turn on the power until assembly is completed NOTE PARTS LIST ASSEMBLY INSTRUCTIONS 12 19 51 59 60 70...

Page 9: ...washer 64 to secure the computer frame onto the right and left upright Left picture for reference STEP 2 NOTE Depending on the height of user the computer needs to be rotated 45 degrees counterclockwi...

Page 10: ...upright 3 into the main frame 3 Repeat on other side STEP 5 1 Use wrench with screwdriver 12 bolt 19 to secure the left base cover into the base frame 2 Repeat on the other side 3 Use wrench with scr...

Page 11: ...s locked into the round tube PULLING UP Support place A with hand and press on B the place of air pressure bar The base frame will slowly come down automatically Please keep pets and children away whi...

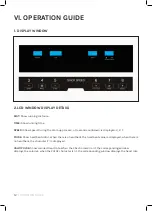
Page 12: ...data 1 When there is a heartbeat the heartbeat value is displayed when there is no heartbeat the character P is displayed CALO PULSE Show calories heart rate When the CAL character is lit the correspo...

Page 13: ...unning or adjust the data when stop 6 SPEED 3 4 5 6 7 8 Adjust the speed quickly 7 Left Handrail Button Start stop adjustment button Right handrail button Speed adjustment button 3 BUTTON FUNCTION I S...

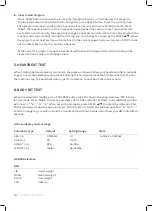
Page 14: ...ome into standby status 5 HEARTBEAT TEST When holding the hand pulse by two hands the pulse window will show your heartbeat after 5 seconds To get an accurate heartbeat value please holding the hand p...

Page 15: ...D SETTING RANGE DATA TABLE P01 SPEED 2 3 3 4 5 3 4 5 5 3 4 5 4 4 4 2 3 3 5 3 P02 SPEED 2 4 4 5 6 4 6 6 6 4 5 6 4 4 4 2 2 5 4 2 P03 SPEED 2 4 4 6 6 4 7 7 7 4 7 7 4 4 4 2 4 5 3 2 P04 SPEED 3 5 5 6 7 7 5...

Page 16: ...exercise At this stage you cannot add the speed or incline too much at one time it is good for your health EXERCISE INTENSITY Warm up at the speed 3 0 mph in 2 minutes then add the speed to 3 3 mph a...

Page 17: ...ase stop at once if you feel chest tightness chest pain irregular heartbeat breath difficulty dizziness or other discomfort during exercise You should consult with your physician or health professiona...

Page 18: ...inside leg straight hand try to touch the toes Maintain 10 to 15 seconds then relax Repeat for each leg do three times see Figure 2 3 Legs and feet tendon stretch two on the Rotary wall or tree stand...

Page 19: ...year remove the motor cover and vacuum under the motor cover RUNNING BELT AND DECK LUBRICATION This treadmill is equipped with a pre lubricated low maintenance deck system The belt deck friction may...

Page 20: ...ain the treadmill 2 For avoiding the slipping during running the belt not too loose for avoiding the more abrasion between the roller and belt and maintain the machine s good running the belt not too...

Page 21: ...ight tightness Place treadmill on a level surface Run Treadmill at approximately 3 7 5mph checking the running condition If the belt has drifted to the right Unplug the safety lock and power switch tu...

Page 22: ...34 36 89 65 10 20 14 47 15 61 62 9 65 90 26 58 64 53 11 46 22 1 48 21 83 58 16 23 70 66 83 43 50 54 58 29 64 52 6 27 2 8 54 60 19 41 28 70 51 51 64 70 3 4 85 19 46 38 81 80 42 64 51 17 33 78 77 34 76...

Page 23: ...d ST4 2 15 4 38 Start Stop 1 39 Control Board 1 40 Computer 1 Bottom Wire No Description Specs Qty 41 Computer Top Cover 1 42 Computer Top Cover 1 43 Barb Cushion 2 44 Magnetic Ring 1 45 Brown Single...

Page 24: ...s burnt with irregular smell replace a control board 3 Check if the motor wire is well connected reconnect it E03 No sensor signal 1 Check if the signal light on control board is light on if the signa...

Page 25: ...r If the motor doesn t rotate after press START button The wire that controls the motor may be the issue Such as the protective tube on control board is damaged or fallen off or the motor wire isn t c...

Page 26: ...e entitled to have the goods repaired or replaced if the goods fail to be of acceptable quality and the failure does not amount to a major failure Full details of your consumer rights may be found at...

Page 27: ......

Page 28: ...WWW LSGFITNESS COM AU...

Reviews: