LSC850 Owner's Manual
page 4
cable 3/16" x 216"
1
bolt package step 7
1
9. final adjustments
8. bunks
7. string cable
vinyl wrapped aluminum bunks
2
bunk adjustment channels
4
bunk backer plates
4
bolt package step 8
1
cap 1 1/2" x 3"
2
cap 1 1/2" x 2"
4
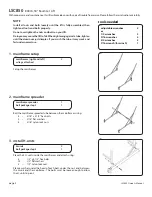
Attach the loop end of the cable to the mainframe opposite the winch
using:
1 – 3/8" x 4 hex bolt
2 – 3/8" flat washers
1 – 1/2" flat washer
1 – 3/8" nylon lock nut
String the cable inside the pulley bar as shown in the exploded view (page 6).
Secure it to the winch following the instructions included with the winch.
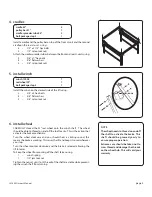
Attach the vinyl wrapped aluminum bunks to the front and rear cradles
using:
4 – 5/16" x 1 hex bolts
8 – 5/16" x 2-1/2" hex bolts
12 – 5/16" lock nuts
For most uses bunks should be placed approximately 18" apart. Make sure
the bunk adjustment channels are on the outside of the lift as shown.
Now tighten all nuts and bolts, except the ones from Step 3 and 4 that must
be free to allow the H-units to pivot.
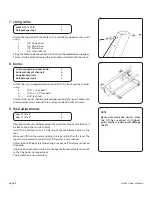
Install the 6 plastisol caps, 2 at the top of the mainframe and 4 on the
legs.
Move your lift into the water and adjust its legs so that the lift is level. The
legs can be removed to lower the lift if the water is very shallow.
Adjust the bunk height just high enough so your craft's bottom will not hit
the cradle.
Adjust the bunk angle to conform to the boat bottom and tighten the bolts
so that the bunks no longer move.
The installation is now complete.
NOTE
Never over crank the winch. Once
the lift has reached its highest
point, further cranking will damage
the lift.


