background image

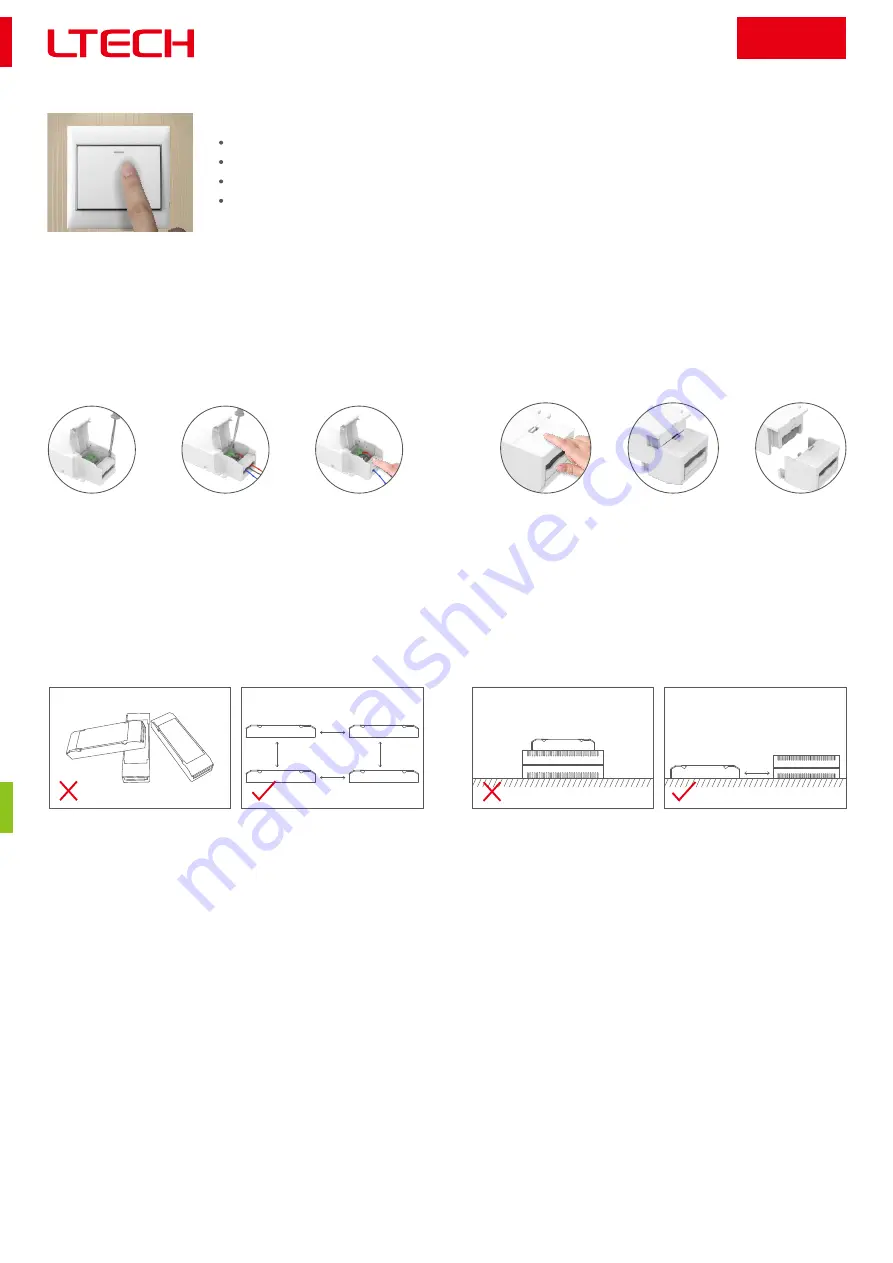
Installation Precautions

15cm

15cm

15cm

15cm

Please do not stack the products. The distance between two products should be ≥15cm so as not
to affect heat dissipation and the lifespan of the products.

15cm

Please not place the products on LED drivers. The distance between the product and the driver
should be ≥15cm so as not to affect heat dissipation and shorten the lifespan of the products.

3

www.ltech-led.com

Push DIM

0-10V

LM-75-12-G1A2

LM-75-24-G1A2

LM-100-24-G1A2

Push DIM

On/off control: Short press.

Stepless dimming: Long press.

With every other long press, the brightness goes to the opposite direction.

Dimming memory: Brightness will be the same as previously adjusted when turning on again.

Reset switch

Tension plate

1. Pry up the protecting housing
in the side plate position with a
tool.

2. Connect to electrical wires
with  a  screwdriver  as  wiring
diagram shows.

Protective Housing Application Diagram

Remove the protective housing

Pull the housing left and right from the bottom to remove it.

3. Press down the tension plate to
fix  the  the  electrical  wires,  then
close the protective housing.

Summary of Contents for LM-75-12-G1A2

Page 1: ... limiting LED fixture e g LED strip The inrush current will be dozens of times increased if connecting built in constant current IC current limiting LED fixtures the driver will activate the overloaded protection hiccups flickering When you order please remark controlling the constant current LED fixture e g MR16 lamp underground light LED wall washer constant current LED strip etc then we can pre...

Page 2: ... 5 0 75 22 20AWG Strip length 8 9mm Wire diameter 1 0 1 5 18 16AWG Strip length 8 9mm Wiring Diagram 0 10V Connection 0 100 dimming Short press to on off long press to dim 0 100 dimming Dimming interface priority First 0 10V next Push DIM Push DIM 0 10V LM 75 12 G1A2 LM 75 24 G1A2 LM 100 24 G1A2 Wire Terminal Connection used in signal port only Wire Terminal YX YX YX 0 10V ...

Page 3: ...4 G1A2 LM 100 24 G1A2 Push DIM On off control Short press Stepless dimming Long press With every other long press the brightness goes to the opposite direction Dimming memory Brightness will be the same as previously adjusted when turning on again Reset switch Tension plate 1 Pry up the protecting housing in the side plate position with a tool 2 Connect to electrical wires with a screwdriver as wi...

Page 4: ...racteristic THD vs Load Over Load Diagram Load Efficiency IO A Load Load Push DIM 0 10V LM 75 12 G1A2 LM 75 24 G1A2 LM 100 24 G1A2 0 2 4 6 8 10 12 14 6 25 6 5 6 75 7 7 28 LM 75 12 G1A2 PF THD IO A VO V 70 75 80 85 90 95 50 60 70 80 90 100 AC230V 50Hz 0 80 0 85 0 90 0 95 1 00 50 60 70 80 90 100 AC230V 50Hz AC230V 50Hz 0 5 10 15 20 25 50 60 70 80 90 100 AC230V 50Hz Relationship Diagrams Efficiency v...

Page 5: ...uency of Optical output Waveform frequency of Optical output Exemption assessment Brightness 0 1 1 5 30 40 70 90 100 10 20 50 60 80 Flicker Test Form Push DIM 0 10V LM 75 12 G1A2 LM 75 24 G1A2 LM 100 24 G1A2 LM 100 24 G1A2 PF THD 70 75 80 85 90 95 50 60 70 80 90 100 AC230V 50Hz 0 80 0 85 0 90 0 95 1 00 50 60 70 80 90 100 AC230V 50Hz 0 5 10 15 20 25 50 60 70 80 90 100 VO V AC230V 50Hz 0 4 8 12 16 2...

Page 6: ...ay cause a short circuit and damage the components or trigger a accident If a fault occurs please do not attempt to fix the product by yourself If you have any question please contact the supplier This manual is subject to changes without further notice Product functions depend on the goods Please feel free to contact our official distributors if you have any question Attentions Warranty periods f...

Page 7: ...oduct description 2020 03 18 A3 Added 5 year warranty 2021 06 08 A4 Update product silk screen 2021 12 10 Updated by Huang Yunting Liu Weili Huang Yunting Huang Yunting Huang Yunting Push DIM 0 10V LM 75 12 G1A2 LM 75 24 G1A2 LM 100 24 G1A2 A5 The connection diagram of the terminal with wire is added to the wiring diagram 2022 05 20 Liu Weili ...

Reviews: