Bedienung der LUBING Steuerung
Working with LUBING Controller
LUBING Top Klima System
- 35 -
LUBING Top Climate System
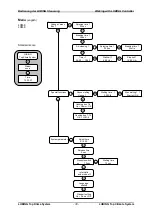
Statusanzeige
: Es wird der Status gemeldet, in
dem sich die Anlage gerade befindet:
„
Anlage aus
“: Die Anlage ist abgeschaltet
„
Anlage bereit
“: Die Anlage ist eingeschaltet, es
besteht aber kein Sprühbedarf
„
Anlage kuehlt
“: Die Anlage läuft im Kühlbetrieb
„
Staubbinden
“: Die Anlage befindet sich im Au-
tomatik-Modus
und
durchläuft
das
Staubbinden-Intervall
„
Anlage wartet
“: Die Zeitschaltuhr ist eingeschaltet
und die Anlage befindet sich nicht inner-
halt der eingestellten Betriebszeit
„
Einweichen
“: Das Einweichprogramm wurde
gestartet, die Anlage weicht ein
„
Anlage spuelt
“: Das Spülprogramm wurde gestar-
tet, die Anlage spült
Uhrzeit
: Die aktuelle Uhrzeit wird angezeigt
Hinweis
: Mit den +/- Tasten kann zwischen den
verschiedenen Informationen der Standardanzei-
ge gewechselt werden.
Installation
Spannungsversorgung
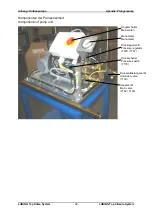
Das LUBING Top Klima System wird komplett
verdrahtet geliefert. Alle Komponenten sind be-
reits angeschlossen, der Controller wird über den
Leistungsschaltkasten an der Pumpeneinheit mit
Spannung versorgt. Die Anschlußbelegung ist in
den Anschlußplänen (ab S. 47) gezeigt.
Anschluß externer Klimarechner und Senso-
ren
Der potentialfreie Schaltkontakt eines externen
Klimarechners wird an einer Modulplatine ange-
schlossen. Diese Leitungen müssen getrennt ver-
legt werden und sollten abgeschirmt sein. Es dür-
fen nur potentialfreie Leitungen aufgelegt werden.
Sensoren werden ebenfalls an einer Modulplatine
angeschlossen (siehe Anschlusspläne). Auch die-
se Leitungen getrennt verlegen. Die Leitungen
müssen niederohmig sein (1,5mm
2
).
Achtung! Um Störungen auszuschließen alle
Kabel in der Steuerung eng an der Bodenplat-
te verlegen!
Achtung! Modulplatinen niemals bei einge-
schalteter Steuerung herausziehen oder ein-
stecken!
„
System sprays
“: The system is in the cooling
mode active.
„
Air-cleaning
“: The system is in automatic-
mode and runs in the air-cleaning
intervall.
„
System waits
“: The timer is activ and the sys-
tem is in the off-time range.
„
House wetting
“: The house wetting pro-
gramm was started, the system is
wetting.
„
System flushes
“: The flushing programm was
started, the system flushes the lines.
Time
: The display shows the actuell time
Note:
It is possible to switch with the +/- keys
between this informations of the standart
score.
Installation
Power supply
The LUBING Top climate system is competly
connected. All komponets are connected, the
controller will be served with power from the
clamping box at the pump. The way of con-
nection is shown in the clamping plans (page
47 ff).
Connection of separate climate controller
and sensors
A separate climate controller has to be con-
nected to the modul-plates. This lines has to
be installed separate from other lines and has
to be shield from other lines. These clamps
are for power-free lines only.
Sensors has to be connected to the modul-
plates also (see clamping plans). This lines
has to be installed separate from other lines
and has to be shield from other lines. Use
lines with 1,5mm
2
at least.
Take care: To avoid errors all cables inside
the controller must be fixed near to the
bottom plate!
Attention: Never plug or unplug Modul-
plates, while Controller is switched on!
Summary of Contents for Top Climate System
Page 2: ......


