AIRFUSION MOTO Installation Instructions
8 |
P a g e
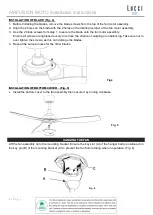
Fig. 9
Carefully insert the receiver above the hanger ball in the remainder spacing in the mounting bracket. Take
care not to damage or loosen any of the wiring. (Fig. 8).
FINISHING THE INSTALLATION
NOTE: Ensure the earth wiring is secure and correct, by performing an earthing continuity
test from the fan’s accessible metal body back to the earth terminal at the terminal
block on the mounting bracket.
INSTALLATION OF THE CANOPY (Fig. 9)
1.
Loosen the 2 screws at the bottom of the mouthing bracket.
2.
Slide the canopy up to the mounting bracket and align the key holes on the canopy with the screws on the
mounting bracket. Turn the canopy until it locks into place with the narrow section of the key holes and
secure it by tightening the two screws. Avoid damaging the electrical wiring prepared previously.
3.
Slide the canopy cover up to the canopy.
Fig. 8
Summary of Contents for Airfusion Moto
Page 80: ...AIRFUSION MOTO Installation Instructions 79 P a g e 2 8 9 10 11 4...
Page 82: ...AIRFUSION MOTO Installation Instructions 81 P a g e Phillips 300 15 30 2 11 3 2 11 15...
Page 83: ...AIRFUSION MOTO Installation Instructions 82 P a g e 4 1 2 2 2 3 2 1 4 5 A B C 6 4 6 5...
Page 84: ...AIRFUSION MOTO Installation Instructions 83 P a g e 7 DC 7 1 L 2 3 7 7 7...
Page 85: ...AIRFUSION MOTO Installation Instructions 84 P a g e 8 8 7 L N 220 250 VAC L N...
Page 86: ...AIRFUSION MOTO Installation Instructions 85 P a g e 9 1 2 2 3 10 1 2 10 2 10 9 10 10...
Page 90: ...AIRFUSION MOTO Installation Instructions 89 P a g e 30 24 6...

