Airfusion Newport Installation Instructions
10 |
P a g e
USING YOUR CEILING FAN
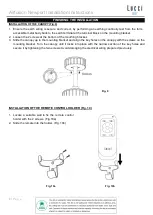
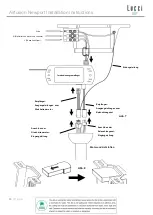
REMOTE CONTROL (Fig.11)
PAIRING REMOTE AND RECEIVER – WHEN 1 DC CEILING FAN IS INSTALLED IN ONE LOCATION
NOTE:
Ensure that you have installed a single pole disconnection switch in the fixed wiring for the fan.
NOTE:
Ensure power to the receiver is ON prior to pairing the remote with the receiver.
•
Turn OFF the mains supply to the fan by on/off wall switch.
•
Install the batteries into the remote. Please make sure the polarity of the battery is correct.
•
Turn ON the power to the receiver.
•
Press and hold the “
” button on the remote for 10 seconds within 30 seconds of switching the power
ON to the receiver of the ceiling fan.
•
There will be a notification ‘beep’ sound from the receiver to indicate that the paring process is successful.
•
Turn ON and change the speed of the ceiling fan via the remote to check the operation and successful
paring.
Fig. 11
(1)
Reverse control
(2)
Natural wind (The fan speed automatic cycle
between 1 to 6 speed)
(3)
Speed control
(4)
Light On/Off
(5)
Fan On/Off
(6)
1.5V AAA battery x 2 pcs (Included)
Summary of Contents for Airfusion Newport
Page 76: ...Airfusion Newport Installation Instructions 75 P a g e 6 20 kg 7 2 3 m 2 1 m 8 2 9 10 11 12 4...
Page 80: ...Airfusion Newport Installation Instructions 79 P a g e A B C 6 5 5 1 5 2 5 3 6...
Page 82: ...Airfusion Newport Installation Instructions 81 P a g e 7 8 DC DC N L...
Page 83: ...Airfusion Newport Installation Instructions 82 P a g e 9 1 2 2 3 10 9 1 2 10a 2 10b 10a 10b...
Page 86: ...Airfusion Newport Installation Instructions 85 P a g e 24 6...

