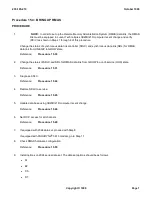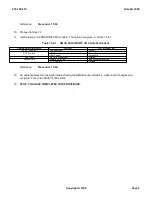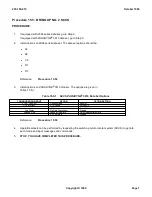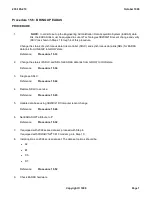
Procedure 15.9: BRING UP SCANS III DATA LINK
PROCEDURE
1.
NOTE:
In order to set up the Software Change Administration and Notification System (SCANS)
data link, the SCANS III link must be equipped in Lucent Technologies 3B20D/21D Computer recent
change and verify (RC/V) as shown in Steps 1 through 4 of this procedure.
Change the status of synchronous data link controller (SDLC) and synchronous data link (SDL) for SCANS III
data link from UNEQIP to GROW state.
Reference:
Procedure 15.42
2.
Change the status of SDLC and SDL for SCANS III data link from GROW to OOS state.
Reference:
Procedure 15.43
3.
Diagnose SDLC.
Reference:
Procedure 15.44
4.
Restore SDLC to service.
Reference:
Procedure 15.45
5.
Update data base using 3B Computer recent change.
Reference:
Procedure 15.46
6.
Verify that components for SCANS III dial-up data link are installed properly.
Reference:
Procedure 15.47
7.
Install options on
PARADYNE
®
3810 modem as shown is Steps 8 through 43.
NOTE:
Options are changed using the Diagnostic Control Panel (DCP) on the modem. The DCP contains a
2-line liquid crystal display (LCD) which displays modem status, control functions and configuration
options. The DCP also contains several keys which allow the user to access and change the
options.
Refer to Figure 15.9-1 for an illustration of the DCP.
8.
On the DCP, press the
>
key until
Configure
comes into view.
Response:
Idle:14.4 <=>
Test Configure
9.
Press the
F3
key to select the
Configure
mode.
235-105-210
October 1999
Copyright © 1999
Page 1
Summary of Contents for 5ESS-2000
Page 96: ...235 105 210 October 1999 Copyright 1999 Page 2 ...
Page 184: ...235 105 210 October 1999 Copyright 1999 Page 3 ...
Page 300: ...13 STOP YOU HAVE COMPLETED THIS PROCEDURE 235 105 210 October 1999 Copyright 1999 Page 55 ...
Page 339: ...7 STOP YOU HAVE COMPLETED THIS PROCEDURE 235 105 210 October 1999 Copyright 1999 Page 13 ...
Page 342: ...235 105 210 October 1999 Copyright 1999 Page 2 ...
Page 359: ...235 105 210 October 1999 Copyright 1999 Page 5 ...
Page 609: ...2 STOP YOU HAVE COMPLETED THIS PROCEDURE 235 105 210 October 1999 Copyright 1999 Page 12 ...
Page 676: ...235 105 210 October 1999 Copyright 1999 Page 9 ...
Page 792: ...3 STOP YOU HAVE COMPLETED THIS PROCEDURE 235 105 210 October 1999 Copyright 1999 Page 9 ...
Page 799: ...Figure 11 36 3 1 Cleaning Points 235 105 210 October 1999 Copyright 1999 Page 7 ...
Page 801: ...235 105 210 October 1999 Copyright 1999 Page 9 ...
Page 839: ...2 STOP YOU HAVE COMPLETED THIS PROCEDURE 235 105 210 October 1999 Copyright 1999 Page 16 ...
Page 999: ...2 STOP YOU HAVE COMPLETED THIS PROCEDURE 235 105 210 October 1999 Copyright 1999 Page 13 ...
Page 1008: ...Figure 11 55 1 CTSNS DIP Switch Settings 235 105 210 October 1999 Copyright 1999 Page 2 ...
Page 1011: ...235 105 210 October 1999 Copyright 1999 Page 5 ...
Page 1053: ...235 105 210 October 1999 Copyright 1999 Page 15 ...
Page 1289: ...Figure 15 17 2 AMATPS Data Link 235 105 210 October 1999 Copyright 1999 Page 2 ...
Page 1292: ...235 105 210 October 1999 Copyright 1999 Page 5 ...
Page 1303: ...9 STOP YOU HAVE COMPLETED THIS PROCEDURE 235 105 210 October 1999 Copyright 1999 Page 2 ...
Page 1360: ...Figure 15 47 2 Typical SCANS III Link Diagram 235 105 210 October 1999 Copyright 1999 Page 2 ...
Page 1372: ...235 105 210 October 1999 Copyright 1999 Page 2 ...
Page 1374: ...235 105 210 October 1999 Copyright 1999 Page 4 ...
Page 1421: ...Table 1 1 O M Checklist 235 105 210 October 1999 Copyright 1999 Page 3 ...

