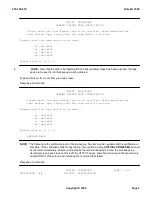
Response:
Forms selection form is displayed.
15.
To end transaction, type and enter
trend
Response:
Transaction End
form is displayed. Cursor at tr_name field.
16.
Depress
RETURN
four times to default all four fields on trend form.
17.
Type and enter
e
Response:
At top right of screen,
updating . . . FORM EXECUTED.
Data entry page is displayed.
18.
Type and enter
<
Response:
RCV MENU RCVECD COMPLETED
19.
To boot the system; on the EAI page enter poke command
52
Note:
The boot forces a configuration of the CU and MHD.
20.
When initialization is complete, restore system to full duplex operation, continue with Section
6.33.3
.
6.33.3 Grow Memory
NOTE:
This procedure requires that both CU 0 and CU 1 memory be grown. Record the memory side that is grown
first before beginning. This will insure that the same memory side is not grown twice, for example when
personnel changes are made during a shift change. Once the first side is grown, this procedure is repeated
for the second side.
1.
At the MCC, bring up the EAI page.
2.
To force the active CU on line, enter poke command
12
Response:
EAI page CU status indicates which CU is FOFL and FONL.
3.
To access the ECD form
rcvparams
; at RC/V or STLWS terminal, type and enter:
RCV:MENU:RCVECD;
Response:
rcvparams
form is displayed. Cursor at
database_name
filed.
4.
Type and enter the following values:
Field No.
Name
Value
1
database_name
=
incore
2
reviewonly
=
n
3
journaling
=
*
Response:
Forms selection page is displayed.
5.
To begin update, type and enter
trbegin
6.
Depress
RETURN
Response:
Screen prompts for required action.
7.
Type and enter
e
Response:
At top right of screen,
updating . . . FORM EXECUTED.
Data entry form is displayed.
235-105-210
October 1999
Copyright © 1999
Page 4
Summary of Contents for 5ESS-2000
Page 96: ...235 105 210 October 1999 Copyright 1999 Page 2 ...
Page 184: ...235 105 210 October 1999 Copyright 1999 Page 3 ...
Page 300: ...13 STOP YOU HAVE COMPLETED THIS PROCEDURE 235 105 210 October 1999 Copyright 1999 Page 55 ...
Page 339: ...7 STOP YOU HAVE COMPLETED THIS PROCEDURE 235 105 210 October 1999 Copyright 1999 Page 13 ...
Page 342: ...235 105 210 October 1999 Copyright 1999 Page 2 ...
Page 359: ...235 105 210 October 1999 Copyright 1999 Page 5 ...
Page 609: ...2 STOP YOU HAVE COMPLETED THIS PROCEDURE 235 105 210 October 1999 Copyright 1999 Page 12 ...
Page 676: ...235 105 210 October 1999 Copyright 1999 Page 9 ...
Page 792: ...3 STOP YOU HAVE COMPLETED THIS PROCEDURE 235 105 210 October 1999 Copyright 1999 Page 9 ...
Page 799: ...Figure 11 36 3 1 Cleaning Points 235 105 210 October 1999 Copyright 1999 Page 7 ...
Page 801: ...235 105 210 October 1999 Copyright 1999 Page 9 ...
Page 839: ...2 STOP YOU HAVE COMPLETED THIS PROCEDURE 235 105 210 October 1999 Copyright 1999 Page 16 ...
Page 999: ...2 STOP YOU HAVE COMPLETED THIS PROCEDURE 235 105 210 October 1999 Copyright 1999 Page 13 ...
Page 1008: ...Figure 11 55 1 CTSNS DIP Switch Settings 235 105 210 October 1999 Copyright 1999 Page 2 ...
Page 1011: ...235 105 210 October 1999 Copyright 1999 Page 5 ...
Page 1053: ...235 105 210 October 1999 Copyright 1999 Page 15 ...
Page 1289: ...Figure 15 17 2 AMATPS Data Link 235 105 210 October 1999 Copyright 1999 Page 2 ...
Page 1292: ...235 105 210 October 1999 Copyright 1999 Page 5 ...
Page 1303: ...9 STOP YOU HAVE COMPLETED THIS PROCEDURE 235 105 210 October 1999 Copyright 1999 Page 2 ...
Page 1360: ...Figure 15 47 2 Typical SCANS III Link Diagram 235 105 210 October 1999 Copyright 1999 Page 2 ...
Page 1372: ...235 105 210 October 1999 Copyright 1999 Page 2 ...
Page 1374: ...235 105 210 October 1999 Copyright 1999 Page 4 ...
Page 1421: ...Table 1 1 O M Checklist 235 105 210 October 1999 Copyright 1999 Page 3 ...


