44.
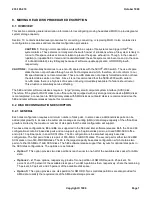
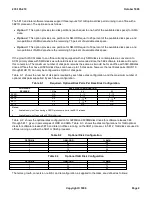
Perform Steps 45 through 50 for each of the power units listed in the following illustration.
ILLUSTRATION
POWER UNIT
CABINET/FRAME LOCATION
495FA - H
036 - 178
494GA - C
036 - 024
495FA - E
045 - 016
45.
Unlatch and unseat power unit.
46.
Is IOP growth unit being tested?
If
YES
, continue with the next step.
If
NO
, go to Step 48.
47.
Verify that
ALM
LED is lighted on IOP power switch and
POWER ALARM
and
OOS
LEDs are lighted on
TN9
CPs, and go to Step 49.
48.
Verify the following responses.
Response:
ALM
and
OFF
LEDs are lighted on IOP power switch.
Major audible alarm is indicated at MCC terminal.
REPT FAULT
or
REPT POWER DOWN
or
REPT UNAVAILABLE
message received.
POWER ALARM
and
OOS
LEDs are lighted on all
TN9
CPs.
49.
Relatch power unit unseated in Step 45.
50.
Have all power units listed in the illustration in Step 44 been tested?
If
YES
, continue with the next step.
If
NO
, repeat from Step 44 for next power unit.
51.
At selected IOP
TN6
power switch, operate
ON
switch.
Response:
REPT POWER UP
or
REPT OUT OF SERVICE
or
REPT FAULT CLEARED
message is
received.
Unit label indicates
OOS
or
OOS MAN
.
OOS
LED lighted on selected IOP power switch.
52.
At selected IOP
TN6
power switch, operate
ROS/RST
switch to
RST
position and wait for selected IOP and
all subunit
RST COMPLETED
messages.
53.
Note:
All subunits and unit are diagnosed and restored to service.
Verify the following responses.
Response:
RST COMPLETED
message is received.
At common processor display page, unit label indicates
ACT
(CU indicates
STBY
).
54.
At the MCC terminal, type and enter:
OP:OOS;
Response:
OP OOS COMPLETED NONE
235-105-210
October 1999
Copyright © 1999
Page 5
Summary of Contents for 5ESS-2000
Page 96: ...235 105 210 October 1999 Copyright 1999 Page 2 ...
Page 184: ...235 105 210 October 1999 Copyright 1999 Page 3 ...
Page 300: ...13 STOP YOU HAVE COMPLETED THIS PROCEDURE 235 105 210 October 1999 Copyright 1999 Page 55 ...
Page 339: ...7 STOP YOU HAVE COMPLETED THIS PROCEDURE 235 105 210 October 1999 Copyright 1999 Page 13 ...
Page 342: ...235 105 210 October 1999 Copyright 1999 Page 2 ...
Page 359: ...235 105 210 October 1999 Copyright 1999 Page 5 ...
Page 609: ...2 STOP YOU HAVE COMPLETED THIS PROCEDURE 235 105 210 October 1999 Copyright 1999 Page 12 ...
Page 676: ...235 105 210 October 1999 Copyright 1999 Page 9 ...
Page 792: ...3 STOP YOU HAVE COMPLETED THIS PROCEDURE 235 105 210 October 1999 Copyright 1999 Page 9 ...
Page 799: ...Figure 11 36 3 1 Cleaning Points 235 105 210 October 1999 Copyright 1999 Page 7 ...
Page 801: ...235 105 210 October 1999 Copyright 1999 Page 9 ...
Page 839: ...2 STOP YOU HAVE COMPLETED THIS PROCEDURE 235 105 210 October 1999 Copyright 1999 Page 16 ...
Page 999: ...2 STOP YOU HAVE COMPLETED THIS PROCEDURE 235 105 210 October 1999 Copyright 1999 Page 13 ...
Page 1008: ...Figure 11 55 1 CTSNS DIP Switch Settings 235 105 210 October 1999 Copyright 1999 Page 2 ...
Page 1011: ...235 105 210 October 1999 Copyright 1999 Page 5 ...
Page 1053: ...235 105 210 October 1999 Copyright 1999 Page 15 ...
Page 1289: ...Figure 15 17 2 AMATPS Data Link 235 105 210 October 1999 Copyright 1999 Page 2 ...
Page 1292: ...235 105 210 October 1999 Copyright 1999 Page 5 ...
Page 1303: ...9 STOP YOU HAVE COMPLETED THIS PROCEDURE 235 105 210 October 1999 Copyright 1999 Page 2 ...
Page 1360: ...Figure 15 47 2 Typical SCANS III Link Diagram 235 105 210 October 1999 Copyright 1999 Page 2 ...
Page 1372: ...235 105 210 October 1999 Copyright 1999 Page 2 ...
Page 1374: ...235 105 210 October 1999 Copyright 1999 Page 4 ...
Page 1421: ...Table 1 1 O M Checklist 235 105 210 October 1999 Copyright 1999 Page 3 ...


