2.
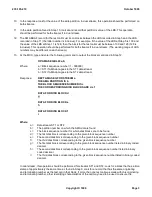
Note the NLI set referenced page for the NLI to be removed/replaced.
3.
Type and enter page noted in Step 2.
Response:
DLI/NLI/TMSLNK SET xx
page is displayed.
Where:
xx = NLI set number.
NOTE:
If even NLI to be replaced/removed is already in out-of-service (OOS) state, continue with Section
11.26.4
4.
CAUTION:
If for any reason the ONTC has a degraded condition, clear the problem(s) first. Do
not continue until the degraded condition has been cleared. Never switch the ONTC
unconditionally.
5.
If the NLI to be pulled is on the ONTC side marked ACTIVE MAJOR, switch ONTC sides by typing and
entering the following command:
SW:ONTC
Response:
SW ONTC COMPLETED
6.
Note the ACTIVE MINOR ONTC side.
11.26.4 Remove NLI Set from Service
1.
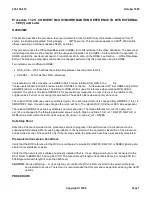
Remove the odd NLI, of the DEGRADED MINOR side noted in a previous step, from service by typing and
entering the following command:
RMV:NLI=a-b-c
Where:
a =
SM-2000 number
b =
NLI number
c =
degraded (DGR)/ACTIVE MINOR ONTC side.
Response:
RMV NLI=a-b-c COMPLETED
2.
Repeat Step 1 for the even NLI of the set on the DGR ONTC side, if necessary.
11.26.5 Remove Even NLI Paddleboard
1.
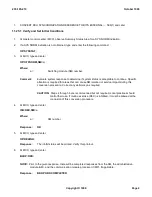
Remove the designated even NLI paddleboard from the backplane. Refer to Engineering Notes note 64 of J
drawing J5D003NB-1 for the proper locations. For additional information, refer to the TSIU4 Wiring Side
Designation Label (comcode 847004413).
11.26.6 Replace/Reseat Even NLI Paddleboard
1.
Replace/reseat the even NLI paddleboard into the backplane. Refer to Engineering Note 64 of J drawing
J5D003NB-1 for the proper locations. For additional information, refer to the TSIU4 Wiring Side Designation
235-105-210
October 1999
Copyright © 1999
Page 2
Summary of Contents for 5ESS-2000
Page 96: ...235 105 210 October 1999 Copyright 1999 Page 2 ...
Page 184: ...235 105 210 October 1999 Copyright 1999 Page 3 ...
Page 300: ...13 STOP YOU HAVE COMPLETED THIS PROCEDURE 235 105 210 October 1999 Copyright 1999 Page 55 ...
Page 339: ...7 STOP YOU HAVE COMPLETED THIS PROCEDURE 235 105 210 October 1999 Copyright 1999 Page 13 ...
Page 342: ...235 105 210 October 1999 Copyright 1999 Page 2 ...
Page 359: ...235 105 210 October 1999 Copyright 1999 Page 5 ...
Page 609: ...2 STOP YOU HAVE COMPLETED THIS PROCEDURE 235 105 210 October 1999 Copyright 1999 Page 12 ...
Page 676: ...235 105 210 October 1999 Copyright 1999 Page 9 ...
Page 792: ...3 STOP YOU HAVE COMPLETED THIS PROCEDURE 235 105 210 October 1999 Copyright 1999 Page 9 ...
Page 799: ...Figure 11 36 3 1 Cleaning Points 235 105 210 October 1999 Copyright 1999 Page 7 ...
Page 801: ...235 105 210 October 1999 Copyright 1999 Page 9 ...
Page 839: ...2 STOP YOU HAVE COMPLETED THIS PROCEDURE 235 105 210 October 1999 Copyright 1999 Page 16 ...
Page 999: ...2 STOP YOU HAVE COMPLETED THIS PROCEDURE 235 105 210 October 1999 Copyright 1999 Page 13 ...
Page 1008: ...Figure 11 55 1 CTSNS DIP Switch Settings 235 105 210 October 1999 Copyright 1999 Page 2 ...
Page 1011: ...235 105 210 October 1999 Copyright 1999 Page 5 ...
Page 1053: ...235 105 210 October 1999 Copyright 1999 Page 15 ...
Page 1289: ...Figure 15 17 2 AMATPS Data Link 235 105 210 October 1999 Copyright 1999 Page 2 ...
Page 1292: ...235 105 210 October 1999 Copyright 1999 Page 5 ...
Page 1303: ...9 STOP YOU HAVE COMPLETED THIS PROCEDURE 235 105 210 October 1999 Copyright 1999 Page 2 ...
Page 1360: ...Figure 15 47 2 Typical SCANS III Link Diagram 235 105 210 October 1999 Copyright 1999 Page 2 ...
Page 1372: ...235 105 210 October 1999 Copyright 1999 Page 2 ...
Page 1374: ...235 105 210 October 1999 Copyright 1999 Page 4 ...
Page 1421: ...Table 1 1 O M Checklist 235 105 210 October 1999 Copyright 1999 Page 3 ...


