Procedure 4.11: SET UP NAIL-UP CONNECTION
PROCEDURE
1.
If the nail-up connection is for a trunk circuit, then remove the trunks from service, using the following
commands, otherwise, go to Step 2.
RMV:TRK,DEN=a-b-c-d[,UCL];
RMV:TRK,TEN(a,b,c,d,e)[,UCL];
Where:
a
= Switching module (SM) number
b
= Digital line and trunk unit (DLTU) number or the trunk unit (TU) number
c
= Digital facility interface (DFI) number
or
c
= Service group number
d
= Channel on the remote terminal (RT)
or
d
= Channel board number
e
= Circuit number.
Response:
The trunks will be removed from service.
2.
At recent change and verify (RC/V) terminal, begin an RC/V session by typing and entering the following
command:
RCV:MENU,APPRC;
.
Response:
The main RC/V menu appears.
3.
Type and enter:
7.11i
Response:
NAIL-UP AND HAIRPIN SPECIFICATION
page is displayed.
Cursor at PORT1 attribute.
4.
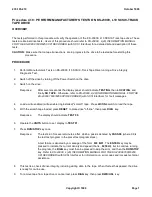
Type in the data as shown in Figure 4.11-1 .
Where:
x xxxxxxxx and y yyyyyyyy are the equipment numbers determined in
Procedure 4.8 .
Response:
The ENTER COMMAND prompt is displayed.
5ESS(R) SWITCH
RECENT CHANGE 7.11
NAIL-UP AND HAIRPIN SPECIFICATION
CONTROLLING PORT NON-CONTROLLING PORT FOR BOTH PORTS
*1. C OE x xxxxxxxx__ #12. NC OE y yyyyyyyy__ #23. SIGMODE
4. C LOSS 0.0 15. NC LOSS 0.0 24. HAIRPIN N
5. C INIT SIG 01__ 16. NC INIT SIG 01__ 25. DDS N
6. C FINAL SIG 01__ 17. NC FINAL SIG 11__ 26. PATH NUM 1
7. C TRWRD UAC 18. NC TRWRD UAC 27. DSC NUM _
235-105-210
October 1999
Copyright © 1999
Page 1
Summary of Contents for 5ESS-2000
Page 96: ...235 105 210 October 1999 Copyright 1999 Page 2 ...
Page 184: ...235 105 210 October 1999 Copyright 1999 Page 3 ...
Page 300: ...13 STOP YOU HAVE COMPLETED THIS PROCEDURE 235 105 210 October 1999 Copyright 1999 Page 55 ...
Page 339: ...7 STOP YOU HAVE COMPLETED THIS PROCEDURE 235 105 210 October 1999 Copyright 1999 Page 13 ...
Page 342: ...235 105 210 October 1999 Copyright 1999 Page 2 ...
Page 359: ...235 105 210 October 1999 Copyright 1999 Page 5 ...
Page 609: ...2 STOP YOU HAVE COMPLETED THIS PROCEDURE 235 105 210 October 1999 Copyright 1999 Page 12 ...
Page 676: ...235 105 210 October 1999 Copyright 1999 Page 9 ...
Page 792: ...3 STOP YOU HAVE COMPLETED THIS PROCEDURE 235 105 210 October 1999 Copyright 1999 Page 9 ...
Page 799: ...Figure 11 36 3 1 Cleaning Points 235 105 210 October 1999 Copyright 1999 Page 7 ...
Page 801: ...235 105 210 October 1999 Copyright 1999 Page 9 ...
Page 839: ...2 STOP YOU HAVE COMPLETED THIS PROCEDURE 235 105 210 October 1999 Copyright 1999 Page 16 ...
Page 999: ...2 STOP YOU HAVE COMPLETED THIS PROCEDURE 235 105 210 October 1999 Copyright 1999 Page 13 ...
Page 1008: ...Figure 11 55 1 CTSNS DIP Switch Settings 235 105 210 October 1999 Copyright 1999 Page 2 ...
Page 1011: ...235 105 210 October 1999 Copyright 1999 Page 5 ...
Page 1053: ...235 105 210 October 1999 Copyright 1999 Page 15 ...
Page 1289: ...Figure 15 17 2 AMATPS Data Link 235 105 210 October 1999 Copyright 1999 Page 2 ...
Page 1292: ...235 105 210 October 1999 Copyright 1999 Page 5 ...
Page 1303: ...9 STOP YOU HAVE COMPLETED THIS PROCEDURE 235 105 210 October 1999 Copyright 1999 Page 2 ...
Page 1360: ...Figure 15 47 2 Typical SCANS III Link Diagram 235 105 210 October 1999 Copyright 1999 Page 2 ...
Page 1372: ...235 105 210 October 1999 Copyright 1999 Page 2 ...
Page 1374: ...235 105 210 October 1999 Copyright 1999 Page 4 ...
Page 1421: ...Table 1 1 O M Checklist 235 105 210 October 1999 Copyright 1999 Page 3 ...


