Beta Draft Confidential
Installing and Removing Modules
Installing or Replacing IOA Modules
CBX 500 Multiservice WAN Switch Hardware Installation Guide
4/5/03
6-17
Replacing IOA Modules
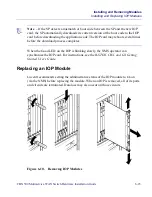
To replace an IOA module when an IOP is already installed:
1. Put on the antistatic wrist strap (provided in the accessory kit) and plug it into the
ESD grounding jack on the switch.
2. Using a #2 Phillips-head screwdriver, loosen the thumbscrews located on the top
and bottom of the IOP module.
3. Locate the ejector lock at the top of the IOP module, then slide the ejector lock
down to disconnect the IOP from the network.
4. Lift the top and bottom card ejectors simultaneously to disengage the module
from the switch. Then carefully slide the IOP module out of the switch about one
inch (2.54 cm).
5. From the back of the switch, disconnect any external cables from the existing IOA
module. Tag the cables for identification and reconnection.
6. Using a #2 Phillips-head screwdriver, loosen the thumbscrews at the top and
bottom of the IOA.
7. Grasp the thumbscrews for leverage, then carefully slide the IOA module out from
the back of the switch and place the module into an antistatic container.
8. Insert the new or replacement IOA module into the back of the switch, aligning it
with the card guides.
!
Caution – Any circuits running through the IOP module are terminated when the
module is removed, possibly resulting in a loss of data. Lucent recommends setting the
IOP module’s administrative status to Down via the NMS before removing the module
from the switch. If necessary, see the B-STDX, CBX, and GX Switch Module
Configuration Guide for instructions.
Warning – The following procedure may make the device susceptible to electrostatic
charge.

