Beta Draft Confidential
Installing and Removing Modules
Installing and Replacing IOP Modules
6-22
4/5/03
CBX 500 Multiservice WAN Switch Hardware Installation Guide
Installing a New IOP Module
To install a new IOP module:
1. Remove the blank slot cover on the front of the switch that corresponds to the
installed IOA on the back of the switch.
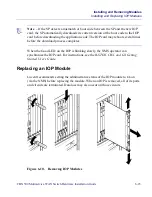
2. Align the IOP module with the card guides and carefully slide the module into the
switch. Press firmly to be sure that it has engaged the backplane connectors.
3. Depress the ejectors simultaneously.
4. Slide the card ejector lock up.
5. Using a #2 Phillips-head screwdriver, secure the IOP module by tightening its
thumbscrews (using a maximum of 6 to 8 inch-pounds of torque).
6. Using a #2 Phillips-head screwdriver, secure the IOA module by tightening the
thumbscrews (using a maximum of 6 to 8 inch-pounds of torque).
7. If necessary, reconnect the power cord(s) and power up the switch.
8. Check the LEDs on the IOP to verify the operational status of the module.
Warning – The following procedure may make the device susceptible to electrostatic
charge.
!
Caution – Unlike previous CBX 500 modules, the 32-Port Channelized T1/E1 FR/IP
IOM uses a new type of connector with closely-spaced pin alignments. You should
carefully plug in and secure the IOA before connecting the input/output processor
(IOP) module to it.
Note – Before continuing, wait until the Good LED on the IOP module is either solid
green or blinking slowly. This may take several minutes.

