background image

Manual 

EN

With the Thermo Control PRO II you have purchased a digital thermostat of the newest generation which can control all common vivarium heaters 

with a maximum load of 1000W. The device has a realtime clock and four temperature time zones. For each temperature time zone a different 

temperature value can be set allowing to recreate the natural temperature variations over the day inside the terrarium. An alarm function warns 

optically and acoustically if the device measures a temperature that is either higher or lower than the temperature setting. In addition the thermo-

stat has a timer which allows you to time control additional devices like lighting or ventilators. The continuous temperature display and the small 

size of the thermostat allow its use as additional thermometer.

Operating conditions

• The device may only be operated at 230V / 50/60Hz AC Voltage

• The device may be operated in any position, but it has to be ensured that it is impossible for it to fall into water.

• The ambient temperature limit during operation may not fall below and exceed 0°C and 60°C respectively.

• The device is designed for use in dry and clean rooms.

• At formation of condensed water a period of acclimatisation of up to 2h has to be ensured.

• Protect the device from moisture, spray water and impact of heat!

Designated Usage

This device may be operated with heat/cooling systems for regulation of air or water temperature in unpressurised containers (e. g. aquaria, 

terrariums) or rooms. Other forms of operation as mentioned above are not allowed!

Installation:

BInstall the temperature sensor at a suitable place inside the terrarium/aquarium. Since you should have temperature gradients in your terrarium, 

you have to think about which temperature area you want to control with the thermostat. In most cases placing the sensor in the middle of the 

terrarium just above the substrate is recommended. For aquariums use a place where you have a good water flow around the sensor.
Position the thermostat in a way that you can easily control the displayed temperature all the time. Plug in the devices you want to have controlled 

into the receptacles of the thermostats. Heaters in I and timer controlled devices (e.g. lighting) in II. Connect the AC Adaptor to a properly installed 

wall socket. You can now make the desired settings as to the following instructions.

Setting the Functions: 

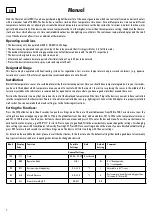
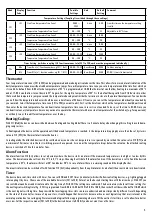
Press the SET button for more than 3 seconds to open the settings menu. There are 18 available menus from F00 to F38. For a clear overview the 

settings have been arranged in groups. F00 to F14 are the global functions like clock, mode and alarm. F21 to F24 are the temperature time zones 

and F31 to F38 the timer. Use the arrow buttons to choose between menus and press SET to enter the desired menu. You will see a shortname for 

each function in the display, e.g. at F00 “ClC” for clock. Press any key to go ahead. With the arrow buttons you can change the settings. For changing 

time settings you can switch from Minutes to Hours by Pressing SET. Press ENT to save settings and exit the menu. If you are finished with all settings 

press ENT for more than 3 seconds to exit the settings menu. The device will start working with the new settings.
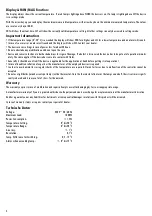
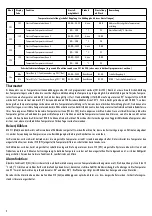
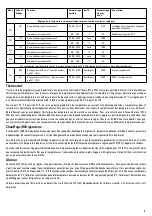
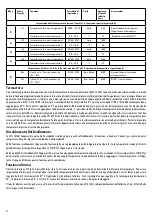
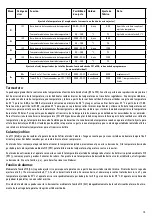
For details on the available functions please consult the chart below. In the chart are also the default settings that build a good base for commonly 

kept species like corn snakes or leopard geckos but can be changed as desired.

Menü

Display 

Code

Function

Possible 

Settings

Unit

Default 

Setting

Comment

General Settings

F00

CLC

Clock

00:00 ~23:59

Hour:Minute


F11

MOD

Operation Mode

CL/Ht


Ht

Ht = Heating mode-,  

CL = cooling mode

F12

HYS

Hysteresis (switching delay)

0,5~15,0

°C

1

Adjustable  in 0,1°C steps

F13

ALR

Alarm Difference

0,0~15,0

°C

0

Device warns when difference is bigger than 

this value, 0= Alarm Off

F14

ALS

Acoustic Alarm On/Off

ON/OFF


OFF


1.

Summary of Contents for Thermo Control Pro II

Page 1: ...Operating Instructions Bedienungsanleitung Thermo Control Pro II...

Page 2: ...ensor in the middle of the terrarium just above the substrate is recommended For aquariums use a place where you have a good water flow around the sensor Position the thermostat in a way that you can...

Page 3: ...riums or with only two or three different temperatures over the day Heating Cooling With F11 Mod the device can be switched between Heating and Cooling Mode There is a 3 minute delay when changing thi...

Page 4: ...nerally it should be verified if the device is applicable for the application at hand before putting it into operation In case of doubt consultation of experts or the manufacturer of the employed devi...

Page 5: ...rrariums kurz ber dem Bodengrund Im Aquarium empfiehlt sich eine Stelle die gut vom Wasser umstr mt ist Installieren Sie das Ger t so dass Sie die Anzeige gut kontrollieren k nnen Stecken Sie die zu s...

Page 6: ...nenSiedenTemperaturverlaufindividuellandieBed rfnisse Ihrer Tiere anpassen W hlen Sie dazu die Temperaturzeitzone F21 bis F24 die Sie anpassen m chten Geben Sie zuerst die Uhrzeit an ab der die Temper...

Page 7: ...peraturbereich 0 bis 50 C ber Anzeige HHH oder unterschritten Anzeige LLL ert nt ein Alarmton Bei Ausfall des Sensors ert nt ein Alarmton und das Display zeigt EEE Kontaktieren Sie Ihren H ndler Das G...

Page 8: ...n en contact avec des courants d eau Installez le thermostat de mani re ce que vous puissiez bien contr ler tout le temps la temp rature indiqu e Branchez les appareils que vous voudrez contr ler dans...

Page 9: ...n mode refroidissement l appareil s allume d s que la temp rature r gl e est d pass e de l hyst r se r gl e pour F12 HYS et au plus t t apr s une temporisationde3minutes D squelatemp rature estredesce...

Page 10: ...eurs ne peuvent tre appel es et consult es que via le syst me de param trage de l appareil Informations importantes D s que la temp rature de 0 50 C est en dessous ou au dessus le signal d alarme se m...

Page 11: ...acquari un punto in cui avete un buon flusso dell acqua intorno al sensore Collocate il termostato in tal modo che pu controllare facilmente la temperatura visualizzata Connettete gli apparecchi che d...

Page 12: ...di raffreddamento l apparecchio si accende non appena la temperatura impostata sale eccedendo l isteresi impostata in F12 HYS e non prima che sia trascorso un ritardo di 3 minuti Non appena la tempera...

Page 13: ...mente nella modalit di regolazione Informazioni importanti Se la gamma di temperatura 0 50 C oltrepassata apparir sul display HHH se invece insufficiente apparir LLL e un allarme suoner Nel caso di er...

Page 14: ...uelo En un acuario es recomendable elegir un sitio bien ba ado por el agua Coloque Ud el term stato de tal manera que puede controlar bien la indicaci n de temperatura Introduzca Ud los componentes pr...

Page 15: ...e enfriamiento el aparato se conecta en cuanto la temperatura ajustada ha sobrepasado el valor de hist resis ajustado mediante F12 HYS y como muy pronto pasados 3 minutos de retraso Tan pronto como la...

Page 16: ...ncia Cuando las temperaturas sean por encima indicacion HHH o por debajo Indicaci n LLL de las temperaturas del mbito de temperaturas 0 hasta 50 suena la se al de alarma Si el sensor falla suena una s...

Page 17: ...ium vlak boven de bodem te positioneren In het aquarium wordt een plaats aanbevolen waar het water goed omheen stroomt Installeer het apparaat dusdanig dat u het display goed kunt controleren Plug de...

Page 18: ...het apparaat opnieuw in de verwarmingsmodus Het apparaat wordt in koelmodus geschakeld zodra de temperatuur met de in F12 HYS ingestelde schakeltemperatuur heeft overschreden en ten vroegstena3minuten...

Page 19: ...de temperatuur hoger op het display HHH of lager op het display LLL is dan het temperatuurbereik 0 C tot 50 C hoort u een alarmtoon In het geval van uitval van de sensor klinkt een alarmtoon en wordt...

Page 20: ...raciones dir janse a su especialista In caso di richieste in garanzia o di sostituzioni rivolgersi al proprio rivenditore di zona Bij recht op waarborg of herstelling gelieve zich te wenden tot uw spe...

Reviews: