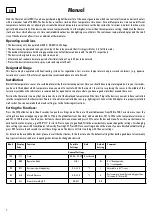
Menü
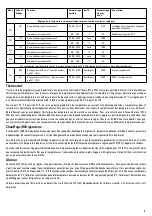
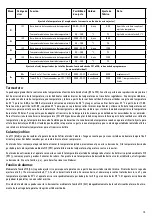
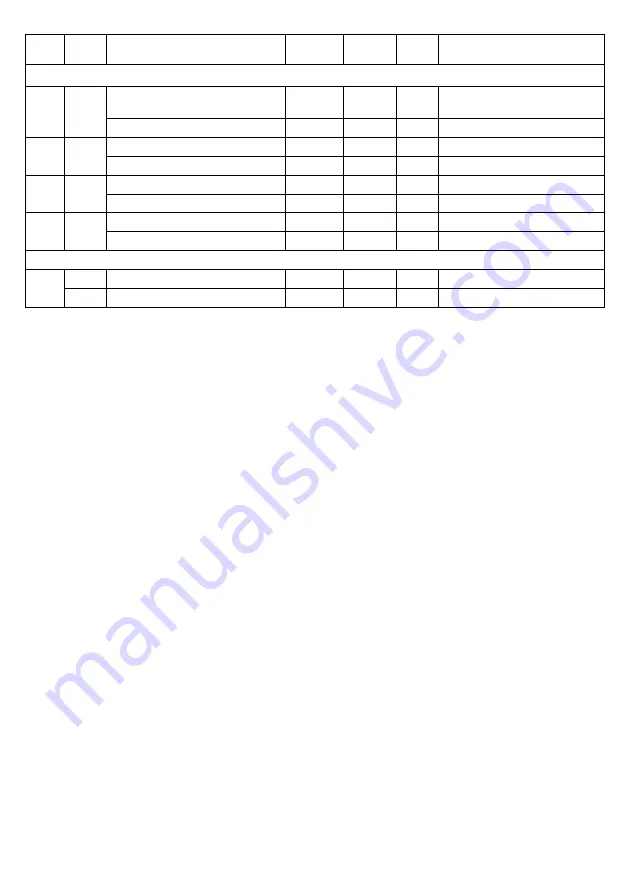
Display
Code
Function
Possible
Settings
Unit
Default
Setting
Comment
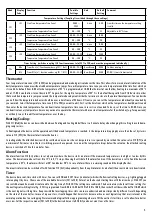
Temperature Settings (Coupling I is switched through these settings)
F21
tE1
Start Time Temperature Time Zone 1
00:00 ~
23:59
h:min
8:00
From this time on the temperature setting
is valid
Temperature Temperature Time Zone 1
0,0 ~ 50,0
°C
25
Adjustable in 0,1°C steps
F22
tE2
Start Time Temperature Time Zone 2
00:00 ~23:59
h:min
10:00
Temperature Temperature Time Zone 2
0,0 ~ 50,0
°C
28
F23
tE3
Start Time Temperature Time Zone 3
00:00 ~23:59
h:min
17:00
Temperature Temperature Time Zone 3
0,0 ~ 50,0
°C
25
F24
tE4
Start Time Temperature Time Zone 4
00:00 ~23:59
h:min
21:00
Temperature Temperature Time Zone 4
0,0 ~ 50,0
°C
23
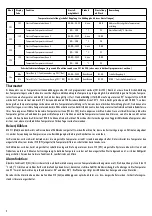
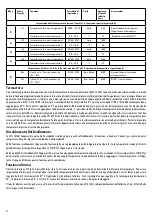
Timer Setting (switches coupling II, 8 functions menus total, F31 to F38, each must be programmed individually )
F3x
ONx
Timer On x (x = Function number, e.g F31 = On1)
00:00 ~23:59
Hour:Minute
0F:00
Switches coupling II
Ofx
Timer Off x (x = Function number, e.g F31 = Of1)
00:00 ~23:59
Hour:Minute
0F:00
0F:00 = timer slot deactivated
Thermostat
Four temperature time zones (F21 to F24) can be programmed and are being activated over the time. This allows for a more natural simulation of the
daily temperature sequence without sudden temperature jumps. For each temperature time zone you set a temperature and the time from which on
it is valid. As default from 8:00 o’clock a temperature of 25°C is programmed, at 10:00 the thermostat would allow heating to a maximum of 28°C
and at 17:00 it would allow to cool down to 25°C again. For the night a temperature of 23°C is the default being valid from 21:00 o’clock in order
that no sudden temperature jumps oocur and the temperature development inside the terrarium is close to the natural development. You can decide
yourself how the temperature behavior should be over a time frame of 24 hours. Of course you can set the temperatures individually as needed by
your animals. Select the temperature time zone (F21 to F24) you want to edit. First set the time from which on the temperature should be active and
then enter the desired temperature. You can deactivate a temperature time zone, in case it is not needed. To do so, set the time to 0F:00. Since you
can deactivate every temperature time zone you can also operate the thermostat with a constant temperature for the whole day (e.g. for aquariums)
or with only two or three different temperatures over the day.
Heating/Cooling:
With F11 (Mod) the device can be switched between Heating and Cooling Mode! There is a 3 minute delay when changing this setting to avoid dama-
ging compressors.
In Heating mode the device will be operated until the desired temperature is reached. Is the temperature dropping by more than the set hysterisis
value in F12 (HYS) the thermostat activates the heater.
In cooling mode the attached device will be switched on as soon as the set temperature is surpassed by more than the value set in F12 (HYS) and
a minimum of 3 minutes since the last switching process have passed. As soon as the temperature drops below the set value, the attached cooling
device is switched off. Use this mode for fans.
Alarm Function:
The alarm function F13 (ALr) allows to set a deviance where the device starts an alarm if the measured temperature is too high or too low by this
value. The deviation can be set from 0 to 15°C in 0,1°C steps. Choosing 0 will shut off the alarm function. If the deviation is set to 5 and the desired
temperature is 25°C, the alarm will start at 30°C and below 20°C. In case of alarm there is a warning sound and the display flashes.
The acoustic alarm can be switched off with function F14 (ALS) independently from the optical alarm. As a default the acoustic alarm is deactivated.
Timer:
The device has a real-time clock with timer. You can set 8 ON and 8 OFF times (in minutes) which will allow controlling devices, e.g. lighting plugged
into coupling II by time. Choose one of the available time slots (F31 to F38). Enter at on the desired starting time with the arrow keys. With SET you
can switch between hours and minutes and to the stop time oF. With ENT the settings are confirmed. The device always checks all timer settings for
the next logical switching time! E.g. if F31 is programmed from 8:00 to 13:00 but F32 to 9:00 to 10:00, then socket 2 will be switched off at 10:00 which
is the next logical switching time. Keep in mind that overlapping timer slots can cause undesired and most importantly different results depending
on the state of the controller. In case of a power loss, it could happen that timer slots become active as next logical step that are irrelevant in the
normal operation due to overlapping. We recommend a logical follow up programming where in F31 the earliest start time is set to allow for a better
overview. Set the respective menus (F31 to F38) to the desired time or to 0F:00 if you do not want to use the timer.
2.

