6
TROUBLESHOOTING
If your LUG-ALL will not lower or back off
automatically, the following tests can be made:
1) Inspect cable on drum to see that it is not “wedged”
or “jammed”. Test by operating free release. The
cable should pull out freely.
2) Examine U-frame pawl spring. With the reverse lever
in the lifting position, the spring should hold the
pawl against ratchet teeth. In the lowering position,
the spring should hold the pawl away from the
ratchet teeth.
3) Check the button on the side of the U-frame pawl for
excessive wear. Its width should be approximately 1
1/2 times the diameter of the main frame pawl
spring. Place the reverse lever in the lowering
position, move the U-frame until the pawl button
comes in contact with the spring. If the button is not
worn excessively and slips past the spring, then the
U-frame is twisted and the winch-hoist should
be repaired.
4) If the pawl button contacted the main frame pawl
spring and guided the U-frame pawl into the ratchet
wheel, then test the main frame pawl spring for
fatigue. With the reverse lever in the lowering
position and the hoist under light tension, place the
handle in the full lowering position so that the
U-frame pawl engages the ratchet wheel. If the main
frame pawl does not release, continue to press on the
handle and at the same time press the “trigger”. If
the “trigger” pressure releases the main frame pawl,
but spring pressure does not, it indicates the spring is
fatigued and should be replaced.
5) If, when the above test is made, pressure on the
“trigger” does not release the main frame pawl, test
the U-frame pawl for excessive wear. To test, place
an object (knife blade, nail, paper clip, etc.) between
the U-frame pawl and the tooth it would normally
engage for lowering. If it lowers one notch under
this test with the unit under light tension, then the
trouble is located. This condition is more likely to
develop after a LUG-ALL has been repaired and a new
main frame pawl installed but not a new U-frame
pawl. Under normal conditions the two pawls wear
evenly and seldom give any difficulty.
6) Check both U-frame and main frame pawls for
“snappy” spring action. Sluggish action can result
from dirt or corrosion on the shafts and in the shaft
holes. Remove shafts and clean with fine steel wool.
Clean the shaft holes in the pawls. The U-frame and
main frame pivot points are equipped with OILITE
Operating Instructions For Your LUG-ALL® 6000-15 Cable Winch-Hoist / Copyright 2008 © LUG-ALL Corporation. All rights reserved.
CARE OF THE LUG-ALL CABLE
RATCHET WINCH-HOIST
Your LUG-ALL is designed to provide many years of
satisfactory performance if used properly. Always
hang it freely with a straight line between the top
hook and the load hook (do not jam against a
stationary object). And remember, LUG-ALL hoists
are intended for industrial use, not for lifting or
supporting human or animal cargo, or lifting over
people.
The LUG-ALL is extremely easy to care for. Its open
construction makes it simple to clean after use in
mud, ice, sand or other extreme conditions. Strip
the cable from the drum and flush the drum with
water or steam. A quick check of the hoist takes
only seconds. Years of life can be added to the
hoist by following these recommendations.
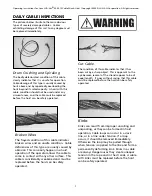
• Do not snag or pull the cable over sharp or rough
edges as this will wear and fray the cable. LUG-ALLs
are equipped with high quality cable, and with
reasonable care will give satisfactory service.
• When rewinding the cable on the drum, apply light
(10 lbs) tension. This assures even wrapping and will
prevent the cable from “wedging” the next time it is
used under heavy load.
• Stop pulling when the cable clamp reaches the cable
guide or pulley wheel, or the pulley wheel reaches t
the cable guide (depending on rig used), as continued
pulling will damage parts.
• Use a steady, straight pull to operate the LUG-ALL.
• When operating the LUG-ALL under load, do not
allow the handle to “fly” as this can cause damage to
the U-frame.
bearings. Apply light oil on all bearing surfaces and
reassemble.
7) Check to see that both pawls engage solidly at the
base of the ratchet teeth in both lifting and
lowering cycles.
8) If main frame pawl on rapid lowering model does not
fully engage, check the actuating pin and edge of
projection on the rapid lowering assembly that
engages the actuating pin to see if it is bent.
9) The U-frame pawl should align with the ratchet teeth,
if it does not, check to see if the U-frame is twisted
from someone having let go of the handle while
handling a load.


