background image

26

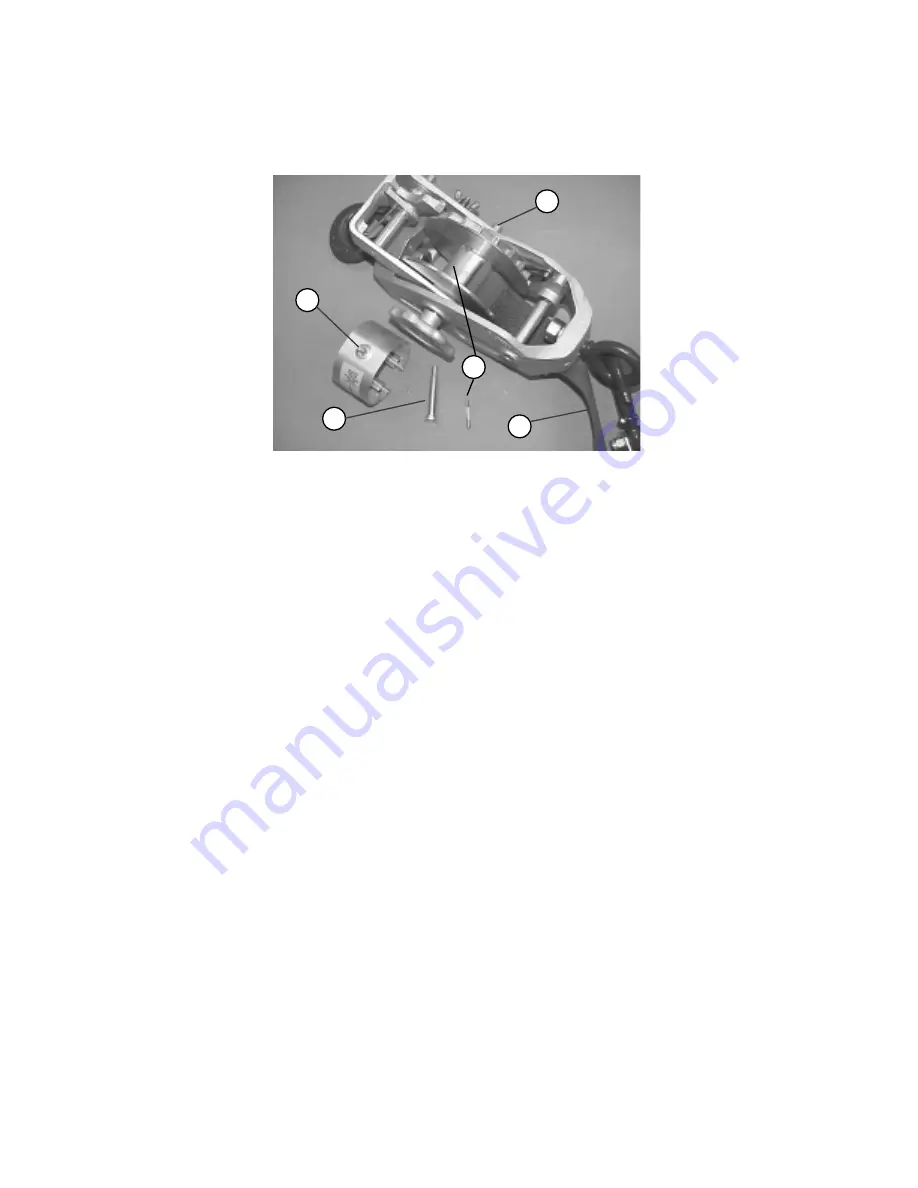
Instructions for Replacing Web Strap:

1. Loosen #528 hook attachment nut about 1 turn.
2. Remove # 347 retaining ring from one end of web attachment pin.
3. Push #524 web attachment pin through side link.
4. Swing #523 side link and slip web strap off the #525 bushing.
The four above steps will remove the Hook Assembly.

5. Reel web strap off drum as far as possible.
6. Remove #520 web shield assembly.
7. Drive out #134 drum shaft locking pin.
8. Drive out #194 drum shaft far enough to allow removal of drum.
9. Remove #512 drum anchor screw and remove web.

To insert new web, reverse the above operations---but be sure to:
a. 
Insert end of web with short stitched side against hub of drum.
b. Thread web strap through web guide and pulley block before

 assembling hook.

c. IMPORTANT: Tighten #528 hook attachment nut securely as last

operation.

To Remove Handle Side Bar and/or Handle Socket:

1. Remove link pin nuts and link pins to remove stress link and

overload link.

2. Drive out pivot pin for socket and side bar to separate them.

To Replace Stress Link:

1. Remove threaded link pin nuts located on the handle casting into

which the fiberglass tube is inserted.

2. Install new stress link and reverse above operation.

NOTE: Use one stress link and one overload link; the use of two

overload links would provide excessive strength and eliminate
the “safety” valve action of the handle.

6

9

8

5

7

FIG. 3

Summary of Contents for 6000-15SH

Page 1: ...1 OPERATING AND SERVICING INSTRUCTIONS FOR YOUR Winch Hoist LUG ALL MORGANTOWN PA 19543 Since 1949 More Than 5 Decades Of Excellence Provided by www hoistsdirect com...

Page 2: ...by logging on to LUG ALL s website and completing our on line customer survey www lug all com For parts list drawings log on to our website www lug all com THE HOISTS DESCRIBED IN THIS BOOKLET ARE IN...

Page 3: ...oor Puller 15 The Reversible Handle 15 Cable Return Crank 16 HOW TO TAKE CARE OF YOUR LUG ALL How to Take Care of Your LUG ALL 17 Servicing Instructions For Regular Lowering LUG ALL and LUG ALL Car Do...

Page 4: ...r replacement parts See the LUG ALL parts list or the LUG ALL website for correct part numbers MORGANTOWN BUSINESS PARK 604 HEMLOCK ROAD MORGANTOWN PA 19543 610 286 9884 FAX 610 286 9661 www lug all c...

Page 5: ...y operated and maintained to avoid risk of property damage or bodily injury Please do not attempt to operate your LUG ALL until you carefully read the instructions and recommendations in this booklet...

Page 6: ...6 use LUG ALLs to support human or animal cargo in any manner use LUG ALLs as load binders...

Page 7: ...ny substitution for the LUG ALL reversible handle let the LUG ALL cable or webstrap come in contact with any other surface use a LUG ALL cable or webstrap as a choker leave a load unattended and or su...

Page 8: ...G ALL beyond rated capacity Cheating on capacities is a dangerous trick Overloading a LUG ALL can cause accidental injury to the operator the hoist or the load It can also damage the hoist so that it...

Page 9: ...ng Cable or web strap must be in a straight line to assure even wrapping on the drum Do not snag or pull the cable or web strap over sharp or rough edges as this will break the wires Never bend the ca...

Page 10: ...ee compare cable with that shown on page 11 for illustration of dangerous cable conditions Note that cable must be replaced even though damage to cable appears minor Cable must be evenly wrapped aroun...

Page 11: ...aying that this cable must be replaced before the hoist can be safely operated Broken Wires The frayed condition of this cable indicates broken wires and an unsafe condition Cable deficiencies of this...

Page 12: ...to lift one two three or a full stroke of the handle four ratchet teeth TO LOWER requires load of 15 lbs or more 1 Set reverse lever to hold the u frame pawl away from the ratchet teeth Fig 2 2 Moveha...

Page 13: ...full stroke on the handle four ratchet teeth TO LOWER requires load of 15 lbs or more 1 For regular lowering one ratchet tooth per stroke of the handle use the instructions on the previous page plus p...

Page 14: ...HAT IT WILL HANG FREELYAND BE FREE TO MOVE FROM SIDE TO SIDE If the frame is jammed out of line it is subjected to undue stress from uneven loading and would not be free to move sideways which is nece...

Page 15: ...ok THE REVERSIBLE HANDLE The handle is designed to bend before your LUG ALL is dangerously overloaded This protects the operator the load and the hoist thus avoiding the possibility of costly accident...

Page 16: ...or lowering loads as its short length provides very limited leverage A shear pin protects against dangerous overloading Crank conversion kits are available for all models except 6000 15SH 1 To Place...

Page 17: ...ese recommendations 1 Do not snag or pull the cable over sharp or rough edges as this will break the wires LUG ALLs are equipped with high quality cable and with reasonable care will give satisfactory...

Page 18: ...m drum It is not necessary to remove cable shield to replace cable 2 If cable is not broken but frayed whiskered etc cut clean If to be reused cut at cable clamp 3 Slip old cable out through drum 4 Cu...

Page 19: ...on the outside of the main frame and the left side between drum and the main frame Position u frame so that pawl is on the right side See Fig 3 Fig 3 4 Align holes of the drum u frame and the main fr...

Page 20: ...ame pawl and main pawl shaft 1 Place frame so the name LUG ALL cast on the side at the top is on left 2 Place loop of spring at 1 end on spring anchor on the main frame with the hoop of the spring bet...

Page 21: ...sher SERVICING INSTRUCTIONS FOR RAPID LOWERING LUG ALLS Rapid lowering LUG ALLs are identified by the suffix R in the model number The repairing of these models differs only slightly from the regu lar...

Page 22: ...the unit under light tension then the trouble is located This condition is more likely to develop after aLUG ALL hasbeenrepairedandanewmainframepawlinstalled but not a new u frame pawl Under normal c...

Page 23: ...le loosen the handle locking nut right hand thread slide the smaller tube to the desired position and retighten the handle locking nut by hand Do not use a wrench The shear pin between the handle sock...

Page 24: ...24 Regular Handle Position with hand Handle Position for extra leverage in backing off heavy loads...

Page 25: ...idered insulated members Use an appropriate insulating link stick to achieve proper working distances The repairing of these models is the same as for the regular lowering models except for replacing...

Page 26: ...ons but be sure to a Insert end of web with short stitched side against hub of drum b Thread web strap through web guide and pulley block before assembling hook c IMPORTANT Tighten 528 hook attachment...

Page 27: ...ad is considered to be insufficient by the user Inspection Criteria for Synthetic Web Straps Remove from service if any of the following is visible Strap shows signs of melting charring or chemical da...

Page 28: ...phone 610 286 9884 Fax 610 286 9661 Delivery expenses and insurance for warranty service to and from LUG ALL are the responsibility of the Buyer Proof of purchase such as sales receipt or other docume...

Reviews: