background image


Say Goodbye to Ugly Products 

C

ONTENTS


Important Safety Information .......................................................................... 4


Get To Know Your Misting Fan ........................................................................ 5


Product Benefits .......................................................................................... 5


Parts List...................................................................................................... 5


Assembly Instructions...................................................................................... 6


Step 1: Assembling the Stand Pole ............................................................... 6


Step 2: Connecting the Back Panel .............................................................. 7


Step 3: Connecting the Water Line ............................................................... 8


Step 4: Connecting the Fan Head to the Stand Pole ..................................... 9


Step 5: Assembling the Water Tank ........................................................... 10


Operating Instructions ................................................................................... 11


Maintenance ................................................................................................. 12


Technical Support.......................................................................................... 14


Product  Specifications .............................................................................. 14


Troubleshooting ........................................................................................ 14


Warranty ....................................................................................................... 15


SAVE THESE INSTRUCTIONS 

Please carefully read this manual before attempting to use this misting fan. For 
your own safety, comply with all safety instructions and warnings contained in 
this owner’s manual to prevent personal injury or property damage.  


Summary of Contents for MF24B

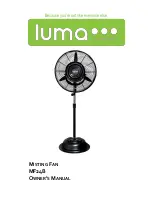
Page 1: ...Because you re not like everyone else MISTING FAN MF24B OWNER S MANUAL ...

Page 2: ...e any questions or concerns regarding your product or if you would simply like to share an idea with us please feel free to contact us Our friendly and knowledgeable customer support team is here for you Call us today at 866 737 6390 or email support lumacomfort com For future reference we recommend you attach a copy of your sales receipt here and record the following information You will need thi...

Page 3: ...ine 8 Step 4 Connecting the Fan Head to the Stand Pole 9 Step 5 Assembling the Water Tank 10 Operating Instructions 11 Maintenance 12 Technical Support 14 Product Specifications 14 Troubleshooting 14 Warranty 15 SAVE THESE INSTRUCTIONS Please carefully read this manual before attempting to use this misting fan For your own safety comply with all safety instructions and warnings contained in this o...

Page 4: ...ould the grounded plug be altered in any way An improper connection can result in electric shock 8 If possible avoid using extension cords with this misting fan If an extension cord is absolutely necessary do not use more than one extension cord and do not use a single extension cord to operate more than one fan 9 Do not insert objects or allow fingers to enter into the fan head as this may cause ...

Page 5: ...rosive metal for safety and durability Quiet high efficiency fan motor Adjustable misting flow with a fully insulated seal around the water pump Oscillating fan head covers a wider area Adds moisture to dry environments and eliminates airborne dust particles Covers up to 800 square feet and features a 4 hour maximum run time with each full tank PARTS LIST Check to insure the following parts are in...

Page 6: ...no residual foam left in any of the components A screwdriver and wrench will be required to assemble this misting fan STEP 1 ASSEMBLING THE STAND POLE 1 Refer to diagram 1 below Remove the following parts from the fan s base and set them aside four 4 M6x16 screws large washers small washers and nuts 2 Place the stand pole on the fan base align the screw holes and secure the pole in place using the...

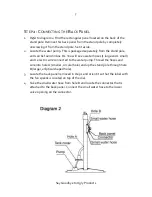
Page 7: ...be found in box 1 You will see 2 water hoses 1 large and 1 small and 1 electric wire connected to the water pump Thread the hoses and wire into hole A smaller circular hole and up the stand pole through hole B larger elliptical shaped hole 3 Locate the back panel removed in step 1 and orient it so that the label with the fan speeds is located on top of the dial 4 Take the small water hose from hol...

Page 8: ...e and 1 small and 1 electric wire with male connector plug connected to it 2 Take the electric wire with the male connector that is located on the back of the fan head and thread it through hole D 3 Take the large water hose with 2 smaller water hoses within it and thread the entire piece through hole C You should now have the water hoses and electric wire coming out the end of the metal pipe ...

Page 9: ...hose from the fan head metal pipe and connect it to the other valve opening attached to the back panel 5 Locate the large water hose from the fan head metal pipe and connect it to the large connector with the quick release valve 6 Attach the fan head metal pipe onto the stand pole and thread all hoses and wires into the stand pole through hole B elliptical shaped hole on the stand pole Make sure n...

Page 10: ... 5 Take the water pump and place it in the pump slot 2 Locate the water tank and place it on the fan base making sure to line up the pump opening with the pump slot so that they fit together Place any protruding hoses or wires into the tank 3 Put the tank cover over the tank ...

Page 11: ...e with optimal output in temperatures up to 104 F 2 Lift up the tank cover and fill the tank with clean water 3 Connect the fan to a power supply 4 Turn on the fan by pressing the red power switch 5 This misting fan has 3 different fan speeds Turn the speed dial to adjust the fan speed ...

Page 12: ... of the fan motor 9 The maximum run time for a full tank on high speed is approximately 4 hours Keep in mind that the effectiveness of this misting fan improves as the temperature rises but in areas with high humidity levels you may want to use the fan with the misting function turned off for the best results MAINTENANCE Always unplug the misting fan from the power supply before servicing or clean...

Page 13: ...cting the unit to a power supply Drain the water tank after the misting fan has been in use Regular scheduled cleaning of the water tank and misting plate before each use is also recommended To clean the water tank open the tank cover remove the pump and then remove the tank from the base Always remember to remove the pump before cleaning the water tank If the misting fan will not be in use for an...

Page 14: ...ds 3 RPMs 1200 1300 1500 Noise Levels dB 62 67 70 Temperature Drop 30 45 F Oscillation 90 Warranty 1 year manufacturer s warranty TROUBLESHOOTING Problem Possible Cause s Possible Solution The fan does not turn on The power cord is not plugged in Check to make sure the plug is plugged into an outlet No mist is coming out of the unit The water tank is empty Make sure there is water in the tank Wate...

Page 15: ... tear of parts that are designed to be replaced such as filters or batteries Power failure and improper power supply such as low voltage defective wiring or inadequate fuses Use of force or damage caused by external influences Complete or partially dismantled appliances THE WARRANTIES AND REMEDIES CONTAINED HEREIN ARE EXCLUSIVE AND IN LIEU OF ALL OTHER WARRANTIES EXPRESS IMPLIED OR STATUTORY INCLU...

Reviews: