background image

5

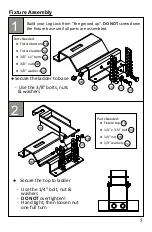
Fixture Assembly

11

2

Build your Log Lock from “the ground up”.

DO NOT

 screw down

the fixture base until all parts are assembled.

Secure the ladder to base


-  Use the 3/8” bolts, nuts


   & washers

Secure the top to ladder


-  Use the 1/4” bolt, nut &


   washers

-

DO NOT

 overtighten!

-  Hand tight, then loosen nut

   one full turn

Parts Needed:

Fixture bottom

Fixture ladder

3/8” x 1” bolts

3/8” nuts

3/8” washers

Parts Needed:

Fixture top

1/4” x 3-¾” bolt

1/4” nut

1/4” washers

1B

1C

4A

4B

4C

1A

3A

3B

3C

4A

4C

1C

4B

1B

3A

3C

3B

1B

Summary of Contents for LL1545

Page 1: ...USER MANUAL Log Lock Easy Clamp Fixture Lumberjack Tools Inc PO Box 730 Chippewa Falls WI 54729 www lumberjacktools com Email info lumberjacktools com Phone 715 720 4719 Rev 05 16 MODELS Log Lock LL1545 ...

Page 2: ...ameters The fixture plates are laser cut from structural steel and folded in a press brake to ensure proper clamping in every use Our lifetime guarantee covers the fixture body The nuts bolts washers and screw handle are covered for 90 days from the date of purchase for breakage under normal working conditions Side loading the fixture could cause failure to occur in the bolts Over tightening of th...

Page 3: ...ed to the operator bystander or tools used in conjunction with the use or misuse of our Log Lock fixture NEVER OPERATE POWER TOOLS UNDER THE INFLUENCE OF DRUGS ALCOHOL OR ANY MEDICATIONS WEAR SAFETY GLASSES DUST MASK AND OTHER PERSONAL PROTECTION ITEMS AS REQUIRED DO NOT WEAR LOOSE ITEMS THAT COULD POTENTIALLY BE CAUGHT IN MOVING PARTS AND KEEP LONG HAIR AWAY FROM WORK AREA KEEP ALL THREADED AND M...

Page 4: ...8 Washer QTY 2 3 8 Nut QTY 2 Note Images not to scale Assembly Parts Not Included Wood screws QTY 4 8 or larger Used for mounting fixture to table workbench 1 2 x 6 Carriage Bolt 1 2 Jam Nut 1 2 Washer QTY 2 1 2 Spring 2A 2B 2C 2D Fixture Top 1A Fixture Bottom 1B Fixture Ladder 1C 4A 4C 4B 3A 3B 3A 5A ...

Page 5: ...er to base Use the 3 8 bolts nuts washers Secure the top to ladder Use the 1 4 bolt nut washers DO NOT overtighten Hand tight then loosen nut one full turn Parts Needed Fixture bottom Fixture ladder 3 8 x 1 bolts 3 8 nuts 3 8 washers Parts Needed Fixture top 1 4 x 3 bolt 1 4 nut 1 4 washers 1B 1C 4A 4B 4C 1A 3A 3B 3C 4A 4C 1C 4B 1B 3A 3C 3B 1B ...

Page 6: ...Mount the fixture so that the stationary base is either flush with the workbench or 1 behind the edge of the table Use four screws or nuts bolts to secure the four holes to the mounting surface screws not included Make sure the mounting surface is flat and level Ensure the workbench is firmly secured or stable 4 Base Parts Needed 1 2 x 6 bolt 1 2 jam nut 1 2 washers Spring Screw handle Parts Neede...

Page 7: ...twisted and knotty making them difficult to secure Other timbers will be straight and free of knots making them easy to secure Ladder Settings Correct Minimum Capacity Correct Maximum Capacity 4 5 1 5 4 is the largest sized log this clamp can handle Lock the top plate into the highest section of the ladder As the handle begins to feel snug complete one full turn 1 is the smallest diameter that wil...

Page 8: ...clamp plate should always be higher than the ladder end of the clamp plate Proper Orientation It is VERY IMPORTANT to always have the top plate securely locked into the ladder rungs on both sides front and back Never operate clamp when top plate is not located completely in ladder rungs Correct Incorrect 8 Fully locked in ladder rung On edge of ladder rung ...

Page 9: ...nd the wood If the clamp is too loose the wood will not be secure and will spin When contact is first felt on the wood tighten the handle with one full turn If the log can still be spun by hand continue tightening the handle in half turn increments until the wood is secured Handle Slide Correct Overhang Incorrect Overhang The handle slide allows for less time to tighten and loosen in the clamp Sim...

Page 10: ...plate or ladder What to look for while cleaning Check for build up in the V shaped trough ladder and the nuts and bolts This includes sap splinters dust dirt Failure to clean could lead to a log spin during next use Inspect all of the nuts and bolts holding the three separate pieces together Is there thread damage visible Do any of the bolts appear bent or deformed Replace any damaged nut bolt or ...

Page 11: ...ang Fixture loose on base Workbench not stable Re tighten screws securing base Move fixture to more stable workbench Thread damage on carriage bolt Over tightening the fixture Replace the damaged bolt and do not over tighten bolt bent Over tightening the fixture Uneven clamping knots etc Replace the damaged bolt and do not over tighten Top not staying locked into ladder Top not oriented over log p...

Page 12: ...your first project use some scrap material and practice Clamping a variety of logs Try cutting tenons using a draw knife and cutting mortise holes to get a feel for how much clamping pressure is needed Thank you again for purchasing our tools PO Box 730 Chippewa Falls WI 54729 715 720 4719 www lumberjacktools com ...

Reviews: