background image


SG900                                               12 


OPERATION


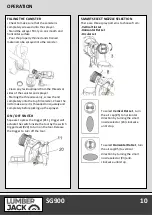
FLOW CONTROL KNOB  

The flow control knob (#18) regulates the 

amount of liquid that can be sprayed. Turning 

the flow knob clockwise increases the flow of 

liquid. Turning the knob counter anti-clockwise  

Decreases the flow of liquid.  

Tip:

 Always test the spray pattern on scrap  

cardboard or similar material first. Begin with 

flow control knob on the highest flow setting. If 

less flow is desired, dial the flow control knob 

anti-clockwise to decrease the flow of liquid. 

Heavier, thicker materials should be sprayed 

with the flow control knob on high flow setting. 

Thinner materials should be sprayed with the 

flow control knob on a low flow setting. 


Developing the proper spraying 

technique 

- Practice spraying on a piece of scrap material  

such as cardboard to test your spray pattern and 

become familiar with the flow control feature of 

the sprayer.  

- Ensure surface to be sprayed is free of dust,  

dirt, and grease.  

- Ensure spray area is clean and free of dust  

that could be blown onto newly sprayed 

surfaces.  

- Cover any areas not intended to be sprayed.  

- Always spray from a minimum of 50mm to a 

maximum of 300mm.  


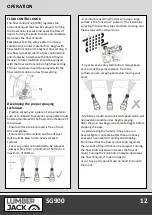
- A commonly used method for spraying a large  

surface is the “crisscross” pattern. This is done by 

spraying in horizontal strips and then crossing over 

these strips with vertical strips. 


- To get an even spray distribution, always keep  

your arm at the same distance  from the  

surface you are spraying and avoid moving your  

wrist.  


- Maintain smooth and consistent speed which will 

help avoid inconsistencies. Begin spraying  

after the pass has begun and release trigger before 

stopping the pass.  

- Avoid spraying too heavily in any one area. 

Several lighter coats are better than one heavy 

coat which can lead to running and dripping. 

Remember that the flow control knob regulates 

the amount of liquid that can be sprayed. Turning 

the flow knob clockwise increases the flow of 

liquid. Turning the knob anti-clockwise decreases 

the flow of liquid. If runs or drips do  

occur, have a dry paint brush on hand to smooth  

them out.  


Summary of Contents for SG900

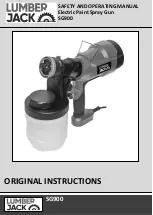
Page 1: ...SG900 Electric Paint Spray Gun SG900 ORIGINAL INSTRUCTIONS SAFETY AND OPERATING MANUAL...

Page 2: ...all information necessary for using the product safely and to ensure its long service life Closely observe all safety information in these instructions General Power Tool Safety Warnings 01 Symbols C...

Page 3: ...he cord Never use the cord for carrying pulling or unplugging the power tool Keep cord away from heat oil sharp edges or moving parts Damaged or entangled cords increase the risk of electric shock e W...

Page 4: ...ve safety measures reduce the risk of starting the power tool accidentally d Store idle power tools out of the reach of children and do not allow persons unfamiliar with the power tool or these instru...

Page 5: ...anipulate the product and always use the safety and or protective guardson the product to avoid risks j Risk of injury Do not direct the product towards people or animals k Never smoke during the pain...

Page 6: ...the event of contact with chemicals Skin contact Clean with plenty of water and soap consult a doctor if necessary Eye contact Rinse with plenty of water consult a doctor Swallowing Do not vomit cons...

Page 7: ...instructions to reduce the risk of injury Caution Wear safety goggles Caution Wear ear defenders The impact of noise can cause damage to hearing Caution Risk of Injury Do not reach into the running sa...

Page 8: ...tex paints or chlorinated solutions For safety reasons it is essential to read the entire instruction manual before first operation and to observe all the instructions therein This product is intended...

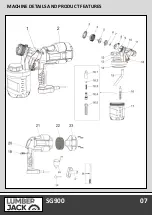
Page 9: ...AIR6V 01 AIR6V 01 AIR6V 01 AIR6V 01 SG900 07 MACHINE DETAILS AND PRODUCT FEATURES...

Page 10: ...for oil based paints or a warm water and soap solution for water soluble paints Use drop cloths during pouring mixing and viscosity testing of materials to be sprayed to protect your floors and anythi...

Page 11: ...ater based or latex paints RUNOUT TIME May require thinning More than 70 seconds runout Note Not recommended for textured paint PREPARATION TIPS Always stir and strain the material thoroughly before u...

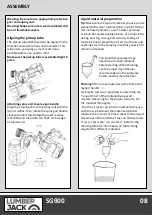
Page 12: ...s threaded on squarely and completely before picking up the sprayer ON OFF SWITCH Squeeze to press the trigger 11 trigger will actuate the switch inside the tool by the switch trigger lever 20 to turn...

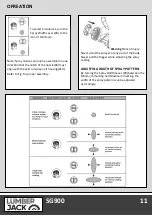
Page 13: ...embly Warning Risk of injury Never point the sprayer at any part of the body Never pull the trigger while adjusting the spray setting ADJUSTING WIDTH OF SPRAY PATTERN By turning the Spray Width Lever...

Page 14: ...nd grease Ensure spray area is clean and free of dust that could be blown onto newly sprayed surfaces Cover any areas not intended to be sprayed Always spray from a minimum of 50mm to a maximum of 300...

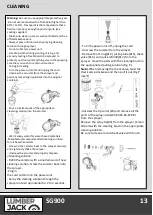
Page 15: ...nufacturers recommended cleaning solution for oil based materials Screw on the canister back to the sprayer securely and vigorously shake the sprayer Unscrew the canister and properly dispose ofcleani...

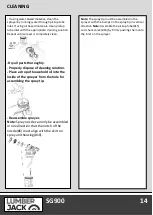
Page 16: ...eaning solution Place a drop of household oil into the inside of the sprayer from the hole for assembling the spray tip Reassemble sprayer Note Spray nozzle can only be assembled in one direction that...

Page 17: ...he filter in place Debris could be sucked in and interfere with the function of the power unit STORAGE Make sure unit is clean and dry before storing Store unit indoors in a dry location To prevent da...

Page 18: ...ted to wear at different rates depending on usage 1 2 7 The product has not been used for hire purposes 1 2 8 The product has been purchased by you as the guarantee is not transferable from a private...

Page 19: ...oduct for any commercial business or resale purposes and we have no liability to you for any loss of profit loss of business business interruption or loss of business opportunity 3 2 This Guarantee do...

Page 20: ...SG900 Is in compliance with the regulations included in the Directives 2006 42 EC EC DECLARATION OF CONFORMITY Certificate for EC type examination delivered by Intertek Testing Services Hangzhou 16 No...

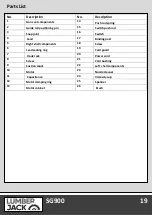
Page 21: ...h push rod 3 Snap joint 16 Switch 4 Lead 17 Binding post 5 Right shell components 18 Screw 6 Lead sealing ring 19 Cord guard 7 Hook rack 20 Power cord 8 Screw 21 Cord bushing 9 Suction canal 22 Left s...

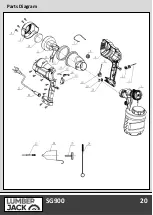
Page 22: ...SG900 20 Parts Diagram...

Page 23: ......

Reviews: