background image


English  - 

26


7.10.3  Setting continuous capture 

1.  Press [MENU] on the 

remote control 

or 

control panel 

to enter 

the setting menu. 

2.  Press [

] or [

] to the [Setting] menu. 

3.  Press [

] to find [Capture]. 

4.  Press [

] or [

] to select [continuous]. 

5.  Press [

] to find [Capture Time]; Press [

] or [

] to set capture 

time. 

6.  Press [

] to find [Capture Interval]; Press [

] or [

] to set interval 

time. 

7.  Press [MENU] to exit. 


7.11 I would like to record videos 

7.11.1  Recording motion images 

<Remark> You may not be able to capture or record images 
when [Capture] mode is set to [Disable]. 

1.  Press [RECORD] on the 

remote control 

to start recording videos. 

2.  Record sounds with the built-in microphone of the control panel. 

3.  Press [RECORD] again to stop recording. 


7.11.2  Setting the quality of captured images 

1.  Press [Menu] on the 

remote control 

or 

control panel 

to enter the 

setting menu. 

2.  Press [

] or [

] to the [Storage] menu. 

3.  Press [

] to find [Image Quality]. 

4.  Press [

] or [

] to select among [High/Medium/Low]. 

5.  Press [Menu] to exit. 


7.11.3  Playing videos 


For playing videos, please refer to 

7.12 I would like to view 

captured/recorded images


Summary of Contents for DC190

Page 1: ...nglish 0 DC190 Document Camera Important User Manual To download the latest version of Quick Start Guide multilingual user manual software or driver etc please visit Lumens http www Mylumens com goto htm ...

Page 2: ...ibug software 10 4 5 Connecting to a computer and projector or monitor simultaneously 11 4 6 Connecting to a computer and reading the USB Disk simultaneously11 4 7 Connecting to an Interactive Whiteboard IWB 12 4 8 Connecting to a TV 12 4 9 Connecting to a speaker 13 4 10 Connecting to a Computer with RS232 13 4 11 Installing application software 14 Chapter 5 Start Using 15 Chapter 6 Control Panel...

Page 3: ... I would like to automatically delete the stored images whenever it is turned off Auto Erase 27 7 15 I would like to enlarge a part of the image PAN 28 7 16 I would like to use the MASK and Spotlight function 28 7 17 I would like to play the slides Slide Show 29 7 18 I would like to compare images compare live images with stored images PIP 30 7 19 I would like to reduce the image noise Projector T...

Page 4: ...ct Lumens Digital Optics Inc hereby reserves the right to make changes to product specifications without prior notice The information in this file is subject to change without prior notice To fully explain or describe how this product should be used this manual may refer to names of other products or companies nevertheless without any intention of infringement Disclaimer of warranties Lumens Digit...

Page 5: ... cloth for cleaning Do not use liquid or aerosol cleaners 11 Do not block the slots and openings in the Document Camera case They provide ventilation and prevent the Document Camera from overheating Do not place the Document Camera on a sofa rug or other soft surface or in a built in installation unless proper ventilation is provided 12 Never push objects of any kind through cabinet slots Never al...

Page 6: ...cause electric shock This symbol indicates that there are important operating and maintenance instructions in this User s Manual with this unit FCC Warning This Document Camera has been tested and found to comply with the limits for a Class A or B digital device pursuant to Part 15 of FCC Rules These limits are designed to provide reasonable protection against harmful interference in a residential...

Page 7: ... Guide 4 Step Card For download of other language versions please visit Lumens website Microscope Adapter VGA Cable USB Cable Audio Cable Power Cord Remote Control Appearance may vary depending on country region Remote Control Holder Pouch Accessory Pouch ...

Page 8: ...English 7 Chapter 3 Product Overview Bottom 9 LED lamp 8 Lens 10 DIP Switch 3 Lamp 7 Remote sensor 1 Gooseneck 2 AF button 6 Built in Microphone 4 Control panel 5 LED indicator ...

Page 9: ...English 8 3 1 Relative position of the presenter and document 3 2 Recommended distance ...

Page 10: ...English 9 Chapter 4 Installation and Connections 4 1 System diagram Computer Projector or monitor TV Earphone or speaker Computer USB Disk ...

Page 11: ... 9 DIP Switch Settings in the DC190 User Manual 4 3 Connecting to a projector or monitor 4 4 Connecting to a computer and use Ladibug software Software can be downloaded from Lumens website Monitor or Projector VGA Cable Power Cord AC Outlet Computer Projector USB Cable Power Cord AC Outlet VGA Cable ...

Page 12: ...monitor simultaneously Press SOURCE button to switch the image source 4 6 Connecting to a computer and reading the USB Disk simultaneously VGA Cable Computer Monitor or Projector VGA Cable Power Cord AC Outlet Computer USB Cable USB Disk Power Cord AC Outlet ...

Page 13: ... regions not listed above Note You should unplug and reconnect the power cord and then restart the machine for DIP Switch Settings to take effect Once C VIDEO is on VGA OUT is not supported Note Only the live image can be displayed in C Video Out mode DIP Switch Power Cord AC Outlet C Video Cable Computer Projector USB Cable Power Cord AC Outlet VGA Cable USB Cable ...

Page 14: ...ting to a speaker 4 10 Connecting to a Computer with RS232 After connecting to the RS232 cable you can use RS232 commands to control DC190 Power Cord AC Outlet Computer Power Cord AC Outlet Earphone or speaker RS232 Adapter ...

Page 15: ... installed on the computer enables you to Control the DC190 Capture and record images Annotate the image highlight important details and save it Support the full screen function Note Please refer to Ladibug software user manual for installation steps and software operation ...

Page 16: ... will flash a few times and stay lit Please contact your distributor if the LED is not on 1 Place an object to be displayed under the camera 2 Turn on Power 3 Adjust the gooseneck and lens to the appropriate positions 4 Press AUTO TUNE button to optimize the image You are ready to teach present Each time the lens is moved locate the camera head and press FOCUS to refocus the lens ...

Page 17: ...e the best brightness and focusing performance Remote Control BRT Manually adjust the brightness of the image Remote Control CAPTURE Capture images to the USB disk priority or internal memory Remote control Control panel DELETE Delete images from the USB disk priority or internal memory Remote Control ENTER Enter Activate functions Remote control Control panel FREEZE Freeze the current image to te...

Page 18: ... to USB disk priority or internal memory and then press Record again to stop recording Remote Control SLIDE SHOW Show the photos or videos stored in the USB disk priority or internal memory in Slide mode Remote Control SOURCE Switch between different sources of signals 1 Live images default 2 Computer Remark This button is disabled in C VIDEO Out mode Remote control Control panel ZOOM Increase or ...

Page 19: ...w keys to adjust the brightness Mode Normal Slide Film Microsco pe Use the left and right arrow keys to select the image mode Photo Text Photo Text Gray Use the left and right arrow keys to select the photo text gray mode Night Vision On Off Use the left and right arrow keys to select The night vision mode suits with darker environment Digital Zoom On Off Use the left and right arrow keys to turn ...

Page 20: ...se the left and right arrow keys to select the capture time Note It only works when the capture mode is set to continuous Capture Interval 1 5 Sec 2 10 Sec 3 30 Sec 4 1 Min 5 2 Min 6 5 Min Use the left and right arrow keys to select the capture interval Note It only works when the capture mode is set to continuous Auto Exposure On Off Regardless of outside environment the machine will adjust the b...

Page 21: ...the preferred language Lock Down On Off Use the left and right arrow keys to turn on off the lock down function You can set the password when On is selected Auto Erase On Off Use the left and right arrow keys to enable disable Auto Erase When On is selected the stored images will automatically be deleted when the system is turned off Preset Load Yes No Read the value of the current image mode Use ...

Page 22: ...sing left and right arrow keys Spotlight Activate Press ENTER to enter the Spotlight mode 6 2 3Spotlight Mode Setting Menu 2nd Level Major Items 3rd Level Minor Items 4th Level Adjustment Values Function Descriptions Spotlight Mode Transparency 0 4 6 Adjust the transparency of the border in the Spotlight mode using left and right arrow keys Step Large Medium Small Select the step distance of the s...

Page 23: ...upported Wacom models please visit our download center The table model Lumens supports Icon of Annotation Main Menu Free hand Drawing Tool menu Icon Description Expand Collapse the Annotation menu Open Close the Free hand Drawing Tool menu Select the line width Select pen color Clear all Free hand drawing tool Draw a line Draw a rectangle Draw a polygon Draw an ellipse Eraser Clear marks of free h...

Page 24: ...h among the following modes in turn 1 Live images default 2 Computer 7 3 I would like to make text clearer and photos more colorful 7 3 1 Photo Text mode descriptions The default Photo Text mode is in Photo Photo mode To change this setting please use the remote control or the control panel to enter the Options of the Setting Menu Photo default for viewing photos or text with photos making photos ...

Page 25: ...use the auto focus 1 Press the FOCUS AF button on the right side of the lens 7 6 I would like to adjust the focal length Use the remote control or control panel 1 Press MENU to enter the setting menu 2 Press or to select Display 3 Press to select Focus 4 Press or to adjust 5 Press MENU to exit 7 7 I would like to adjust the brightness Remote control 1 Press BRT to make it brighter 2 Press BRT to m...

Page 26: ...E on the remote control or control panel to capture and save images You cannot capture images when the capture mode is set to Disable If it is set to Continuous you can capture images continuously Press Capture to start capturing continuously or press Capture again to exit To change the quality of captured images please refer to 7 10 2 Setting the quality of captured images To change the settings ...

Page 27: ...s Remark You may not be able to capture or record images when Capture mode is set to Disable 1 Press RECORD on the remote control to start recording videos 2 Record sounds with the built in microphone of the control panel 3 Press RECORD again to stop recording 7 11 2 Setting the quality of captured images 1 Press Menu on the remote control or control panel to enter the setting menu 2 Press or to t...

Page 28: ...DIO OUT to play sound 7 13 I would like to delete the captured recorded images Remote control 1 Press PLAYBACK to show the thumbnails of all stored files 2 Press or or or to select the file you want to delete 3 Pressing DELETE will open a Delete File window 4 Press or to select Yes 5 Press ENTER to delete the selected file 6 Press MENU to exit 7 14 I would like to automatically delete the stored i...

Page 29: ...press or or or to move the mask position 2 Press MASK again to enter the Spotlight mode and press or or or to move the zone position 3 Press MASK again to exit and return to the live image screen 7 16 2 I would like to set the size of Mask Spotlight function In Mask Spotlight mode use the remote control 1 Press MENU to enter the image OSD menu 2 Press or to select the item to be modified Transpare...

Page 30: ... exit 7 17 2 Activating Pausing Stopping the slide show Note Upper Limit The maximum size of single photo is 7 MB Remote control 1 Press SLIDE SHOW to start playing 2 Press ENTER to pause playing 3 Press ENTER again to continue playing 4 Press SLIDE SHOW again to stop playing Control panel 1 Press MENU to enter the setting menu 2 Press or to the Storage menu 3 Press to find Slide Show 4 Press ENTE...

Page 31: ...e the live image 5 Press PLAYBACK to return to image thumbnails and compare it with other images 6 Press MENU to exit 7 19 I would like to reduce the image noise Projector Type 1 This function enables Document Camera to automatically clear image noise The noise is especially obvious when Document Camera is connected to a DLP projector You can set the DLP projector to improve the image quality 2 If...

Page 32: ... Use Compound Key 1 Use the control panel and press ENTER MENU simultaneously to restore the initial value Note Before using the compound keys please remove all VGA IN devices 7 21 I would like to change the Start Video Off Video Note The file size of the Start Video Off Video should be less than 5MB and the AVI file in H 264 compression format should be used 7 21 1Changing the Start Video 1 Press...

Page 33: ...tomer Video 6 Press MENU to exit 7 22 I would like to use a USB disk 1 Insert the USB disk and a Copy To USB Disk dialog box will appear and you are asked whether to copy files from DC190 to the USB disk Press or on the remote control or control panel to select 7 23 Computer related functions Ensure that the USB cable is connected and the drivers are installed before using the computer related fun...

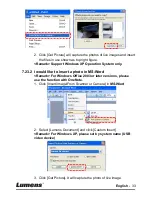
Page 34: ...3 2 I would like to insert a photo in MS Word Remark For Windows Office 2003 or later versions please use the function with OneNote 1 Click Insert Image From Scanner or Camera in MS Word 2 Select Lumens Document and click Custom Insert Remark For Windows XP please set by system name USB video device 3 Click Get Picture It will capture the photo of live image Lumens Document ...

Page 35: ...photo in MS Word Remark For Windows Office 2003 or later versions please use the function with OneNote 1 Click Insert Image From Scanner or Camera in MS Word 2 Select Lumens Document and click Custom Insert Remark For Windows XP please set by system name USB video device Lumens Document ...

Page 36: ...th the remote control and control panel of the DC190 Refer to Chapter 6 Control Panel Remote Control and Setting Menu 5 Press Capture to capture images in MS Word 6 Press Cancel to exit 7 23 4 I would like to set the DC190 as a PC Camera Remark For Windows XP please set by system name USB video device Open My Computer and click Lumens Document to open a live image Lumens Document ...

Page 37: ...or to the Display 3 1 3 Press to select Mode 3 1 4 Press or to the Microscope 4 If the image is not clear 4 1 Please adjust the focus of microscope 4 2 Please press the FOCUS button on either side of the DC190 lens to activate the auto focus 5 Digital Zoom 5 1 Press MENU to enter the setting menu 5 2 Press or to the Display 5 3 Press to select Digital Zoom 5 4 Press or to the On If the eyepiece is...

Page 38: ...h Note You should unplug and reconnect the power cord and then restart the DC190 for all DIP Switch Settings to take effect 9 1 Connecting to a projector or monitor 9 1 1 XGA output default values 9 1 2 SXGA output 9 1 3 WXGA output ...

Page 39: ...glish 38 9 2 Connecting to a TV 9 2 1 NTSC USA Taiwan Panama Philippines Canada Chile Japan Korea and Mexico 9 2 2 PAL Countries regions not listed above Remark Once C VIDEO is on VGA OUT is not supported ...

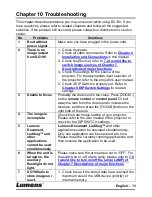
Page 40: ...le to focus Probably the document is too close Press ZOOM on the remote control or control panel Or pull away the lens from the document to increase the distance and then press the FOCUS button on the right side of the lens 4 The image is incomplete Check the Auto Image setting of your projector Please refer to the user manual of the projector or check for the DIP SWITCH settings 5 Lumens Document...

Page 41: ...ay be not applicable to the machine due to improvement in functions Check to see if the Firmware version of your machine is up to date 1 Please go to Lumens official website to check whether the latest version is available for update http www Mylumens com goto htm 2 The steps to check the FW version are as below 2 1 Press MENU on the remote control or control panel to enter the setting menu 2 2 Pr...

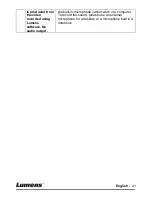
Page 42: ...uced from the video recorded using Lumens software No audio output the built in microphone cannot work in a computer To record the sound please use an external microphone for a desktop or a microphone built in a notebook ...

Reviews: