background image

VC-A70H Firmware(FW) Upgrade                                                                                                                                              11     

8.14


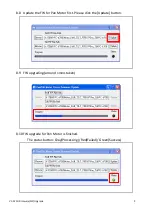
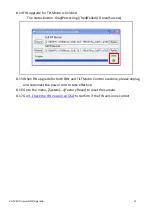
FW upgrade for Tilt Motor is finished. 

The status button: Gray(Processing)/ Red(Failed)/ Green(Success) 


8.15


When FW upgrade for both PAN and TILT Motor Control are done, please unplug 

and reconnect the power cord to take effective. 

8.16


Go to the menu, [System]-->[Factory Reset] to reset the camera. 

8.17


Go 

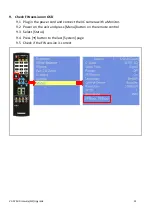
9. Check the FW version on OSD

 to confirm if the FW version is correct. 


Summary of Contents for VC-A70H

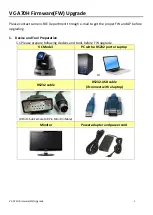
Page 1: ...to get the proper FW and AP before upgrading 1 Device and Tool Preparation 1 1 Please prepare following devices and tools before FW upgrade VC Model PC with a RS232 port or Laptop or RS232 cable RS232 USB cable if connect with a laptop 9Pin D Sub Female to 8Pin Mini Din Male Monitor Power adapter and power cord ...

Page 2: ...laptop Need 2 cables RS232 cable and RS232 USB cable 3 FW Upgrade AP 3 1 Please contact Lumens FAE Department through e mail to get the AP before upgrading Download Tool AP FW Version VC Download Tool VFAxxx VC DSP FW download Motor_Pan_VFBxxx Motor_TIlt_ VFBxxx 4 Download Mode 4 1 Different FW has different download modes For the detailed information and the download procedure please check relate...

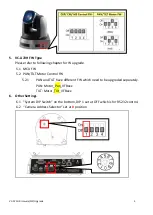
Page 3: ...1 MCU FW 5 2 PAN TILT Motor Control FW 5 2 1 PAN and TILT have different FW which need to be upgraded separately PAN Motor_Pan_VFBxxx TILT Motor_TIlt_VFBxxx 6 Other Settings 6 1 System DIP Switch on the bottom DIP 1 set at OFF which is for RS232 control 6 2 Camera Address Selector set at 0 position ...

Page 4: ...re FW Upgrade 4 7 Control FW 7 1 Please refer to 4 2 Connections for FW upgrade 7 2 Please check the Service DIP Switch at the default position all off and then plug in the power cord 7 3 Launch the VC Download Tool ...

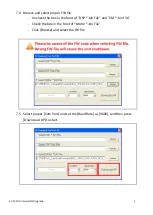
Page 5: ...t proper FW file Uncheck the box in the front of DSP bin File and CM bin File Check the box in the front of Motor bin File Click Browse and select the FW file 7 5 Select proper Com Port and set the Baud Rate as 9600 and then press DownLoad AP to start ...

Page 6: ... finished The button will reverse from grey to black and the camera do the self check automatically 7 8 When firmware upgrade finished please unplug and reconnect the power cord to restart the camera 7 9 Go to the menu System Factory Reset to reset the camera 7 10 Go 9 Check the FW version on OSD to confirm if the FW version is correct ...

Page 7: ...DIP Switch 1 2 4 ON for the PAN motor Note PAN and TILT have different FW and download mode Please upgrade PAN motor first When FW upgrade for PAN finished please change the DIP switch and then upgrade the TILT motor 8 4 Launch the AP VC DSP FW download A Select the Comport and set the Baud Rate to 9600 B Press Disconnect for connection The button will turn to green Connect when it is connected A ...

Page 8: ... green the Pan Tilt button will be enabled 8 6 Please press the Pan Tilt button for Pan Tilt Motor Driver FW Update 8 7 Browse the FW for Pan and Tilt Motor PAN and TILT have different FW which need to be upgraded separately PAN Motor_Pan_VFBxxx TILT Motor_TIlt_VFBxxx ...

Page 9: ...FW Upgrade 9 8 8 Update the FW for Pan Motor first Please click the Update button 8 9 FW upgrading around 1mins taken 8 10 FW upgrade for Pan Motor is finished The status button Gray Processing Red Failed Green Success ...

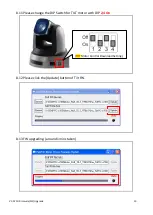
Page 10: ... Firmware FW Upgrade 10 8 11 Please change the DIP Switch for TILT motor with DIP 2 4 On 8 12 Please click the Update button of Tilt FW 8 13 FW upgrading around 1mins taken TILT Motor Control Download Setting ...

Page 11: ...rocessing Red Failed Green Success 8 15 When FW upgrade for both PAN and TILT Motor Control are done please unplug and reconnect the power cord to take effective 8 16 Go to the menu System Factory Reset to reset the camera 8 17 Go 9 Check the FW version on OSD to confirm if the FW version is correct ...

Page 12: ...ersion on OSD 9 1 Plug in the power cord and connect the VC camera with a Monitor 9 2 Power on the unit and press Menu button on the remote control 9 3 Select Status 9 4 Press button to the last System page 9 5 Check if the FW version is correct ...

Reviews: