background image

LF2020-INS-LAB-RevG18 

9

CHARGING THE BATTERIES

Charge the batteries after assembly.
1.  Ensure the control box power switch is ON (i.e., the red button is up).
2.  Insert the charger plug into the battery box charging socket (the top slot).
3.  Insert the other charger plug into the power supply.
4.  All LED indicator lights should be ON during charging.
5.  When one green LED indicator light illuminates, the batteries require approximately two to 

three hours to be fully charged.

6.  When only the red LED indicator light illuminates, the batteries require approximately seven to 

nine hours to be fully charged.

s

  NOTICE: Do not charge the batteries for more than twelve hours.

7.  Unplug the charger FIRST before using the lift.

Info:  The lift will not operate while the batteries are charging. 


The lift will not operate while the red reset button is down.

8.  Replace the batteries when frequent charging is required.

Important Charging Information

Push lift to an appropriate location and charge the batteries with the charger provided. 

s

  NOTICE: Avoid unplugging the pendant and actuator from the control box. Frequent 

plugging and unplugging of the pendant and actuator to and from the control box may 

damage the control box.

CHECKING BATTERY CAPACITY

Info: To check remaining battery capacity, press the battery indicator (blue circle with battery 

symbol) while the lift is not in motion. Remaining battery capacity is indicated by LED 

indicator lights and explained in the following table.

Red

Amber

Green

Green

Green

Status

ON

ON

ON

ON

ON

Fully charged

ON

ON

ON

OFF

OFF

Needs charge

ON

ON/OFF

OFF

OFF

OFF

Charge immediately—DO NOT use lift

OFF

OFF

OFF

OFF

OFF

Bad batteries or bad connection

ALARM BUZZERS

The control box has an alarm buzzer that provides information on the status of the batteries and 
the lift. To stop the buzzer, push down the RED RESET button or press the battery indicator.

Buzzer type

Status

Note

2 beeps per second

Low battery (red/amber lights illuminate) Charge batteries immediately

3 beeps per second

Low battery (red light illuminates)

Charge batteries immediately

6 beeps per second

Very low battery (no lights illuminate)

Charge batteries immediately

3 beeps every other second

Bad battery (no lights illuminate)

Replace batteries immediately

3 long beeps

Overloaded. Batteries are charged but 

lift does not lift

Maximum load capacity exceeded

Summary of Contents for LF2020 Easy Lift STS

Page 1: ...LF2020 INS LAB RevG18 Read this manual before operating your Easy Lift Sit to Stand Save this manual for future use LF2020 EASY LIFT SIT TO STAND LF2090 BARIATRIC EASY LIFT SIT TO STAND USER MANUAL...

Page 2: ...TRANSPORTATION INSTRUCTIONS 7 5 ASSEMBLY INSTRUCTIONS 8 CHARGING THE BATTERIES 9 CHECKING BATTERY CAPACITY 9 ALARM BUZZERS 9 6 OPERATING INSTRUCTIONS 10 LIFTING THE PATIENT 11 7 CARE AND MAINTENANCE 1...

Page 3: ...est that the operator try all the various lifting slings and equipment until the operator is confident with how the patient lift operates The lifting procedures should be explained to the patient befo...

Page 4: ...te personal injury s NOTICE Indicates a potential hazard situation or unsafe practice that if not avoided could result in product or property damage Info Provides application recommendations or other...

Page 5: ...s in the sling WARNING Do not attempt to maneuver the lift by pushing on the mast boom actuator or patient Always maneuver the lift with the handle WARNING During lifting or lowering whenever possible...

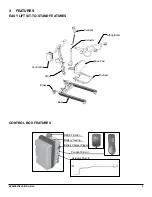
Page 6: ...FEATURES EASY LIFT SIT TO STAND FEATURES Pendant Actuator Lifting Boom Knee Pad Footrest Base Brake Mast Control Box CONTROL BOX FEATURES RESET Button Battery Testing Battery Charger Plug In Actuator...

Page 7: ...s contents If damage is evident notify the carrier or your GF authorized distributor 2 Remove all loose packing from the carton 3 Carefully remove all the components from the carton Info Unless the pa...

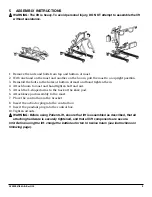
Page 8: ...4 Attach boom to mast and hand tighten bolt and nut 5 Attach the L shaped arms to the back of the knee pad 6 Attach knee pad assembly to the mast 7 Place the control box in the bracket 8 Insert the ac...

Page 9: ...e control box Frequent plugging and unplugging of the pendant and actuator to and from the control box may damage the control box CHECKING BATTERY CAPACITY Info To check remaining battery capacity pre...

Page 10: ...ither open or closed position Preparation before lifting 1 Turn on the power by turning the RED RESET BUTTON clockwise 2 Press the pendant UP or DOWN button once 3 After the battery indicator lights d...

Page 11: ...raps to the hooks 5 Have the patient s hands holding the handles For patients who cannot hold the handles have them hold their arms around the chest 6 Press the UP button on the hand pendant 7 Before...

Page 12: ...ave them hold their arms around the chest 6 Press the UP button on the hand control 7 Before the patient s body is lifted from the chair stop and make sure the sling is secured and patient s knees are...

Page 13: ...0 368 4700 for further information When you believe a component or part is not functioning properly immediately contact GF Tech Support at 1 770 368 4700 as a potentially hazardous condition could exi...

Page 14: ...ting properly x x x Inspect all base hardware for wear x Mast Ensure that mast is fully engaged and locked into mast sleeve x x Inspect mast for bends or deflections x Inspect all mast hardware for we...

Page 15: ...operate even though battery indicator shows charge Battery charger still plugged in Poor connection between control box and pendant or defective pendant Poor connection between actuator and control bo...

Page 16: ...gth 50 Lifting height range Info As measured from sling hooks Minimum 27 Maximum 71 Range 35 Mast height 50 Maximum weight capacity LF2020 Easy Lift STS 400 lb EVENLY DISTRIBUTED LF2090 Bariatric Easy...

Page 17: ...NING WARRANTY SERVICE This limited warranty shall only apply to defects that are reported to the Distributor from whom the Customer purchased the product within the applicable warranty period If there...

Page 18: ...LOYEE OR INDEPENDENT CONTRACTOR WAGES PAYMENTS AND BENEFITS The warranties contained herein contain all the representations and warranties with respect to the subject matter of this document and super...

Page 19: ...spection 7 Intended use 3 Intended use contraindication 3 Introduction 3 L Lift and transfer from bed 11 Lift and transfer from chair 12 Lifting the patient 11 Lubrication 13 M Maintenance schedule 14...

Page 20: ...can be found on our website www grahamfield com 2005 GF Health Products Inc All Rights Reserved Graham Field and Lumex are trademarks of GF Health Products Inc One Graham Field Way Atlanta GA 30340 31...

Reviews: