3. Ceiling Fan Assembly
(Continued)
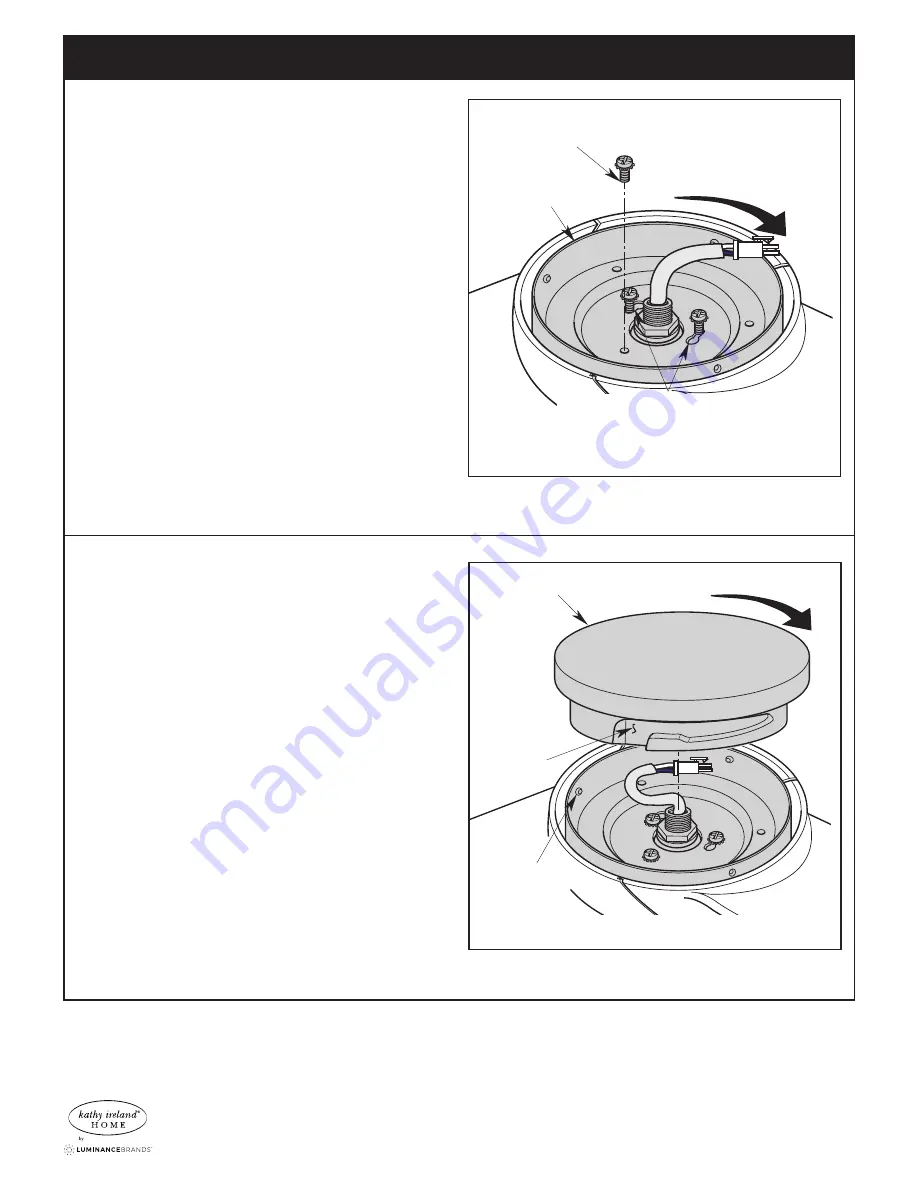
LIGHT KIT ADAPTER
TURN ADAPTER CLOCKWISE
RETIGHTEN THE SCREWS WITH
LOCKWASHER IN THE LIGHT KIT ADAPTER
KEY HOLE SLOTS (2)
REINSTALL ONE #6-32 x 3/8" PAN
HEAD SCREW WITH LOCKWASHER
Figure 3
3.3
Place the 2-pin Motor Assembly Connector through the
Large Center Hole of the Light Kit Adapter (Figure 3) .
NOTE: Position the 2-pin Motor Assembly
Connector through the Light Kit Adapter Center
Hole, making sure that the Light Kit Adapter does
not pinch the wires.
Position the Light Kit Adapter Key Hole Slots onto the
Two Loosened Screw Heads .
Rotate the Light Kit Adapter Clockwise to Engage the
Two Screws .
NOTE: Verify that the serrated washers are not
trapped between the Light Kit Adapter and the
Motor Assembly Hub.
Reinstall the previously removed #6-32 x 3/8” Pan Head
Screw with Lockwasher (Figure 3) .
Retighten all Three #6-32 x 3/8” Pan Head Screws with
Lockwashers to securely attach the Light Kit Housing
Assembly to the Motor Assembly Hub (Figure 3) .
A spare #6-32 x 3/8” Pan Head Screw with Lockwasher
is in the hardware bag, if needed .
3.4
NOTE: If the Accessory Light Fixture is purchased,
Follow the Installation Instructions provided with
the Light Fixture and Skip Step 3.4 of this manual.
Place the No-Light Cover into the opening of the Light
Kit Adapter .
Align the No-Light Cover Three Flat Areas with the Light
Kit Adapter No-Light Cover Three Raised Dimples .
Turn the No-Light Cover Clockwise until it stops
(Figure 4) .
NOTE: Periodically check that the No-Light Cover is
seated fully clockwise in the Light Kit Adapter.
Carefully turn the partially assembled Ceiling Fan
right side up and position the fan on the styrofoam in
preparation for additional assembly .
NO-LIGHT
COVER FLAT
AREAS (3)
NO-LIGHT
COVER
TURN NO-LIGHT COVER CLOCKWISE
LIGHT KIT
ADAPTER
DIMPLES (3)
Figure 4
6
ETL Model No.: CF345 & CF355


