
SY 220 / SY 250 Light Module Installation Instructions
www.Lumishore.com
Lumishore UK Unit 2, Technium 1, Kings Road, Swansea, SA1 8PH, UK | +44(0)208 144 1694 | Info@Lumishore.com
Lumishore USA 7137 24TH Court East Sarasota, Florida 34243 | (941) 405-3302 | Sales@LumishoreUSA.com
LIGHT MODULE INSTALLATION
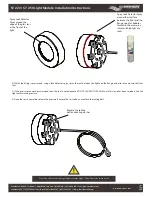
1) Check that the lens has been fitted and tested following the procedure 45-0075. Remove the flange cover plate.
2) Clean the weld-in flange thoroughly with IPA, and a CLEAN rag. Check the flange for any damage, debris or weld splatter. The gasket mating
surfaces must be clean and flat before the light can be fitted.
3) There are two different light beam angles for each of the SY 220, and SY 250. These are 60 Degree, and 100 Degree. The 100 Degree light has a
flat glass front covering the array, and the 60 Degree light has a convex lens covering the array. CHECK THE BEAM ANGLE IS THE CORRECT ANGLE
FOR THE HULL POSITION before fitting.
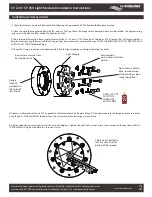
4) Check the O ring is in place on the light module. Place the light module over the light and align the holes.
6) Tighten the bolts in a circular pattern (as shown in the diagram). Tighten the bolts half a turn at a time, then move on to the next bolt. USING A
TORQUE WRENCH tighten the bolts to a torque of 15 Nm.
1
4
7
2
5
3
6
Tighten each bolt half a
turn at a time until ALL
bolts are fully torqued
5) Apply a small amount of Loctite 243 (supplied) to the thread of each bolt before fitting. Fit the light module to the flange, and secure in place
using the bolts - MAKE SURE that the bolts have the washer and nylon insulating washers fitted.
Flange
(already
welded into
the hull with
lens fitted)
Light Module
Securing bolts,
washers and insulation
washers
APPLY LOCTITE
243 TO THE
THREAD OF
EACH SCREW
2
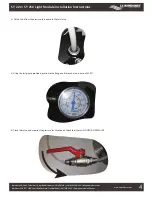
SY 220 / SY 250
60 Degree
Light and
Cable
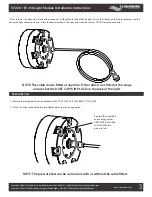
Note: Cable is detach-
able - leave dust cap
fitted until the cable is
ready to be fitted)
Rear surface must be clean,
flat and dent free


