background image

Deutsch

English

25

Piko R

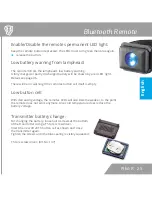
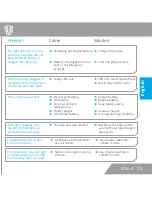
Enable/Disable the remotes permanent LED light:

Keep the remote button depressed: The LEDs must turn green then blue again.    

 

release the button.

Low battery warning from lamphead:

The remote mirrors the lamphead's low battery warning.

A fully charged or partly discharged battery will be shown by a red LED  light.

Details see page 36. 

There will be no warning if the remotes button cell itself is empty.

Low button cell:

With decreasing voltage, the remotes LEDs will also become weaker, to the point 

the remote does not work anymore. Also cold temperature does reduce the 

battery voltage.

Transmitter battery change:

For changing the battery, loosen all 4 screws at the bottom 

of the transmitter using a T5 torx screw driver. 

Insert the new CR 2016 button cell as shown and close 

the transmitter again. 

Tighten the screws until the blue sealing is visibly squeezed.

T5 torx screw driver: (Art.No. 137)

Bluetooth Remote

Summary of Contents for PIKO R

Page 1: ...www lupine de MANUEL D UTILISATION OWNERS MANUAL Piko R PIKO R ...

Page 2: ...ance stockage et charge 16 Diagnostic des pannes 17 Données techniques 18 Notes récentes 35 Sommaire Index Français English Read this manual before using 19 Operation 20 21 Programming 22 Dim Levels Runtimes 23 Bluetooth Remote 24 25 Mounting 26 30 Operation SmartCore Batteries 31 Care and Storage an Charging 32 Troubleshooting 33 Technical data 34 Miscellaneous 35 ...
Page 3: ...ès 2 heures A ce moment là vous ne pouvez plus allumer la lu mière via la télécommande Bluetooth Pour redémarrer le module Bluetooth ou l éclairage appuyez sur l interrupteur ou reconnectez la batterie Réaction exothermique Le boîtier du Piko peut devenir chaud veillez donc toujours à le conserver à une distance su sante des maté riaux in ammables L utilisation à l abri sans refroidissement par ex...

Page 4: ...itialisation et a chage de la tension Le niveau de tension de la batterie Au delà de 8 0 V Batterie chargée Entre 7 1 et 7 9 V Rechargez la batterie ou la batteri est vieille Entre 6 5 et 7 V Batterie inutilisable Fonctionnement Une brève pression permet de passer d un niveau de luminosité à l autre Commuter feux de croisement Mise sous tension À la première pression le projecteur s allumera à pui...

Page 5: ...par bref instants Arrêtez immédiatement La lampe va s éteindre Après une nouvelle mise en marche une Réserve Niveaux les plus bas seulement est encore disponible quelques mi nutes en fonction de l âge de la batterie Une fois la batterie complètement déchargée le projecteur est contraint de s éteindre alors attention Remarque pour une utilisation exclusive avec 2 W ou moins il n y a pas de réserve ...

Page 6: ...u à ce qu il clignote 1x rouge ca 3 sec clignote 2x rouge ca 4 sec clignote 3x rouge ca 5 sec clignote 4x rouge ca 6 sec clignote 5x rouge ca 7 sec clignote 1x bleu ca 8 sec clignote 2x bleu ca 9 sec clignote 3x bleu ca 10 sec clignote 4x bleu ca 11 sec clignote 5x bleu ca 12 sec clignote 6x bleu ca 13 sec clignote 1x verde ca 14 sec Programmes Fonctions supplémentaires Selon sa con guration d usi...

Page 7: ...aux 3 niveaux avec RVLR 3 niveaux Eco 1 45 h 5 h 80 h 3 30 h 10 h 160 h 2 h 5 30 h 95 h 1 45 h 3 30 h 10 h 80 h 3 30 h 7 h 20 h 160 h 2 h 4 h 11 h 95 h 1 45 h 20 h 3 30 h 40 h 2 h 25 h 1 45 h 5 h 3 30 h 10 h 2 h 5 30 h 3 30 h 10 h 80 h 7 h 20 h 160 h 4 h 11 h 95 h RVLR RVLR RVLR RVLR dans ce mode un mode de clignotement plus lent est disponible en supplément L autonomie d éclairage peut varier sel...

Page 8: ... de lampe jusqu à quatre émetteurs radio peuvent être connectés Les émetteurs sont enregistrés par ordre dans la tête de la lampe puis à nouveau e acés Si on veut brancher sa tête de lampe à nouveau exclusivement sur un émetteur il peut alors être né cessaire de relier un émetteur jusqu à 3 fois avec la tête de lampe Bluetooth Dés l atelier votre lampe est déjà connectée à votre émetteur radio Lie...

Page 9: ... pour vis Torx Mettre le nouveau bouton de cellule CR 2032 comme sur l image et fer mer à nouveau le boîtier Resserrer les vis pour que la jointure bleue visible soit comprimée Tourne vis T5 Torx article nr 137 Emetteur d avertissement Pour activer ou désactiver appuyer sur le bouton radio les deux LED sur le bouton radio doivent d abord devenir vertes puis bleues Laisser mar cher le bouton radio ...

Page 10: ...mpe de casque est compatible avec tous les casques de vélo présentant des aérations Fixation alternative voir page 7 Faite ensuite passer l autre extrémité à travers les bouches d aération du casque et la seconde ouver ture du porte casque Maintenez en n la lampe dans la bonne position serrez la bande Velcro autant que possible et xez là En lez la ne bande Velcro sur le côté de l inscription Lupin...

Page 11: ... son bon fonctionnement il est néces saire que les deux vis noires soient correcte ment serrées La position verticale de la tête de la lampe peut être réglée très précisément jusqu à un angle de 60 Fixation de la lampe frontale Piko Câble d extension Avec un câble d extension il est possible de transporter la batterie dans une poche de veste ou un sac à dos Le câblage correspondant peut être rempl...

Page 12: ...e Il disponible à la fois pour la tête de la lampe Piko ainsi que pour le système de batterie FastClick Détails www lupine de Support GoPro Notre Piko peut être xée sur un logement standard GoPro grâce à un support en CNC que nous avons spécialement développé Article N 1070 Options de Fixation supplémentaires ...

Page 13: ...ue noir sur l extrémité de la vis Il est nécessaire de bien respecter la sé quence joint torique vis joint torique support de barre lampe a n de garantir le bon fonctionnement de 3 Resserrez doucement puis fermement la vis Comblez le trou taraudé avec le bouchon d obturation fourni 4 La tête de la lampe et le support peuvent maintenant Avant la xation veuillez veiller à bien desserrer les vis sur ...

Page 14: ...terie La batterie Lupine commune dispose d une sangle sur sa face arrière per mettant de la fixer avec une bande Velcro En outre les batteries appelées SmartS core disposent d un témoin de niveau de charge 13 2Ah 6 6Ah 3 3Ah 3 3Ah Les batteries Fastclick ne peuvent pas être xées avec du Velcro Cependant elles peuvent être directement xées sur la bande frontale grâce au système de clic ou encore av...

Page 15: ... la lumière arrière Fonction chenillard Permis par l éclairage successif de chaque LED en continu Pour éteindre appuyez sur le bouton à nouveau Par exemple 3 LEDs 20 40 60 allumées 1 LED 80 clignote Optique L a chage optique LED se compose de 5 indicateurs LED rouges Les LED ont alors deux états de fonctionnement elles peuvent clignoter ou rester allumées de manière constante Ces états peuvent êtr...

Page 16: ... pas utiliser de piles sèches Risque d explosion Ce chargeur peut être ouvert UNIQUEMENT par son fabricant Avant une longue période de non utilisation chargez complètement la batterie et stockez la dans un endroit le plus frais et sec possible par exemple au sous sol etc Lampe En cas d encrassement nettoyez l extérieur des phares et du faisceau de câbles avec de l eau tiède et un peu de détergent ...

Page 17: ...ortement déchar gée Batterie non ou mal rac cordée au phare Fonctionnement LED défec tueux La batterie est vide La batterie est vieille Températures très basses Le chargeur est défectueux L a chage a été réinitialisé Le bouton de lampe et l émetteur ne sont pas connec tés l un avec l autre Bouton de cellule vide ou mal installé Solution Charger la batterie Véri er les contacts de prise Remplacer C...

Page 18: ...uissance lumineuse Autonomie d éclairage Piko R 7 X 7 3 h 30 Min 7 h 10 h 20 h 40 h 160 h Piko R 4 X 4 1 h 45 Min 3 h 30 Min 5 h 10 h 20 h 80 h Piko RX Duo deux batteries 2 h 4 h 5 h 30 Min 11 h 25 h 95 h Angle de faisceau de la lentille 22 Plage d utilisation 25 C bis 70 C Piko R 4 X 4 3 3 Ah 7 2 V Li Ion Piko R 7 X 7 6 6 Ah 7 2 V Li Ion Piko RX Duo 2 x 2 0 Ah 7 2 V Li Ion Capacité de la batterie...

Page 19: ...t via the Bluetooth remote Either press the lampheads switch or reconnect the battery to start the Bluetooth module or light Heat generation The housing of Piko R may heat up so make sure that you always keep the light at a safe distance to any combustible or flammable materials Could cause fire or death However quiescent operation without cooling the light housing via airflow or the like is possi...

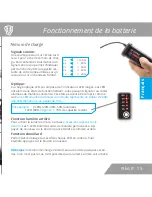
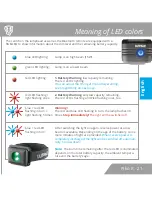
Page 20: ...than 8 0 V battery is fully charged 7 1 to 7 8 V battery needs charging or is old 6 5 to 7 V battery is not ready for use Interpreting the voltage display Operation Each quick push of the button switches through the dim levels Turn on Switching Turn off The first press of the button switches on the light with maximum power The blue LED is illuminated To turn off the lamp keep the button pressed No...

Page 21: ...ve power at a low beam is available Depending on the age of the battery some more minutes of light are provided When reserve power is completely discharged the light will be switched off automati cally So slow down Note The burn time remaining after the red LED is illuminated depends on the total battery capacity the ambient tempera ture and the battery s age blue LED lighting green LED lighting r...

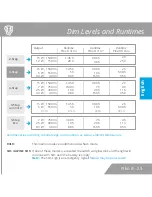
Page 22: ...s 1x red after 3 sec 2x red after 4 sec 3x red after 5 sec 4x red after 6 sec 5x red after 7 sec 1x blue after 8 sec 2x blue after 9 sec 3x blue after 10 sec 4x blue after 11 sec 5x blue after 12 sec 6x blue after 13 sec 1x green after 14 sec Light Settings Extra Settings By default the Piko R operates in the 3 step mode several other light programs are available They are very easy to select by si...

Page 23: ... 95 h 1 45 h 3 30 h 10 h 80 h 3 30 h 7 h 20 h 160 h 2 h 4 h 11 h 95 h 1 45 h 20 h 3 30 h 40 h 2 h 25 h 1 45 h 5 h 3 30 h 10 h 2 h 5 30 h 3 30 h 10 h 80 h 7 h 20 h 160 h 4 h 11 h 95 h RVLR RVLR RVLR RVLR This mode includes an additional slow flash mode SOS ALPINE SOS If one of these modes is activated the switch will glow pink and the light will continue with SOS until the battery is empty Note The...

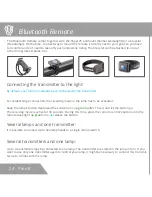
Page 24: ...4 transmitters may be connected to one lamp The transmitter are stored in the lamp in turn If you want to use only one transmitter again to control your lamp it might be necessary to connect this transmit ter up to 4 times with the lamp Bluetooth Remote By default your lamp has already been connected to the transmitter Connecting the transmitter to the light The Bluetooth Remote comes together wit...
Page 25: ...ll be no warning if the remotes button cell itself is empty Low button cell With decreasing voltage the remotes LEDs will also become weaker to the point the remote does not work anymore Also cold temperature does reduce the battery voltage Transmitter battery change For changing the battery loosen all 4 screws at the bottom of the transmitter using a T5 torx screw driver Insert the new CR 2016 bu...

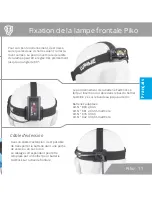
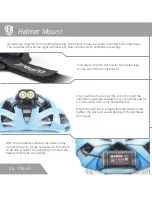
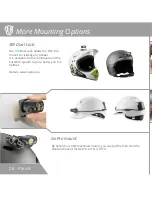
Page 26: ...lready mounted to the lighthead You can attach this helmet light to almost any kind of helmet with ventilation openings Then pull the other end of the velcro through the ventilation openings available on your helmet and fix it on the other side of the helmetmount Direct the light into a straight forward position and tighten the velcro to avoid slipping of the lighthead during use First attach the ...

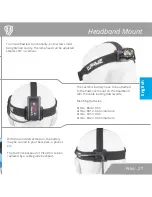
Page 27: ...be attached to the FastClick mount on the headband with the cable looking downwards Matching Batteries Art No 884 2 0 Ah Art No 881 2 0 Ah Smartcore Art No 835 3 3 Ah Art No 842 3 3 Ah Smartcore Headband Mount With the provided extension the battery may be carried in your backpack a pocket etc The FastClick backpart of Piko RX 4 can be replaced by a cable guide backpart 27 Piko ...

Page 28: ...to virtually any helmet It is available for the lamphead and the FastClick system to put a battery on the helmet Details www lupine de By help of our CNC machined mount you can put the Piko R on the standard mount for GoPro Art No 1070 GoPro mount More Mounting Options ...

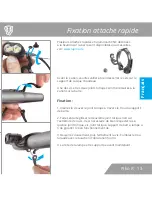
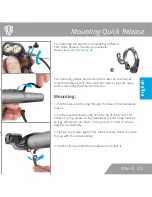
Page 29: ...re requi red for mounting the Piko R on the bar Mounting 1 Put the screw with o ring through the hole of the handlebar mount 2 Put the second black o ring onto the tip of the screw The order of o ring screw o ring handlebar mount lamp must be strictly adhered to as shown in the picture in order to ensure flawless functionality 3 Tighten the screw slightly first then securely Cover the open thread ...

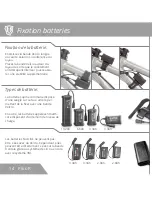
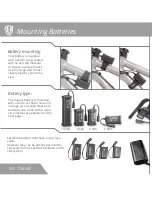
Page 30: ...unting Battery type The regular battery is mounted with a velcro as shown here and on page 24 So called Smartcore batteries also come with a capa city indictaor as explained on the next page FastClick batteries dont have a loop for a velcro However they can be directly put into the clicksystem of the FastClick headbelt or 3M clicksystem 13 2Ah 6 6Ah 3 3Ah 3 3Ah Mounting Batteries ...

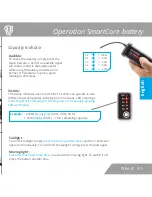
Page 31: ...o times and the 5 LEDs will operate continuously To switch off the taillight simply press the pad again Moving light Press the touch pad three times to activate the moving light To switch it off press the button another time Example 3 LEDs steady glow 20 40 60 1 LED blinking 80 Visible The visible indicator uses 5 red LEDs The LEDs can operate in two different operating states blinking and continu...

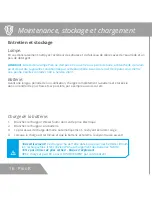
Page 32: ...OT suitable for charging NiMH batteries Do NOT use non rechargeable batteries Risk of explosion This charger may be opened ONLY by the manufacturer Battery If you intend not to use the lamp for a longer period of time fully charge and store it at a cold and dry place When kept in a cool place the annual self discharging rate for such batteries is 15 Product Care and Storage Light After use in dirt...

Page 33: ... Old battery Very low ambient temperature Faulty charger Unsuitable battery The indicator was reseted Solution Charge the battery Check all plug contacts LED unit needs replacement Get in touch with Lupine Charge battery Replace battery Keep battery warm Replace charger Use original Lupine battery Discharge the battery with your light and fully charge it afterwards The lamp does not recogni ze the...

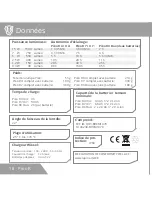
Page 34: ...on Piko R 7 X 7 6 6 Ah 7 2 V Li Ion Piko RX Duo 2 x 2 0 Ah 7 2 V Li Ion 25 C to 70 C Piko R 4 X 4 3 hours Piko R 7 X 7 5 30 hours Piko RX Duo 2 hours per battery Battery capacity nominal voltage Charging time IP68 Protection class Technical data 15 W 1500 Lumens 7 W 750 Lumens 5 W 550 Lumens 2 5 W 300 Lumens 1 2 W 150 Lumens 0 3 W 40 Lumens Light Output Runtime Piko R 7 X 7 3 h 30 min 7 h 10 h 20 ...

Page 35: ...nts ultérieurs de nos produits Rights for improvements and modifications of our products reserved Garantie Warranty Endéans la durée de la garantie de 24 mois la garantie prend en compte tous les composants et couvre les dé ciences conditionnées par la fabrication La batterie fait néanmoins exception Par ail leurs les droits de garantie perdent leur validité en cas d utilisation non conforme aux d...

Page 36: ...36 Piko R Lupine Lighting Systems GmbH Winnberger Weg 11 92318 Neumarkt Germany Phone 49 0 91 81 50 94 90 Fax 49 0 91 81 50 94 915 E mail info lupine de www lupine de ...

Reviews: